BC Mine Certifications Registry
User Manual
Admin Role
Prepared by Annalisa Taylor, King’s Printer, Digital Publishing, Ministry of Citizens’ Services.
Created: April 16, 2018
Date | Author | Version | Change Reference |
2018-05-08 | Annalisa Taylor | 1.0 | Create manual for Mine Supervisor certifications. |
2022-09-22 | Annalisa Taylor | 2.0 | Add Blaster and legacy certification updates. |
2023-03-15 | Annalisa Taylor | 2.1 | Update Queen’s Printer references to King’s Printer. |
2024-04-22 | Annalisa Taylor | 3.0. | Add Shiftboss Plus updates: Shiftboss (OSBC), Blaster regulatory exam, Criminal Record Check, Search by Criminal Record Check, Search by Interviewer, Provisional notes field, Suspension & Cancellation notes field, report updates, gender options, mine sites, contacts. EMLI edits: PST, Territory, remove new online courses. |
2024-05-08 | Annalisa Taylor | 3.1 | Correct style issues for html publishing. |
Contents
1 INTRODUCTION
1.1 BC Mine Certifications Registry
1.2 Who should read this document? The Admin Role
1.3 Legislation
1.3.1 Mines Act
1.3.2 Freedom of Information and Protection of Privacy Act (FOIPPA) of British Columbia
1.4 Minimum Browser Requirements
2 GETTING STARTED
2.1 Registry Access
2.2 Log in to the BC Mine Certifications Registry
2.3 Username and Profile
2.4 Change Your Password
2.5 Registry Partners1
2.5.1 Who Does What?
2.5.2 Contact Information
2.6 Registry Administration Support – Ministry of EMLI
2.6.1 Registry administration services provided by the Admin role
2.6.2 Policies and procedures
2.7 Registry Technical Support – Crown Publications, King’s Printer
2.8 Online Course Registration and Temporary Certificates – Open School
2.9 Official Certificate Reprints – Crown Publications, King’s Printer
2.10 Official Certificate Reprint Fees
2.11 Sign Out
3 SEARCH
3.1 Search Students (Clients)
3.2 Search / Refine Search
3.3 Open a Client Record from the Search Results / Return to Search Results
3.4 Clear Search / New Search
3.5 Search by Gender
3.6 Search by Birthdate
3.7 Search by People ID
3.8 Search by Certification + Mine Site
3.9 Search by Equivalent Certification
3.10 Search by Legacy Certification
3.11 Search by Photo Required
3.12 Search by Certification Status, Suspended and Cancelled
3.13 Search by Provisional Certification
3.14 Search by Interviewer
3.15 Search by Criminal Record Check Status
4 ADD STUDENT (CLIENT)
4.1 Add Student (Client)
4.2 Add Accents in Client Names
4.3 Validation Errors in the Student Details Form
4.3.1 Missing data in required Student Details fields
4.3.2 Incorrect data format
4.4 Edit Student (Client) Details
5 ADDRESS CHANGES
5.1 Canada Post Guidelines
5.2 Address Format Safeguards
5.2.1 Open School System
5.2.2 Address Format Safeguards in the Registry
6 ADD NEW CERTIFICATION
6.1 Add New Mine Supervisor Certification
6.2 Add New Blaster Certification
6.2.1 Add Technical Exam
6.2.2 Add Regulatory Exam
6.2.3 Add Interview
6.2.4 Add Criminal Record Check
6.3 Add New Shiftboss Certification (OSBC)
6.4 Add Equivalent Certification
6.5 Validation Errors on the Exam and Interview Forms
6.5.1 Missing data in exam fields
6.5.2 Missing data in regulatory exam fields for Blaster exams
6.5.3 Missing data in interview fields
6.5.4 Incorrect data format
7 PHOTO FOR SECURE PHOTO ID
7.1 Upload Photo
7.2 Photographs
7.2.1 Photographer Instructions
7.2.2 Photo Administrator Instructions, Adobe Photoshop (Online Version)
7.3 Photo Validation Criteria
7.4 Photo Status
7.5 Update Photo
8 LEGACY CERTIFICATIONS
8.1 Add Legacy Certification
9 EDIT / DELETE CERTIFICATION
9.1 Edit Certification
9.2 Edit Blaster Reg Exam
9.3 Edit Blaster Criminal Record Check
9.4 Delete Certification
10 VIEW CERTIFICATIONS
10.1 View Student (Client) Record
10.2 View Certification History
10.3 View Certification Status
10.4 View Mine Supervisor Certification Details
10.5 Blaster Certifications, 2022
10.6 View Blaster Certification Details
10.7 Check Certification for Equivalent Status
10.8 View Equivalent Blaster Certification Details
11 SUSPENSIONS AND CANCELLATIONS
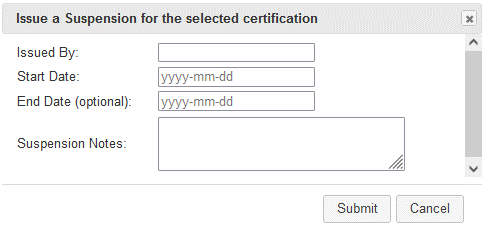
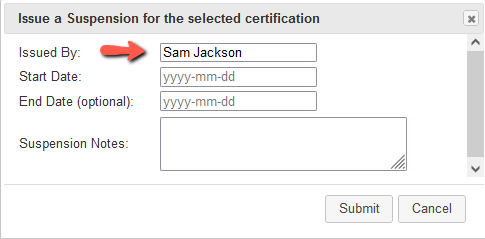
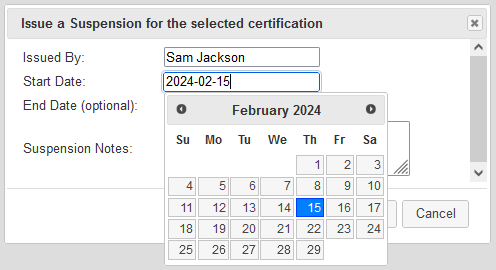
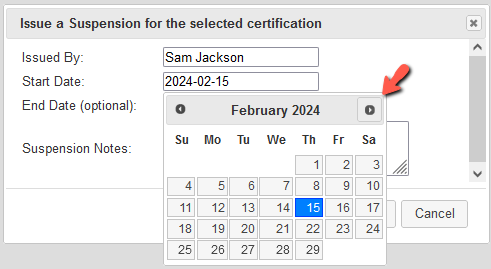
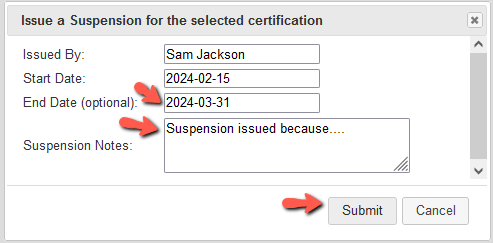
11.1 Add Suspension
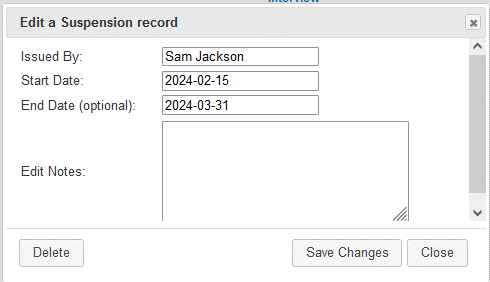
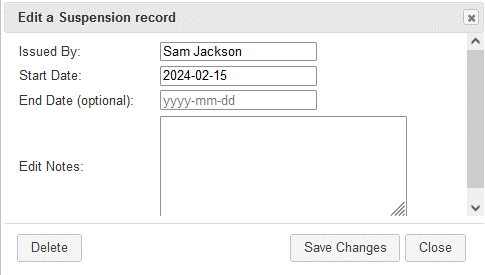
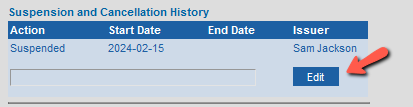
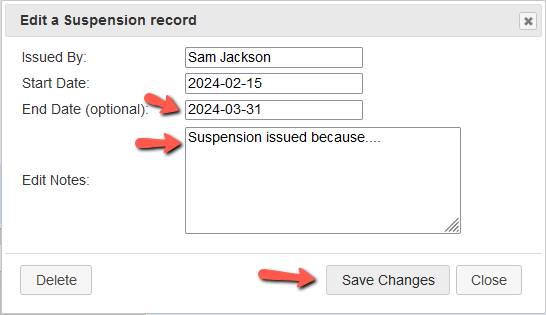
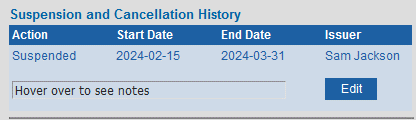
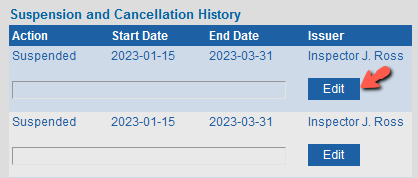
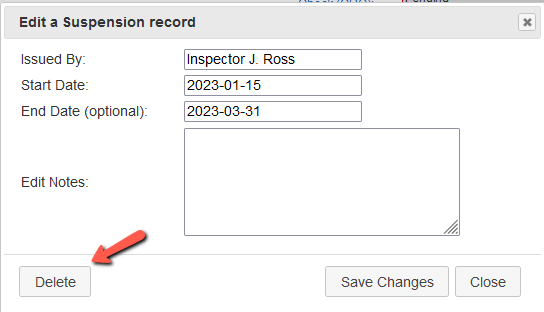
11.2 Edit a Suspension
11.3 View Suspensions
11.4 Add Cancellation
11.5 View Cancellations
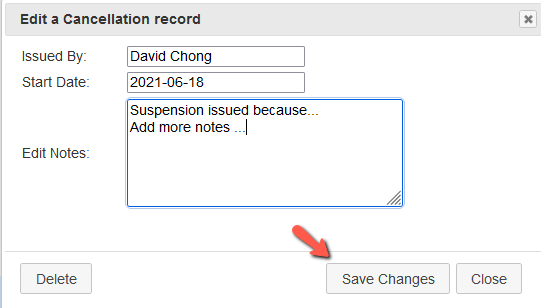
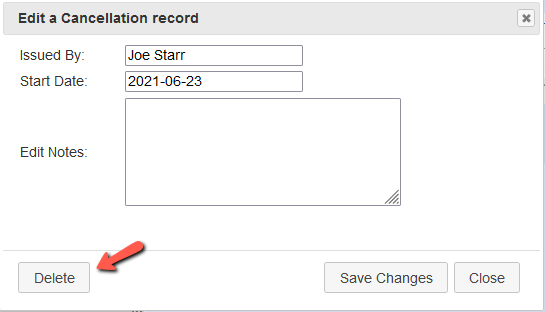
11.6 Edit Cancellations
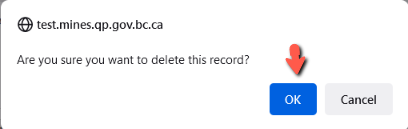
11.7 Delete Suspension and Cancellation
11.8 Tips on Certification History, Suspension and Cancellation History
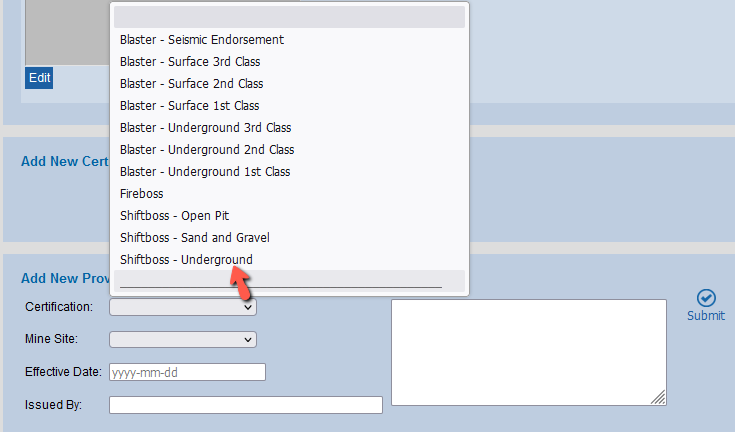
12 PROVISIONAL CERTIFICATIONS
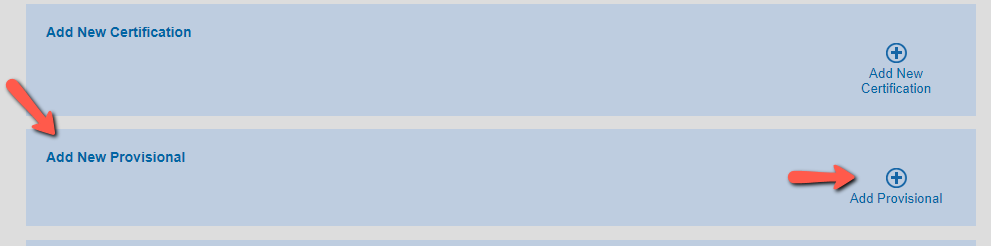
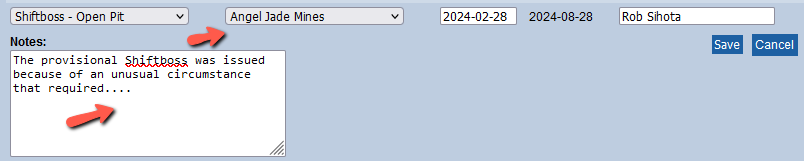
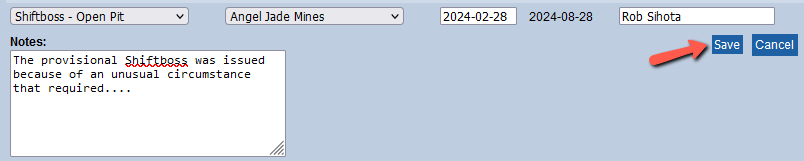
12.1 Add New Provisional Certification
12.2 View Provisional Certification Details
12.3 Edit Provisional Certification
13 CERTIFICATE PRINTING
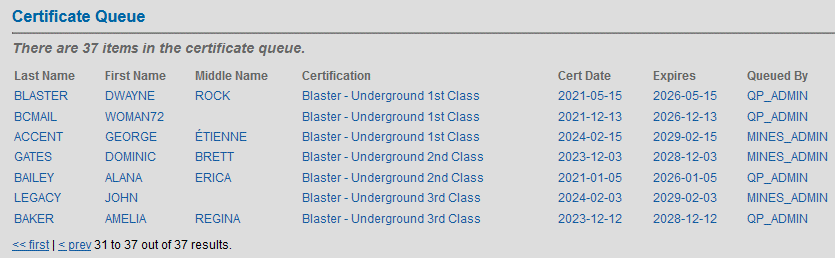
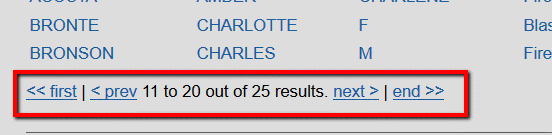
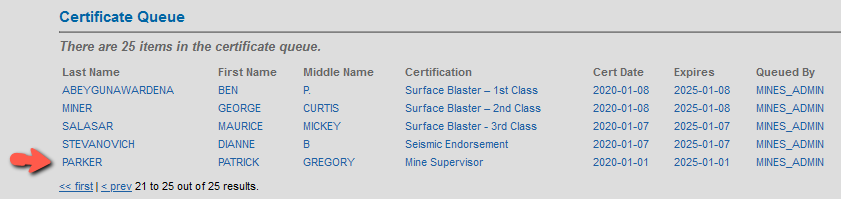
13.1 View Certificate Queue
13.2 Certificate Printing by BC Mail Plus
13.3 Add Legacy Certificate to Print Queue
13.4 Remove Legacy Certificate from Queue
14 CERTIFICATE, WALLET CARD & SECURE PHOTO ID CARD SPECIFICATIONS
14.1 Mine Supervisor Certificate and Wallet Card
14.2 Blaster Certificate and Secure Photo ID Card
14.3 Shiftboss Certificates and Wallet Card
14.4 Legacy Certificates and Wallet Cards
15 DELETE A STUDENT (CLIENT) RECORD (Duplicates)
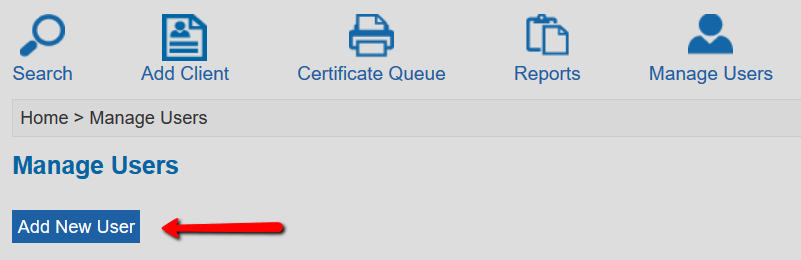
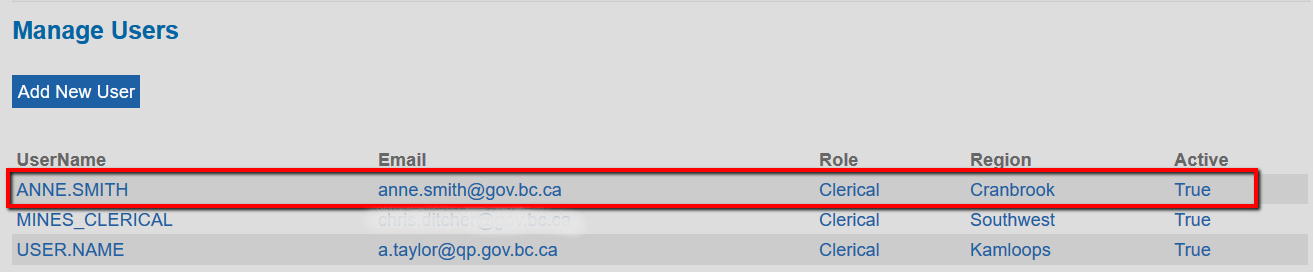
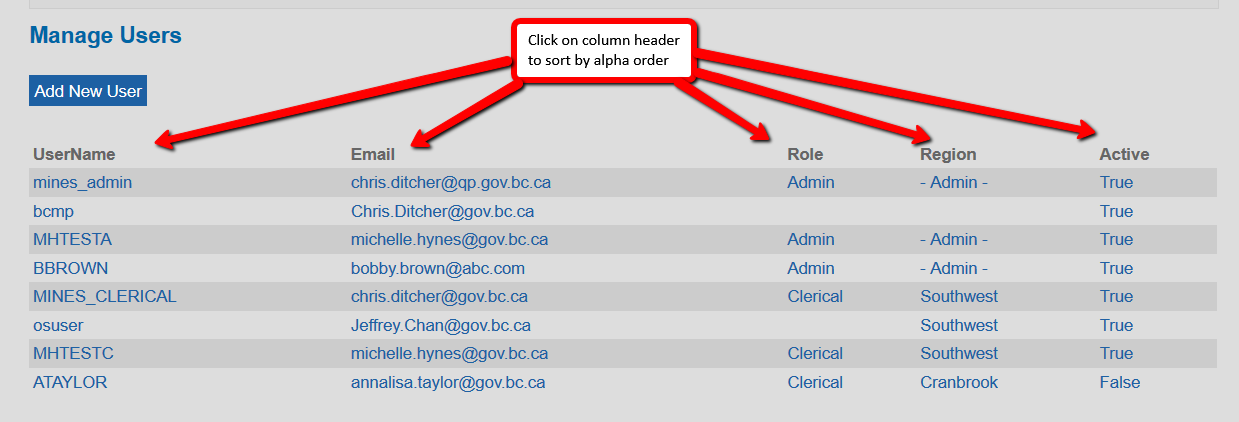
16 MANAGE USERS IN THE REGISTRY
16.1 Add new user account
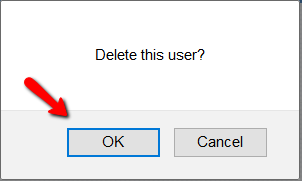
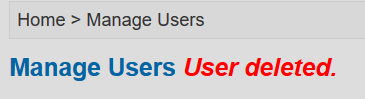
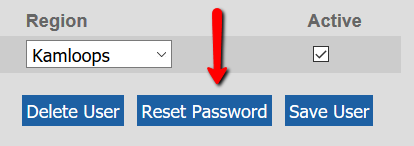
16.2 Delete User
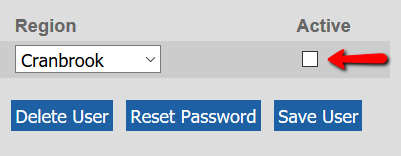
16.3 Deactivate a User
16.4 Edit User
16.5 Reset Password
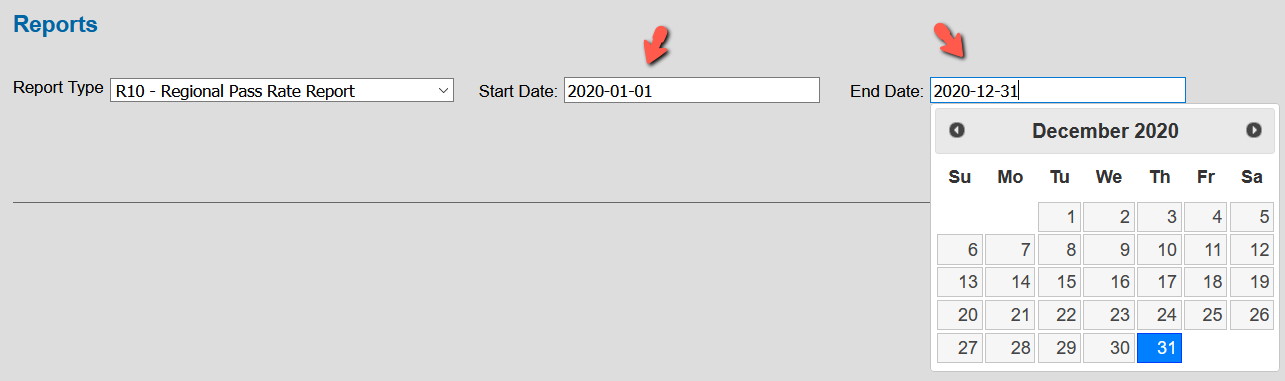
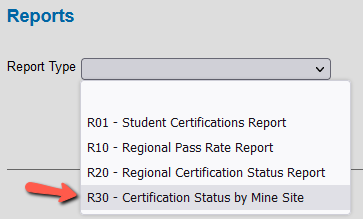
17 REPORTS
17.1 Access Reports
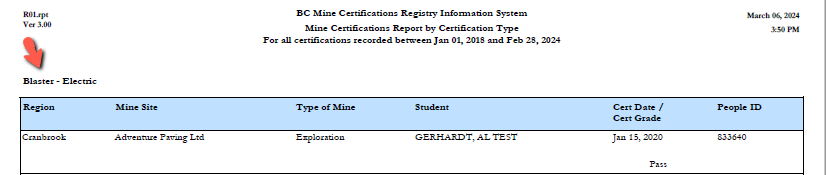
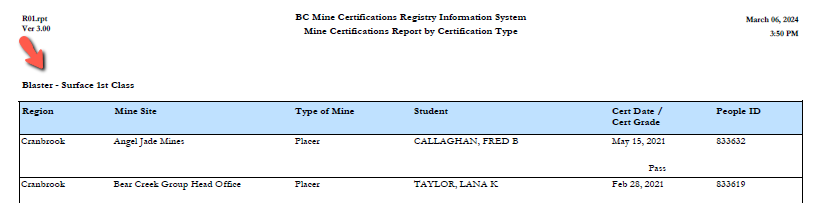
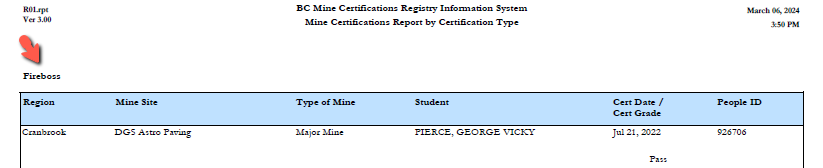
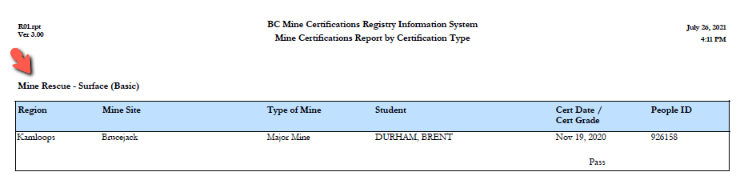
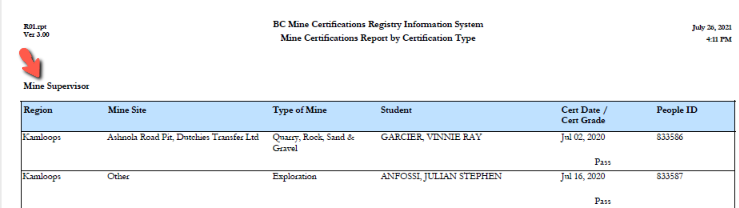
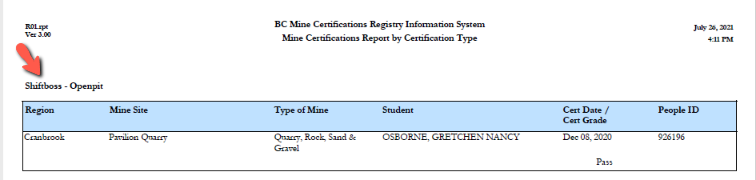
17.2 R01 Student Certifications Report by Type of Certification
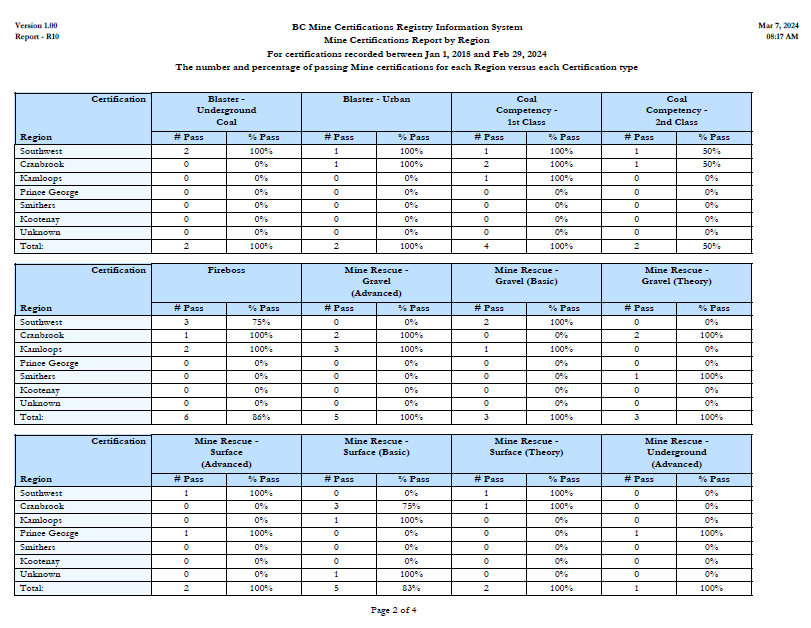
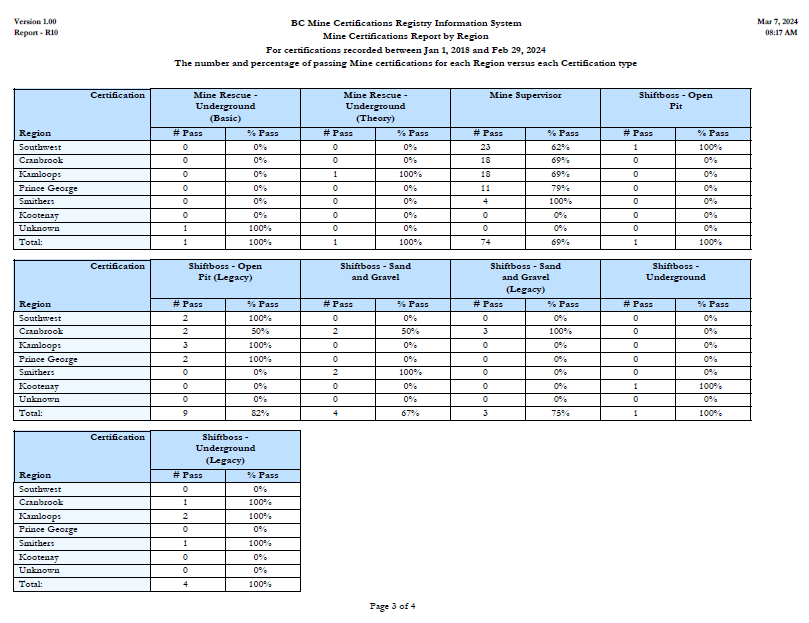
17.3 R10 Mine Certifications Report by Region
17.4 R20 Regional Certification Status Report
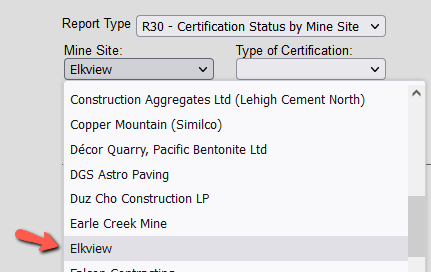
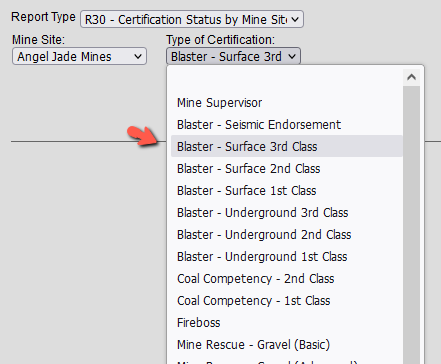
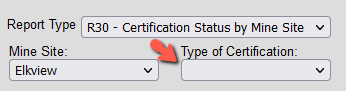
17.5 R30 Certification Status by Mine Site Report
17.6 Certificate Printing Report
INTRODUCTION
BC Mine Certifications Registry
This manual describes the BC Mine Certification Registry web application, which is used by Ministry of Energy, Mines and Low Carbon Innovation (the Ministry) to record the people who have taken a BC Mine Certification Program course, the results of their examination, interview (if applicable), and the status of their certification. The Registry also generates certificates and ID cards that are printed and mailed by BC Mail Plus.
This document describes how to use the Registry in the Admin role (create, read, update, report, queue, manage users).
The BC Mine Certifications Registry, developed and hosted by the King’s Printer Digital Publishing (formerly Queen’s Printer), Ministry of Citizens’ Services, was launched on April 13, 2018.
The BC Mine Certification Registry contains information about all the students and workers (clients) who have taken BC Mine Certification Program courses from April 16, 2018 onwards; plus, legacy certification data transferred to the Registry from the Ministry’s database on October 24, 2021.
UPDATE APRIL 2024 The Ministry of Energy, Mines and Low Carbon Innovation offers a number of certifications required for mining in British Columbia, including certifications acquired via Open School BC, and Legacy certifications acquired via other means: Certifications offered online via Open School BC - Mine Supervisor (OSBC)
- Blaster (OSBC)
- Shiftboss (OSBC)
Legacy certifications - Shiftboss (Legacy)
- Fireboss (Legacy)
- Mine Rescue (Legacy)
- Blaster (Legacy)
The ‘Mine Supervisor’ certification is available online, exclusively through Open School BC.
Open School launched the Mine Supervisor course on April 16, 2018. The seven types of ‘Blaster’ certification are available online, exclusively through Open School BC.
Blaster online courses launched in January 2022. The three types of Shiftboss (OSBC) certification are available online, exclusively through Open School BC.
Shiftboss online courses launched on April 8, 2024. |
Who should read this document? The Admin Role
This document is intended for BC Mine Certifications Registry users who are assigned the Administrator role in the Registry at www.mines.kp.gov.bc.ca.
In addition to search, create, read and update functions, the Administrator role has the unique ability to add new Registry users, assign roles, re-set passwords, and delete duplicate records.
For more information about roles in the Registry and which role can do what, please see the Security Matrix.
Legislation
Mines Act
The BC Mine Certification Program is a legislative requirement. As such, it is necessary to gather and store information on people who are certified under the BC Mine Certifications Program.
The BC Mine Certifications Program is authorized by the Mines Act, [RSBC 1996] Chapter 293, section 34 [Health, safety and reclamation code committee], which enacts the Health, Safety and Reclamation Code for Mines in British Columbia sections 1.12.1, 1.12.6, 1.12.7 and 8.2.1.
Freedom of Information and Protection of Privacy Act (FOIPPA) of British Columbia
The personal information used by the BC Mine Certifications Registry is collected in accordance with the Freedom of Information and Protection of Privacy Act, section 26. The personal information used by the BC Mine Certifications Registry relates directly to and is necessary for the operation of the BC Mine Certifications program.
In accordance with Section 27(1) of the FOIPPA, all personal information will be collected directly from the individual via Open School BC. The accuracy of BC Mine Certifications information is verified by the BC Mine Certifications client at the time the information is collected. At any time, an individual can verify the accuracy of his or her personal information held in the BC Mine Certifications Registry by contacting the Ministry of Energy, Mines and Low Carbon Innovation. An individual BC Mine Certifications client consents to this use of personal information when he or she completes a BC Mine Certifications course form or writes a BC Mine Certifications exam.
An individual may have his or her own record corrected by the Ministry of Energy, Mines and Low Carbon Innovation. At the request of the individual, authorized personnel in the Ministry can make corrections to any BC Mine Certifications data, except person ID, exam date, exam mark, interview date and grade.
Employers do not have direct access to Registry information. Any requests from an employer or any other party for information about a Mine Certifications Registry client will be referred to the individual in question. Registry information may be released to an employer (or other party) only where there is written permission from the client.
Minimum Browser Requirements
You must use an up-to-date version of one of these browsers:
- Chrome™
- Firefox®
- Microsoft Edge
- Safari
Recommended
Latest version of Chrome, MS Edge or Firefox.
GETTING STARTED
Registry Access
Registry access is managed by designated Ministry staff who have the Admin role in the Registry. Please contact the Ministry for help with the following:
- Create a new account in the Registry:
- The Administrator supplies a username to the new user.
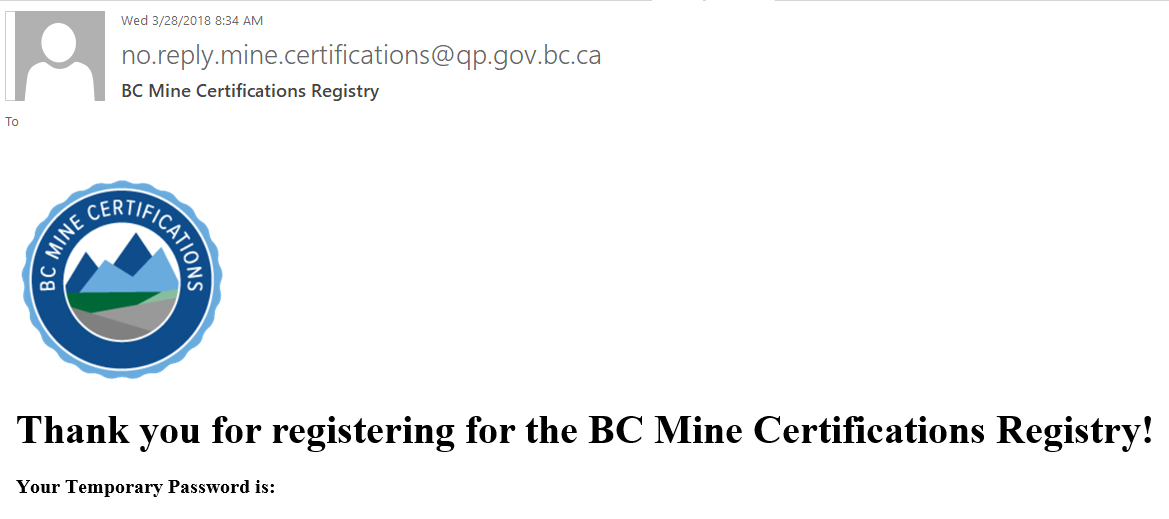
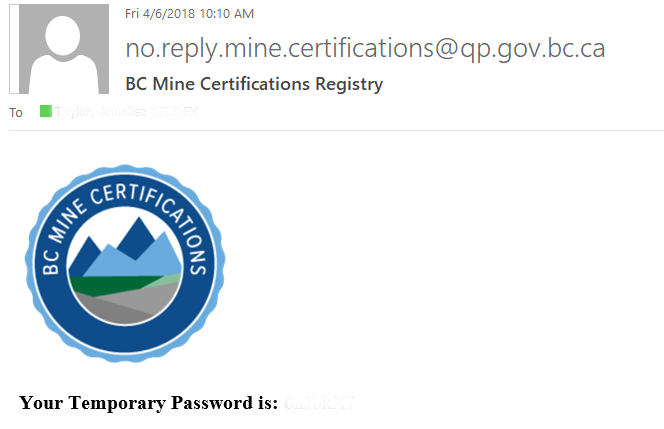
- The Registry generates a temporary password and supplies it to the user via email.
- Reset your forgotten Registry password.
- Remove, or temporarily deactivate an Admin or Clerical account.
See Section 16 Manage Users in the Registry.
Log in to the BC Mine Certifications Registry
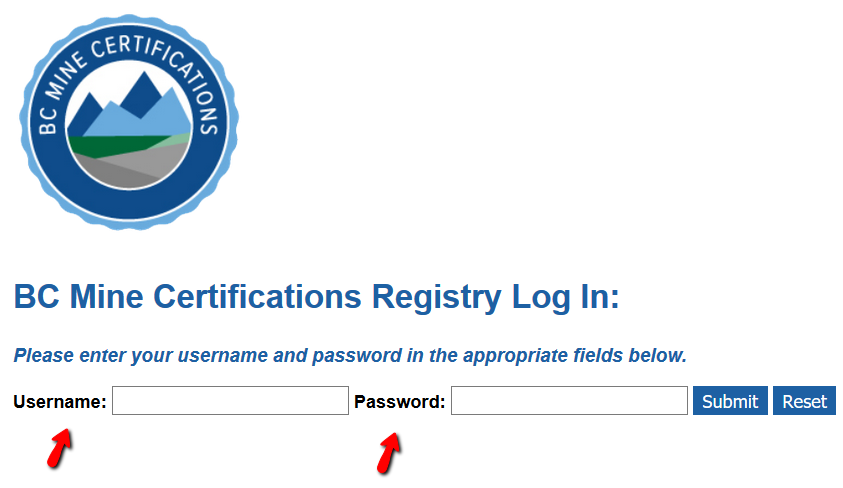
To log in to the BC Mine Certifications Registry:
- Open your internet browser and go to the BC Mine Certifications Registry web address:
https://mines.kp.gov.bc.ca - On the Log in page, enter your username and password in the data fields and click on Log in:
- The Registry opens on the ‘Search’ page:
- Registry functions for the admin role are accessed by clicking on the icons:
- After initial log in using the temporary password, you may change the password using the change password function, accessed by clicking on your username in the top right corner:
See Section 2.4 Change Your Password.
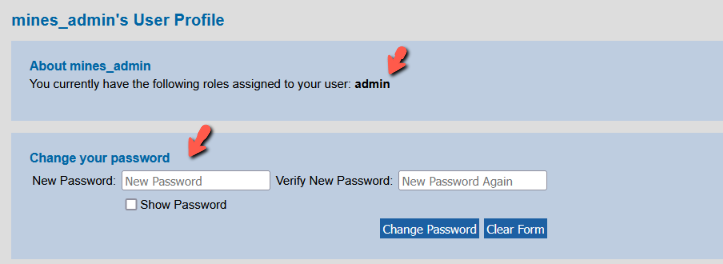
Username and Profile
Your username is always visible in the top right corner of the BC Mine Certifications Registry.
To view the details of your ‘User Profile’:
- Click on your username:
- On the ‘User Profile’ page, you will find:
- The ‘role’ assigned to the user.
- The ‘Change Your Password’ function.
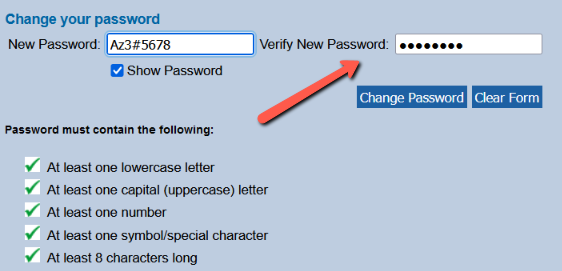
Change Your Password
To change your password:
- Click on your username in the top right corner:
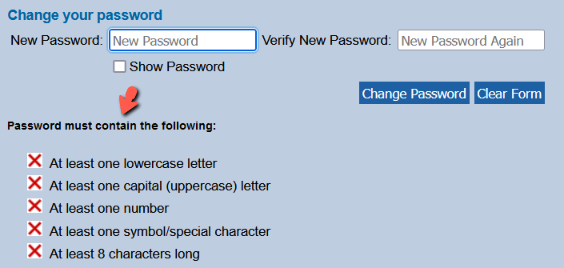
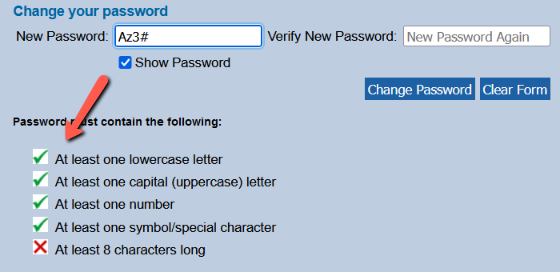
- In the ‘Change your password’ section of the ‘User Profile’ page, click in the ‘New Password’ field. The password criteria panel opens. Create a password that meets the criteria.
- Click in the ’Show Password’ checkbox to display your new password as you are typing it in:
- As you enter the password, the criteria panel displays the status of each criterion:
- When the password meets all the criteria, displaying green checkmarks next to each, enter the password in the ‘Verify New Password’ field:
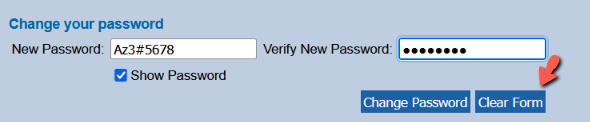
- If you think you’ve made a mistake, click on Clear Form:
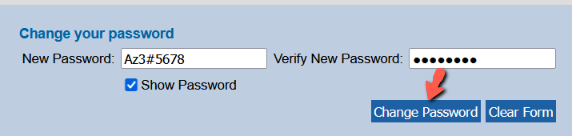
- If you are happy with your entries, click on Change Password:
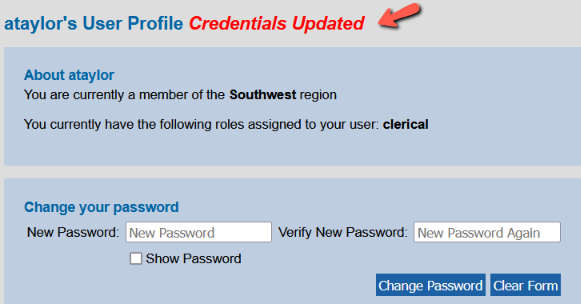
- The ‘Credentials Updated’ message will display on the page. The next time you log-in, use the new password.
TIPS - Passwords must contain:
- At least one capital (upper case letter)
- At least one lower case letter
- At least one number
- At least one symbol/special character
- At least 8 characters
- If you forget your password, please contact mine.certifications@gov.bc.ca and request a password reset.
|
Registry Partners
Who Does What?
The Mine Certification Program has several partners who have different roles in the Registry.
See the Security Matrix for further details.
MINE REGISTRY PARTNERS |
Registry Role | Partner Organization | Key Registry Abilities | Responsibilities / Areas of Interest |
Admin
| Ministry of Energy Mines, Victoria, BC | - Reset a forgotten password.
- Manage users.
- Search.
- Create / update / delete records.
- Update client details (name, address, phone, email, work location).
- Record a provisional certification.
- Record a certification suspension.
- Record a certification cancellation.
- Add/remove legacy certificates to/from queue.
- Administer photographs for photo ID.
- Record a criminal record check
| - Owner of Registry data
- Administer Mine Certification Program.
- Administer provisional certificates issued by Mine Managers.
- Administer suspensions and cancellations.
- Answer questions about policies and procedures governing the Registry.
- Inspect mines for compliance with mandated health and safety requirements.
|
Clerical
| Ministry of Energy Mines, Victoria, BC | - Search
- Update client details (name, address, phone, email, work location).
| - Support the Ministry.
|
Customer Support (CS)
| Crown Publications, King’s Printer | - Add all certificate types to the certificate print queue (for reprints), except Legacy Blaster*.
- Remove all certificate types* from the certificate print queue.
* For Legacy Blaster reprints, clients must contact the Ministry of EMLI | - Process certificate reprint requests.
- Accept credit card payment from the client using Crown Pubs procedures (outside Registry).
- Technical support liaison, recording issues experienced by Registry users in the JIRA Customer Support Kan Ban board.
|
BC Mail Plus
| BC Mail Plus | - Download Certificate Queue
- Clear Certificate Queue
| - Print / assemble certificates, cards and secure photo ID.
- Mail certificates, cards and secure photo ID to customers.
- Answer questions about the status of certificate printing or shipping.
- Address certificate quality issues.
- Address mailing issues.
|
OS System
| Open School BC | - Query Registry.
- Submit client personal info, exam results and interview results to the Registry via the API.
| - Provide Online Mine Certification courses via Moodle.
- Answer questions about the status of course completion.
- Issue a temporary certificate to successful clients.
- Submit results to the Registry.
|
QP Admin
| QP Digital Publications Department | The QP Admin role has all abilities in the Registry.
| - Assist the Ministry with data management issues.
- Assist Open School with data submission issues.
- Resolve Registry technical issues.
|
Contact Information
Registry Administration Support – Ministry of EMLI
Registry administration services provided by the Admin role
To get help with the following Registry administration services, please contact the Ministry of Energy, Mines and Low Carbon Innovation:
- Reset a forgotten password.
- Update a user account in the Registry.
- Add a new user account to the Registry.
- Deactivate a user account in the Registry.
- Remove a user account from the Registry.
- Record a provisional certification.
- Record a certification suspension.
- Record a certification cancellation.
- Delete a duplicate record.
Policies and procedures
If you have any questions about the BC Mine Certification Program, and its policies and procedures governing the use of the Registry, please contact the Ministry of Energy, Mines and Low Carbon Innovation:
See Section 16 Manage Users in the Registry.
Registry Technical Support – Crown Publications, King’s Printer
To get help with Registry technical issues, contact customer support at Crown Publications, King’s Printer.
Please state at the beginning of your call or email that you need help with the BC Mine Certifications Registry or ‘Mines Registry’.
Crown Publications, King’s Printer
Hours of operation: Monday to Friday 7:30 to 4:30 PST
Email: mines.techsupport@gov.bc.ca
Toll-Free: 1 (800) 663-6105
Victoria: (250) 387-6409 |
Online Course Registration and Temporary Certificates – Open School
To help a client with the following issues, please contact Open School BC.
- Registration for online Mine Certification courses.
Example: Client request for a course registration confirmation email - Temporary certificates issued by Open School at couwrse completion.
Official Certificate Reprints – Crown Publications, King’s Printer
To help a client who needs a reprint of their official mine certificate, wallet card or secure photo ID:
- Verify with the client that their mailing address is up-to-date and, if necessary, update their address in the Registry according to Canada Post guidelines.
- Direct the client to contact Crown Publications to order a reprint of their certificate and ID card.
- Advise the client that when they contact Crown Publications, they will be asked to verify their identity, and pay the fee for printing a replacement certificate and ID card.
For any other issues with official certificates, please contact Crown Publications.
Crown Publications, King’s Printer
Hours of operation: Monday to Friday 7:30 to 4:30 PST
Email: mines.certificate.reprint@gov.bc.ca
Toll-Free: 1 (800) 663-6105
Victoria: (250) 387-6409 |
TIPS Crown Publications staff have a ‘customer support’ role in the Registry with which they can: - Search for the client record.
- View a client record.
- View the certificate print queue.
- Add a certificate to the print queue.
- Remove a certificate from the print queue.
Crown Publications staff do not have the ability to update a client’s personal information or any other data in the Registry. Crown Publications staff require assistance from Admin role users to update client contact information such as name, address, telephone, and email. |
UPDATE APRIL 2024 Blaster (OSBC) certifications, with a last printed date, can be reprinted without the Criminal Record Check being completed. For Blaster reprints the CRC status can be ‘Pending’ or ‘Completed’. |
Official Certificate Reprint Fees
Clients who have lost or damaged their certificate or ID card can order a reprint from Crown Publications, King’s Printer, and pay by credit card. The reprint fee includes certificate, ID card, shipping and handling.
The certificate and card are always printed together. They are not sold separately.
OFFICIAL CERTIFICATE REPRINT FEES |
No. | Certification Type | Product Bundle | Fee |
1 | Mine Supervisor (OSBC) Shiftboss (OSBC) | Certificate + Wallet Card | $10 |
2 | Blaster (OSBC) | Certificate + Secure Photo ID Card | $20 |
3 | Shiftboss (Legacy) Fireboss (Legacy) Mine Rescue (Legacy) | Certificate + Wallet Card | $10 |
4 | Blaster (Legacy) | Not printed via the Registry.
Contact the Ministry of EMLI. | N/A |
TIP Certificates and cards are not sold separately. Reprints are bundled as follows: - Certificate 8-1/2 x 11” (paper) + Secure Photo ID (laminated, hologram)
- Certificate 8-1/2 x 11” (paper) + Wallet Card (card stock)
|
Sign Out
To sign out from the BC Mine Certifications Registry, click on Sign out in the top right corner of the page.
TIP: The Registry will automatically time-out and sign-off after one hour of idleness. |
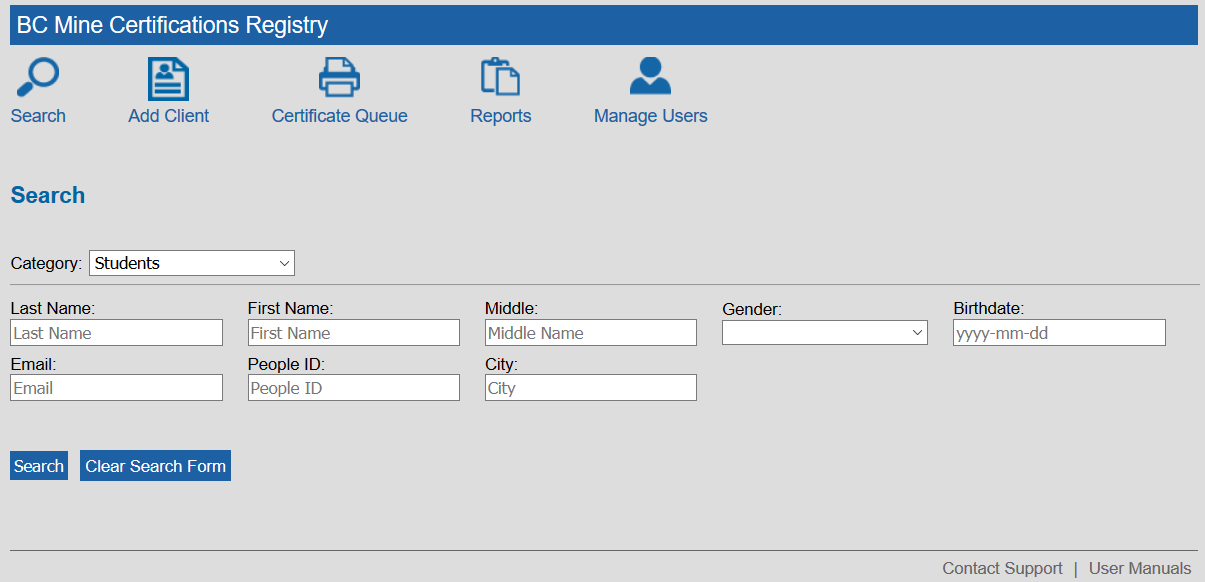
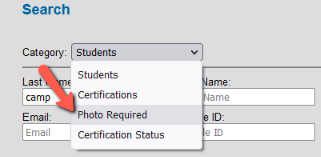
SEARCH
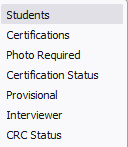
Searches available to the Admin role include:
| - Students search
- Certifications search
- Photo Required Search (for Blaster photo ID)
- Certification Status search (Suspensions and Cancellations)
- Provisional Certifications search
- Interviewer search
- Criminal Record Check search.
|
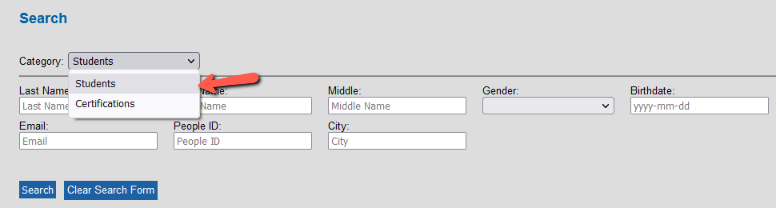
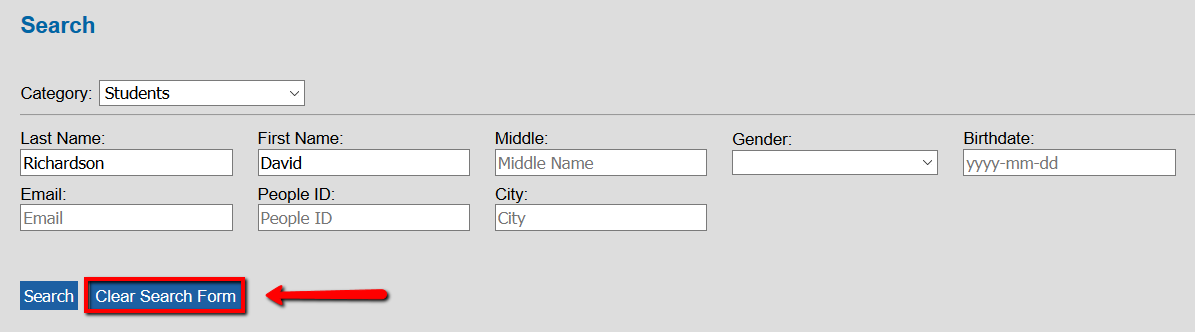
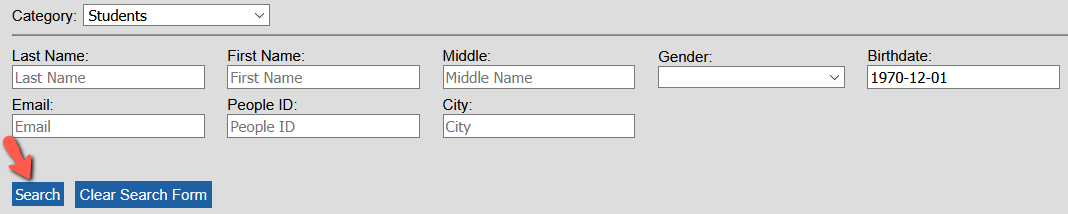
Search Students (Clients)
The ‘Students’ search is the default search in the search ‘Category’ menu and allows you to search for clients by personal data such as name, gender, birthdate, email, people ID and city. You can search by one or more criteria,
for example: search by last name + gender + birthdate.
TIPS - To return a list of all clients in the Registry, perform a ‘Students’ search with no criteria entered in the search form.
- Name searches behave like wildcard searches:
A search for ‘Rich’ will return ‘Rich’, ‘Richard’, Richards’, Richardson’. - Enter data in the search criteria fields in upper- or lower-case letters. Searches are case insensitive.
- To move from one search field to the next, use the Tab key or mouse.
- Search results are ordered alphabetically by last name and then by first name.
- To start a new search, click on Clear Search Form.
|
Search / Refine Search
If you are not sure of the spelling of a name, enter the first few letters of the name. The name searches behave like wildcard searches. A search for ‘Rich’ will return ‘Rich’, ‘Richard’, ‘Richards’, etc.
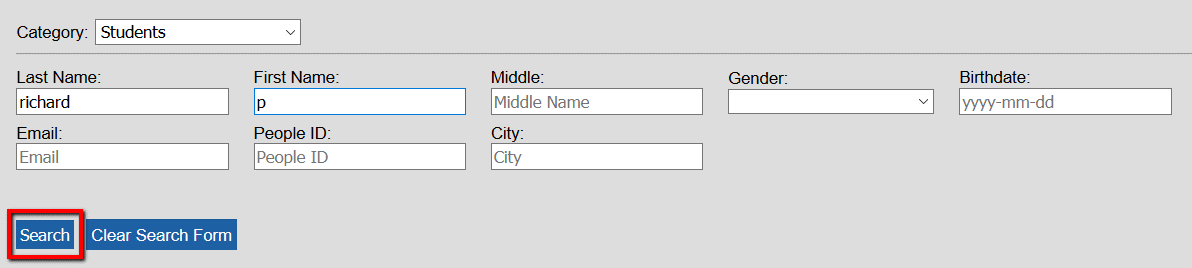
In the following example, to search by ‘Last Name’ and the initial of the ‘First Name’:
- Enter the client last name ‘Richard’ in the Last Name field and in the First Name field enter the initial of the first name, for example: ‘P’. Click on Search (or hit the ‘Enter’ key on your keyboard):
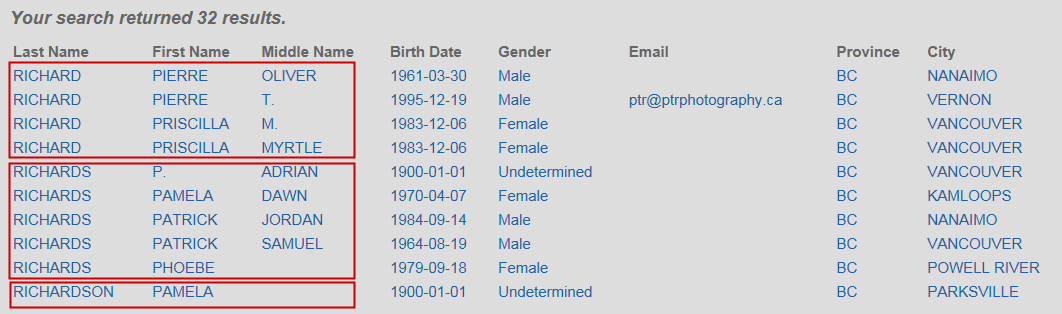
- The name searches name searches perform like wildcard searches returning records with last name ‘Richard’, ‘Richards’ and Richardson’ and first names starting with the letter ‘P’. The search results are ordered alphabetically by last name and then alphabetically by first name and middle name:
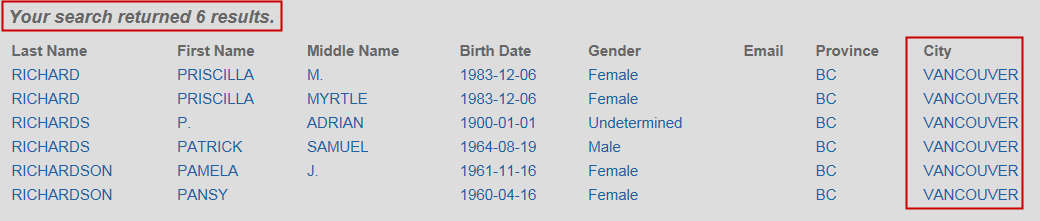
- To refine the search, return to the search form and enter more data, for example: ‘city’, and click on Search:
- The search results have been refined to include only clients from Vancouver with last name starting with ‘Richard’, and first names starting with ‘P’:
- The search results for a ‘Students’ search include the following details: Last Name, First Name, Middle Name, Birth Date, Gender, Email, Province and City:
TIP: To refine a search, perform a search on the ‘search results’ by entering additional criteria to the search form, and clicking again on Search. |
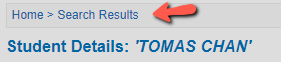
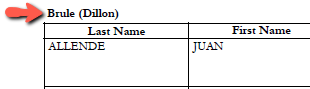
Open a Client Record from the Search Results / Return to Search Results
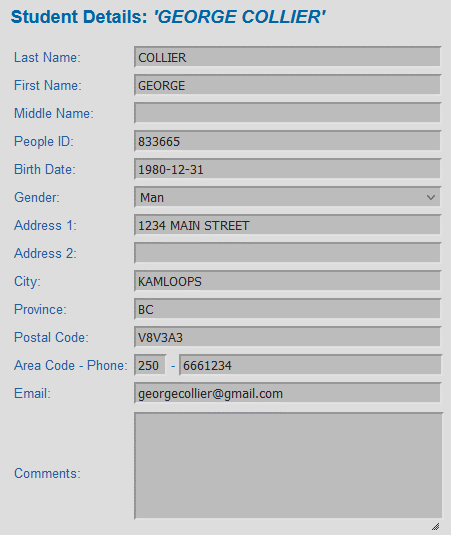
To open a client record from the search results list:
- Click in blue text anywhere in the row:
Student Search results:
Certification Search results:
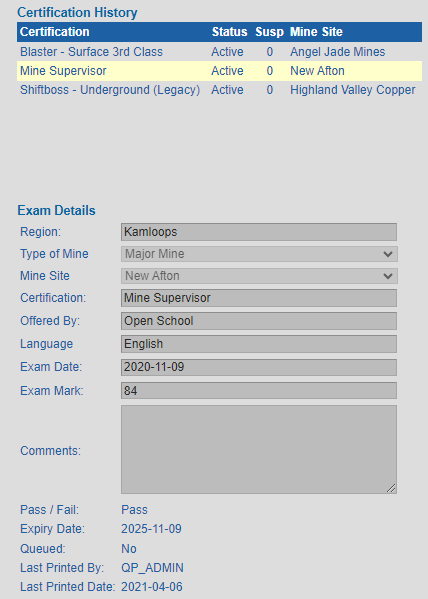
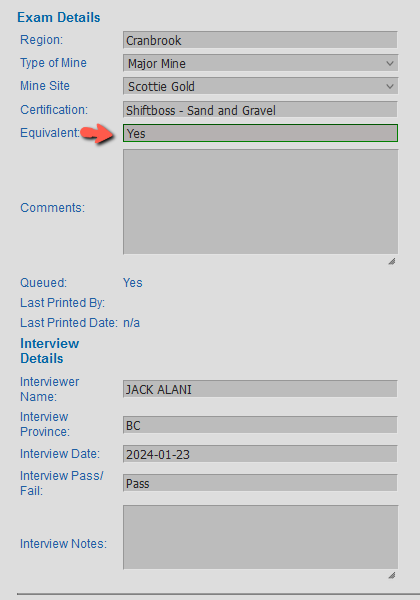
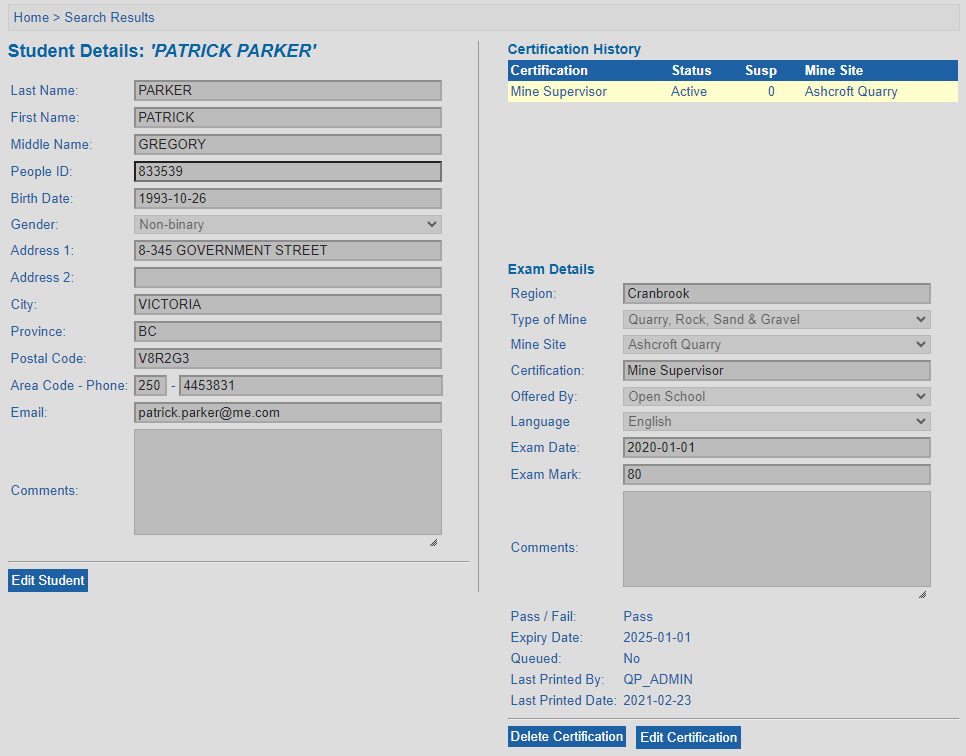
- The Student Details page opens, displaying client details, certification history and certification details:
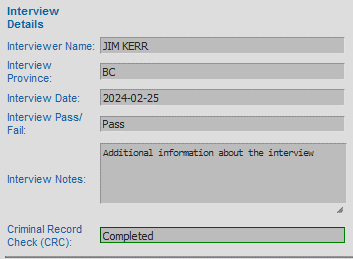
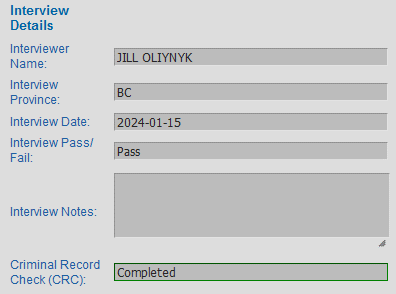
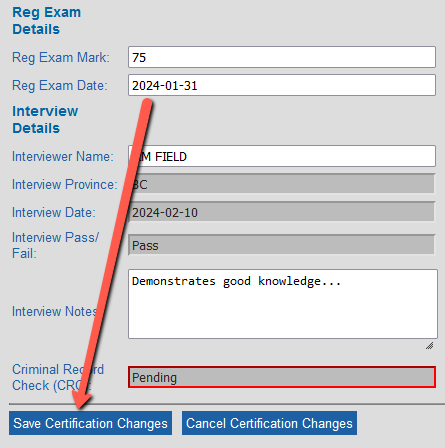
TIPS Shiftboss and Fireboss certifications include ‘Interview Details’ except when a client fails the exam and does not advance to the interview stage of the certification process. |
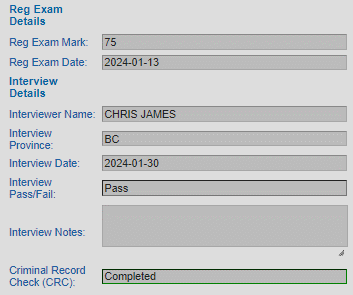
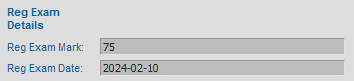
Blaster certifications include ‘Interview Details’, plus ‘Regulatory Exam Details’ and Criminal Record Check status. |
| 
|
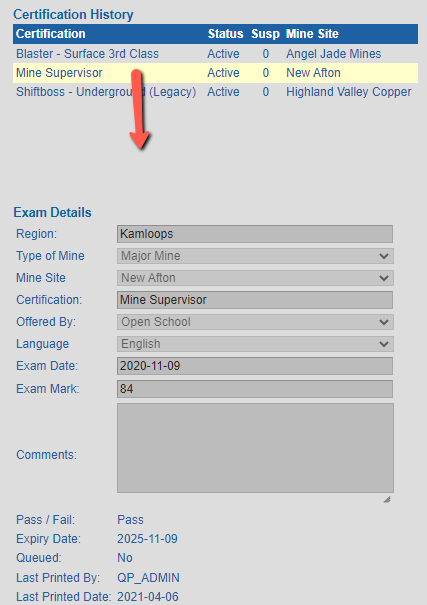
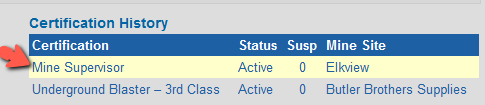
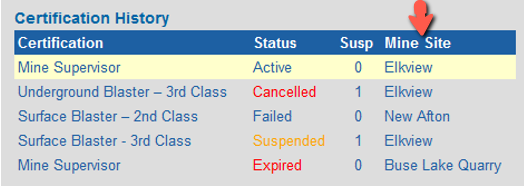
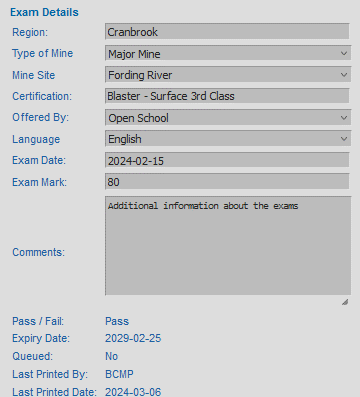
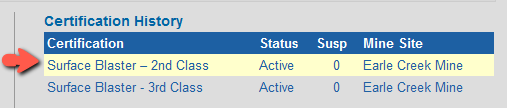
- Under the ‘Certification History’ section, the Mine Supervisor exam is currently selected, as indicated by the yellow background, and the ‘Exam Detail’s displays the details for the Mine Supervisor exam:
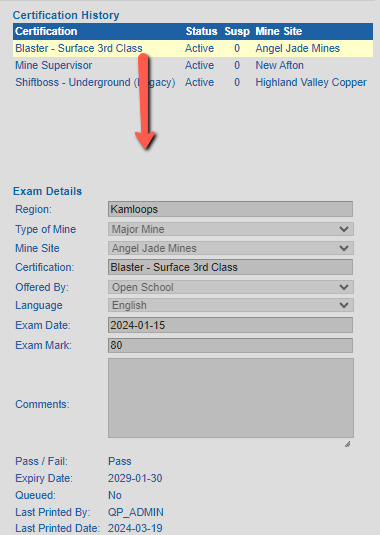
- To view the details for the ‘Blaster – Surface 3rd Class’, click on the certification under ‘Certification History’. Now, the blaster exam is highlighted by the yellow background and its Exam Details are displayed immediately below:
- To return to the search results page, click on the Search Results breadcrumb or use the browser back button:
Clear Search / New Search
To clear a search and start a new search:
- Click on Clear Search Form and enter new criteria in the search form:
TIP: Switching search category from ‘Students’ to ‘Certifications’ clears the current search. 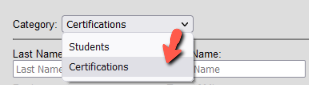
|
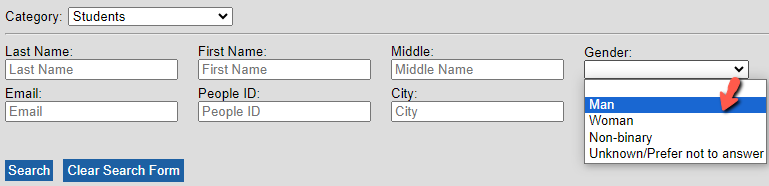
Search by Gender
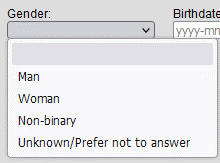
To search clients by Gender:
- Enter any known data in the name fields and select ‘Man, ‘Woman’, ‘Non-binary or ‘Unknown/Prefer Not to Answer’. You can use the mouse to access the dropdown menu, or simply type M, W, X or U in the field and hit Enter to make the selection:
- The search results include only records for the gender selected.
UPDATE APRIL 2024 To comply with new provincial guidelines on the use of gender and sex data, the data stored in the Registry uses the following terms: 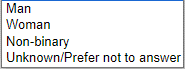
Note: The Registry stores existing records as ‘Female’ and any new records as ‘Woman’.
A search by ‘Woman’ will return results for Woman and Female. |
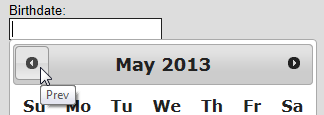
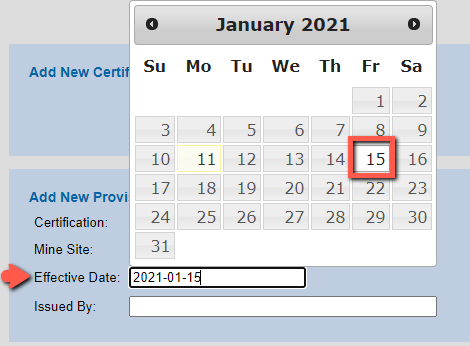
Search by Birthdate
To search by Birthdate:
- Enter the birthdate:
- Use the calendar, or
- Enter the date manually in the following format, including hyphens: yyyy-mm-dd
- Click on Search:
Search by People ID
Every client has a ‘People ID’ which is a unique identifier number generated automatically by the Registry system when a new client record is created. If the client has more than one certification, each certification is added to a single client record under a single people ID.
Client records can be searched by people ID.
The people ID is printed on all certificates and cards:
Certificate, People ID 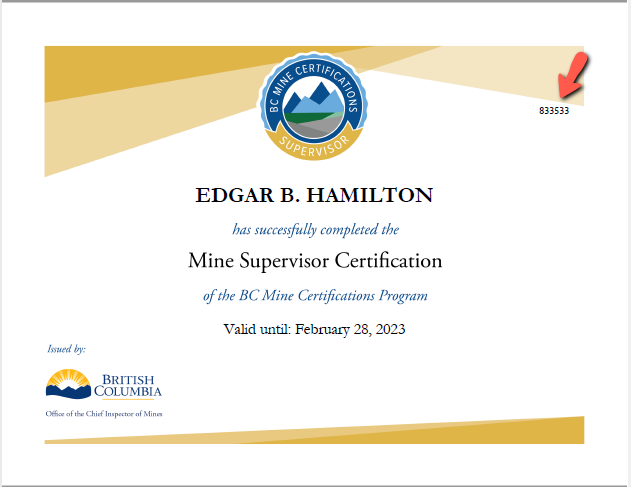
|
Wallet Card, People ID 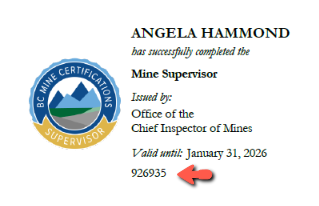
| Blaster Secure Photo ID Card, People ID 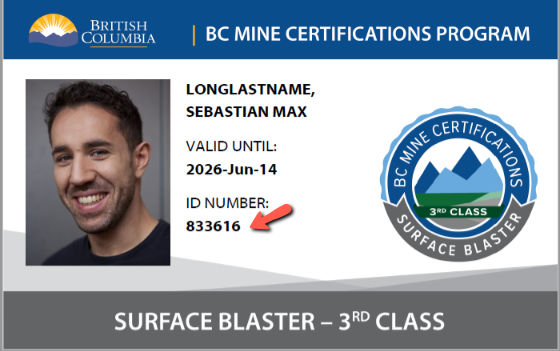
|
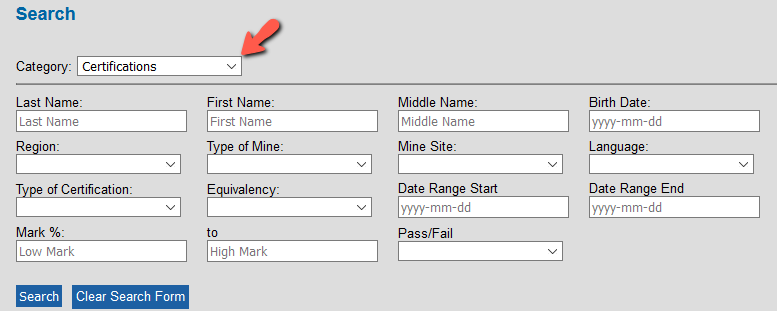
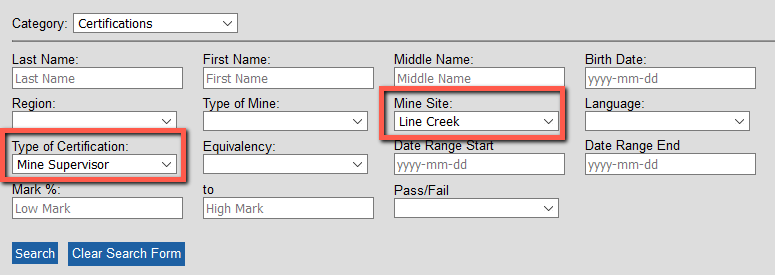
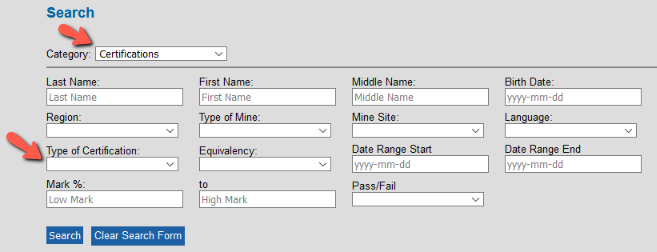
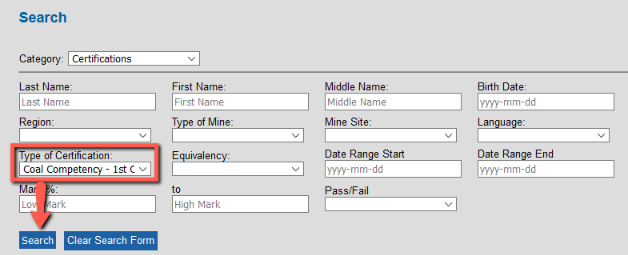
Search by Certification + Mine Site
To search for clients by certification attributes:
- Select the ‘Certifications’ category from the search category menu:
- Enter data or make menu selections in one or more of the search criteria fields and click on Search.
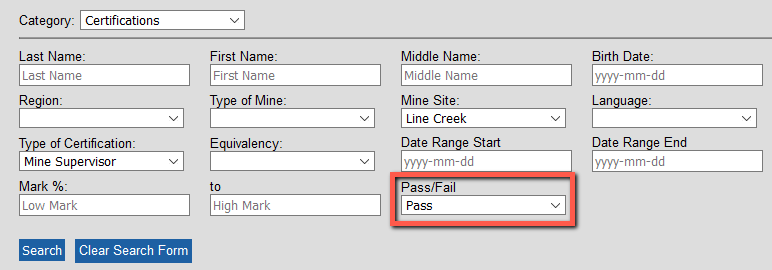
For example, search for the Mine Site, ‘Line Creek’ + the Type of Certification, ‘Mine Supervisor’:
- The search results include clients who have taken the Mine Supervisor exam and who are registered under the Line Creek mine site. Please note that the search results include clients with pass and fail grades.
- To refine the search to include only clients with a passing grade, add the ‘Pass’ criteria to the search:
- Now the results contain only clients with a passing grade on their certification:
TIP: To return a list of all certification types at a mine site, select the mine site in the ‘Mine Site’ field and leave the ‘Type of Certification’ field blank. |
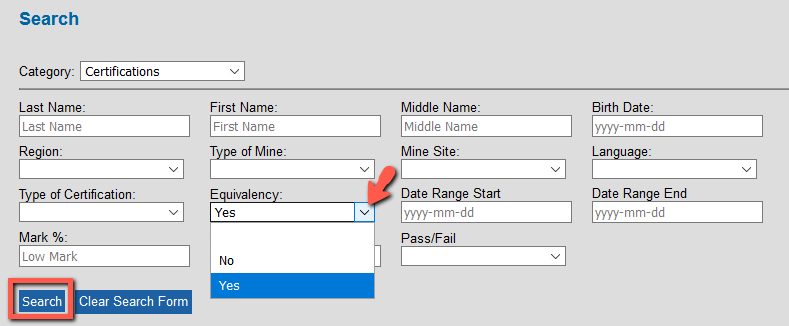
Search by Equivalent Certification
To search for clients who have been issued an Equivalent certification after meeting the Ministry’s requirements:
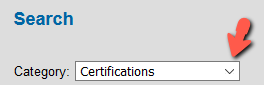
- Select the ‘Certifications’ search category:
- In the ‘Equivalency’ field, select ‘Yes’ and click Search:
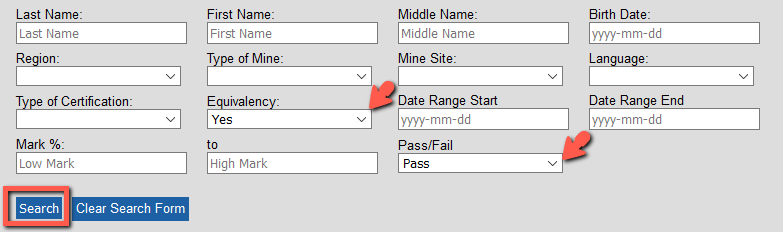
- The search results include all clients who have an Equivalent certification, including passes and fails:
- If required, refine the current search by adding criteria; for example, add ‘Pass’ so that the search results contain only those clients with a passing grade on their Equivalent certification:
- The refined search results include all clients who have an Equivalent certification with a passing grade:
TIPS - To exclude equivalent certifications from the search results, search by the certification type plus the equivalent value ‘No’.
- To include certifications and equivalent certifications in the search results, leave the equivalency field blank.
- Certifications that are eligible for equivalent status are Blaster (OSBC and Legacy), Fireboss (Legacy) and Shiftboss (OSBC and Legacy).
- A search by Mine Supervisor or Mine Rescue equivalent value ‘Yes’ returns no results because there is no equivalent for a Mine Supervisor or Mine Rescue certification in B.C.
|
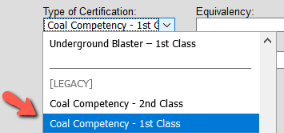
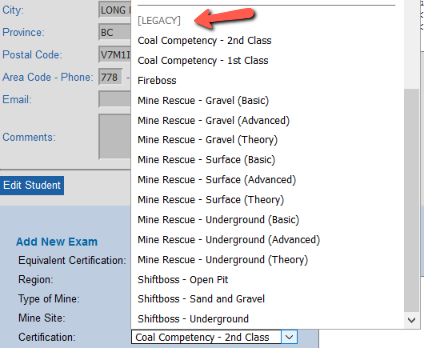
Search by Legacy Certification
Legacy certifications were imported from the Ministry’s database into the Registry on October 24, 2021.
To search by a Legacy certification:
- On the search page, select the ‘Certifications’ search category menu, and open the dropdown menu in the ‘Type of Certification’ field:
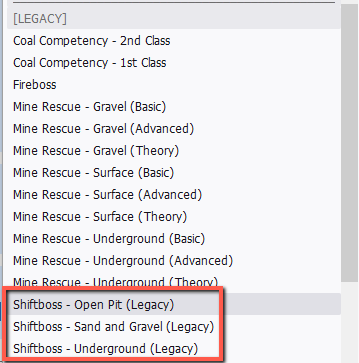
- In the ‘Type of Certification’ menu:
- The Legacy certifications for Fireboss, Mine Rescue and Shiftboss categories are displayed below the new certifications, after the heading ‘LEGACY’.
- The Legacy certifications for the Blaster category are displayed below the heading ‘LEGACY ARCHIVED’.
Legacy Certifications 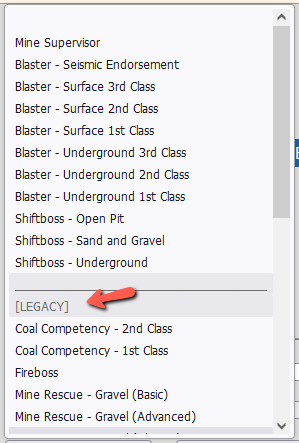
| Legacy Archived Certifications 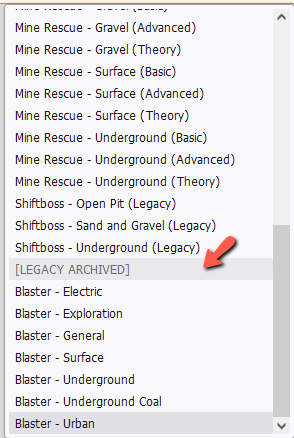
|
TIP The Legacy Shiftboss certifications are now marked with the suffix ‘(Legacy)’ to distinguish them from the new Shiftboss (OSBC) certifications that share the same certification names. |
- Select a Legacy certification:
- Click on Search:
- The Search Results contain a list of clients who have a record for the selected Legacy certification:
TIP: To return a list of all certifications in the Registry, perform a Certifications search with no criteria entered in the search form. |
Search by Photo Required
The Secure Photo ID Cards issued for Blaster (OSBC) certifications require a photograph of the certificate holder to be uploaded using the Registry photo app. Once the photo is uploaded, and the Criminal Record Check is completed the secure photo ID and certificate are automatically added to the certificate print queue:
To search for clients whose blaster certifications require a photograph:
- On the search page, open the search Category menu and select ‘Photo Required’:
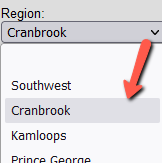
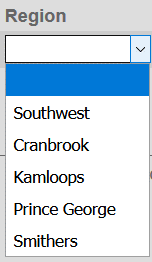
- To restrict the search by Region, Mine Type or Mine Site, select a value from the dropdown menus of one or more search criteria fields. Click on Search:
- The Search Results show all clients in the selected Region whose record requires a photo before the secure photo ID card and certificate can be printed:
TIP To find all certificates in the Registry that require a photo, leave the search criteria fields blank and click on Search: 
|
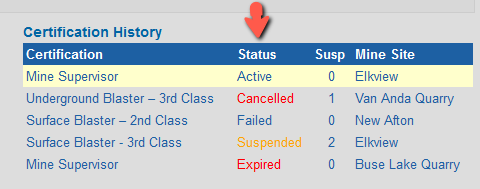
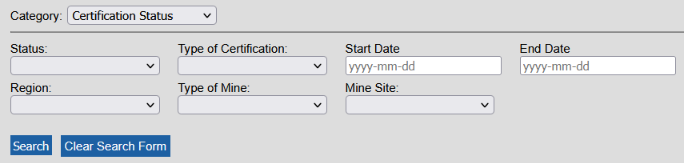
Search by Certification Status, Suspended and Cancelled
To search for certifications with a suspended or cancelled status:
- On the search page, open the search ‘Category’ menu and select ‘Certification Status’:
- In the ‘Status’ field, select ‘Suspended’ or ‘Cancelled’:
- If required, select other criteria to add to the search; for example, select a Mine Site. Click on Search:
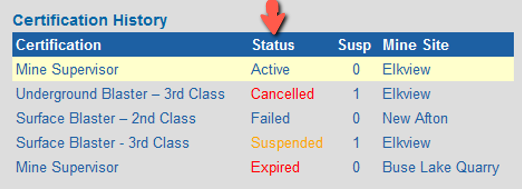
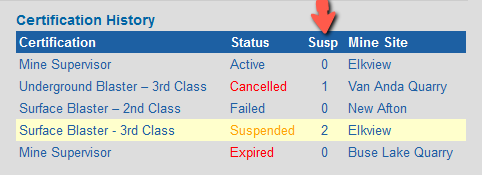
- The Search results display all certifications at Elkview mine site that have ever had a suspension applied, including active and expired suspensions:
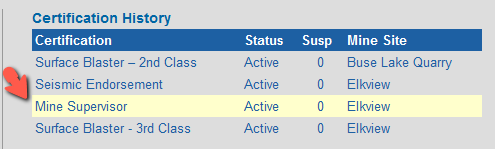
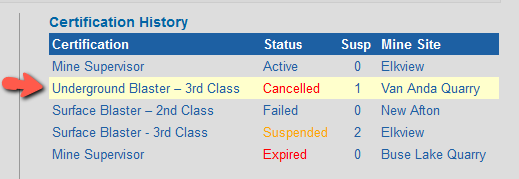
- For more information, click on the entry in the list to open the person’s record:
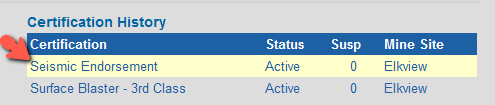
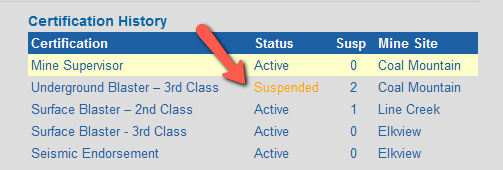
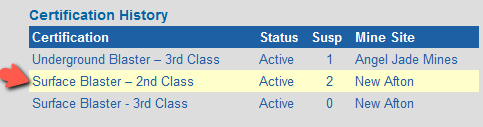
- In the record, the certification is highlighted under ‘Certification History’, and in this example displays a ‘Cancelled’ status:
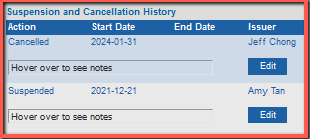
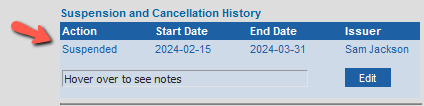
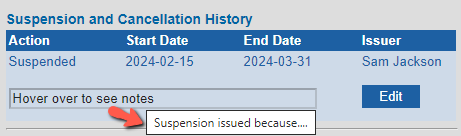
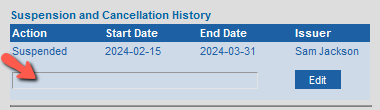
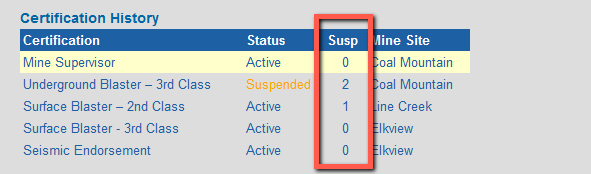
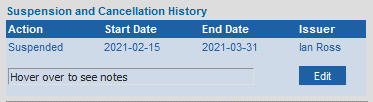
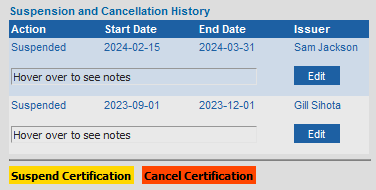
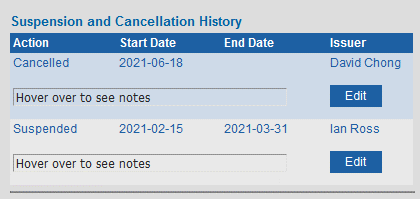
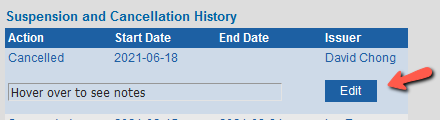
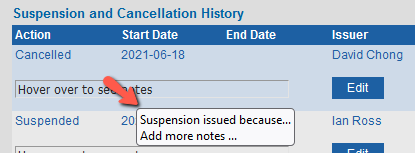
- Scroll down the record to review the ‘Suspension and Cancellation History’ for this certification.
In this example a cancellation has superseded a suspension:
TIPS - To find all suspended and cancelled certifications in the Registry, including active and expired suspensions, leave the search criteria fields blank and click on Search:
- Search results are ordered by the start date of the suspension, with the oldest at the top of the list.
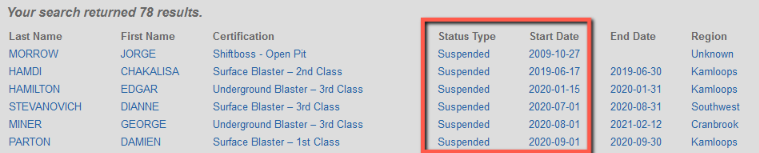
- Search results include suspensions on ‘active’ or ‘expired’ certifications.
- Search results include cancellations on ‘active’ or ‘expired’ certifications.
- To find suspensions issued during a given date range, enter a ‘Start Date’ and ‘End Date’ in the search criteria.
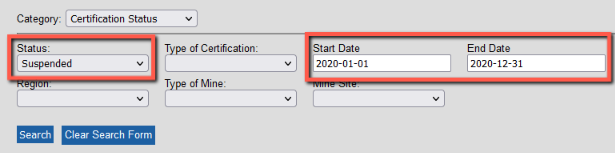
- Search results include suspensions that have start dates occurring within the date range selected.

- To find cancellations issued during a given date range, enter a ‘Start Date’ and ‘End Date in the search criteria.
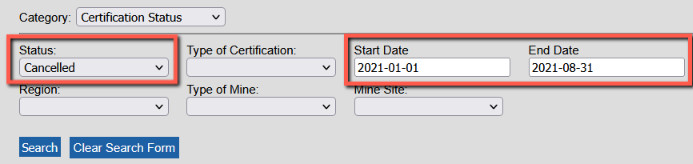
- Search results include cancellations issued within the date range entered.

|
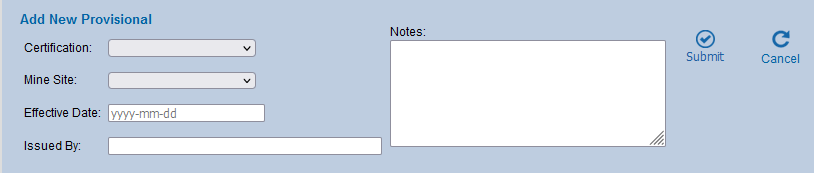
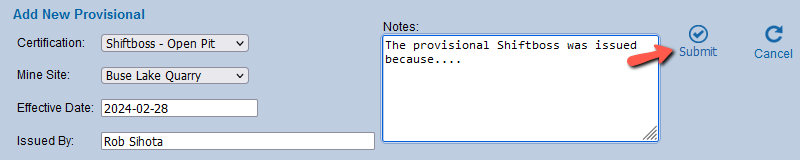
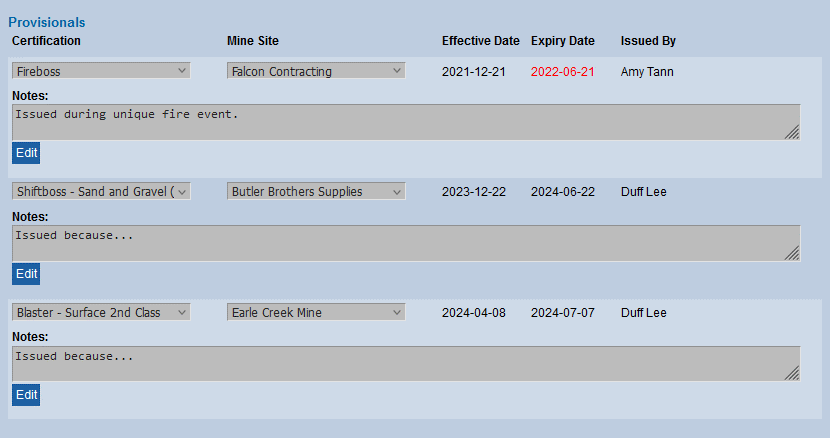
Search by Provisional Certification
To search for provisional certifications by ‘Mine Site’:
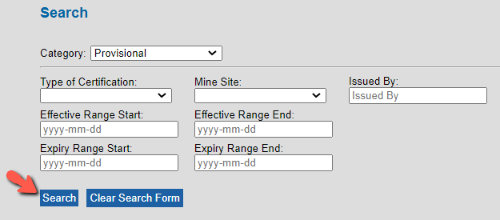
- On the search page, open the search ‘Category’ menu and select ‘Provisional’:
- In the ‘Mine Site’ field, select a mine site from the list, and click on Search.
For example: select mine site ‘Angel Jade Mines’:
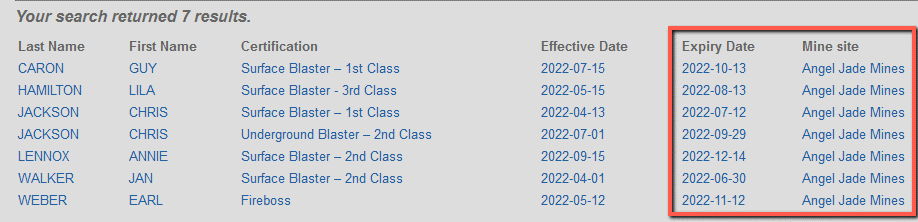
- The Search Results display all provisional certifications recorded under the ‘Angel Jade Mines’ mine site, ordered by last name in alphabetical order. If a person has multiple provisional certifications, the oldest is at the top:
- To refine the search, enter additional criteria. For example, in the ‘Expiry Range Start’ and ‘Expiry Range End’ fields enter a start date and end date. Click on Search.
- The search results display all provisional certifications under the Angel Jade mine site that expire between June 1, 2022 and December 31, 2022:
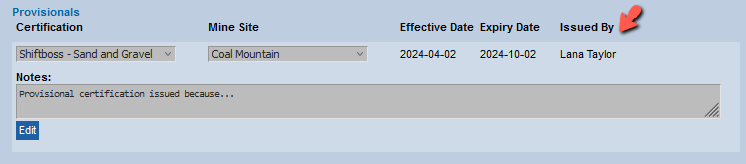
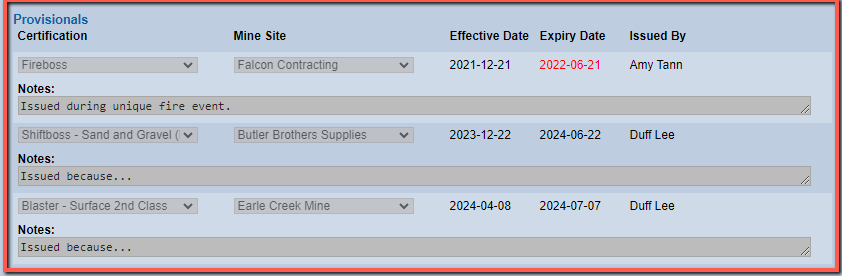
- To see details about the provisional certification, click on the person’s name to open their record:
- In the record, scroll down to the provisional certifications where you will find information about any other provisional certifications issued for this person, certification dates, and who issued the provisional certification:

|
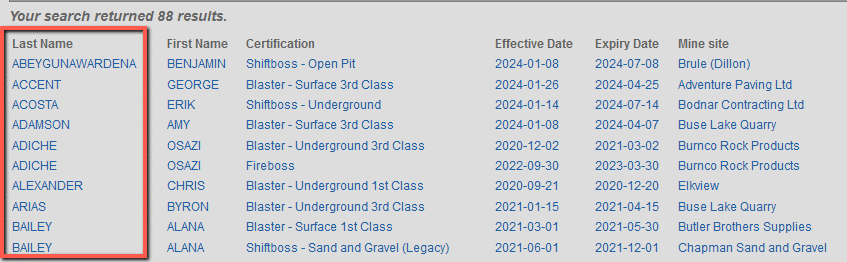
TIPS To find all provisional certifications in the Registry, including current and expired provisional certifications: - Leave the search criteria fields blank and click on Search:
- The Search Results display all provisional certifications in the Registry, ordered alphabetically by last name:
- If a person has multiple provisional certifications, the oldest is at the top.
|
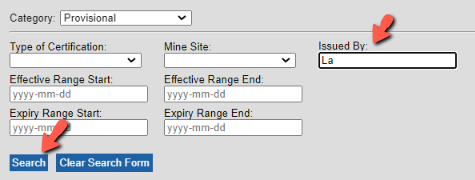
To search by the issuer of the provisional certification: - In the ‘Issued By’ field, enter a partial name or full name.
For example: ‘La’ will turn “Lana Taylor’ and ‘Larry David’. - The search results contain all the provisional certifications issued by an issuer whose first name begins with ‘La’. To view issuer details, open the record and scroll down to the Provisionals information.
- Scroll down to the provisional certifications to view the issuer:
|
TIPS - The ‘Issued By’ search is case insensitive. “La” or “la” will return the same results.
- A search by ‘Effective Range Start’ (Example: 2021-01-01 + no end date), will return all provisional certifications issued on or after 2021-01-01.
|
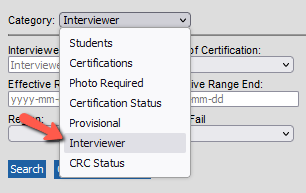
Search by Interviewer
Some certification types require an interview to complete the certification requirements.
The Registry records the name of the interviewer / examiner who conducted the interview with the applicant.
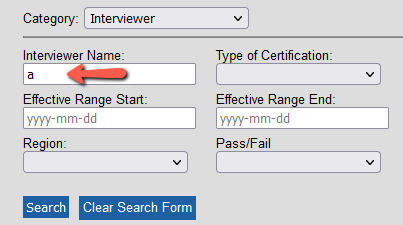
To search the Registry by the interviewer name:
- Select the ‘Interviewer’ category from the search category menu:
- Enter the name of the interviewer in the ‘Interviewer’ field, using one or more letters of the first name, or the full name. For example, the letter ‘a’:
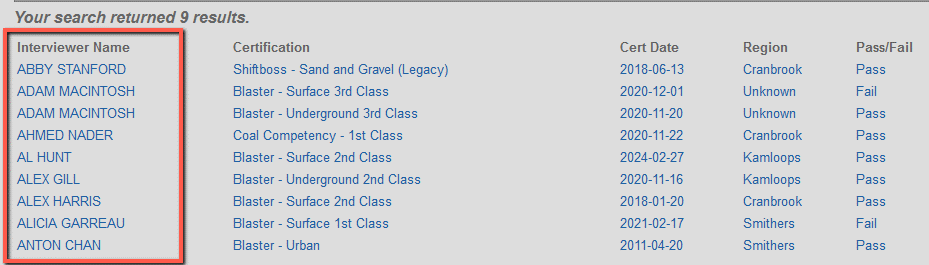
- The search results are listed alphabetically by the interviewer’s first name:
- To refine the search, add criteria.
For example: select the ‘Region’.
- The search results now include interviewers whose first names start with ‘A’ who provided interviews to workers in the Cranbrook region.
TIPS - An empty search by interviewer will return all certifications with interviews.
- A search by interviewer name relies on correct and consistent spelling of the name, e.g. ‘Andy’ will not find ‘Andrew’.
- A search by effective date range, returns certifications issued between the start and end dates. The certification date is the date of the interview.
|
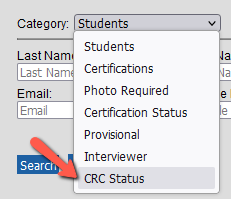
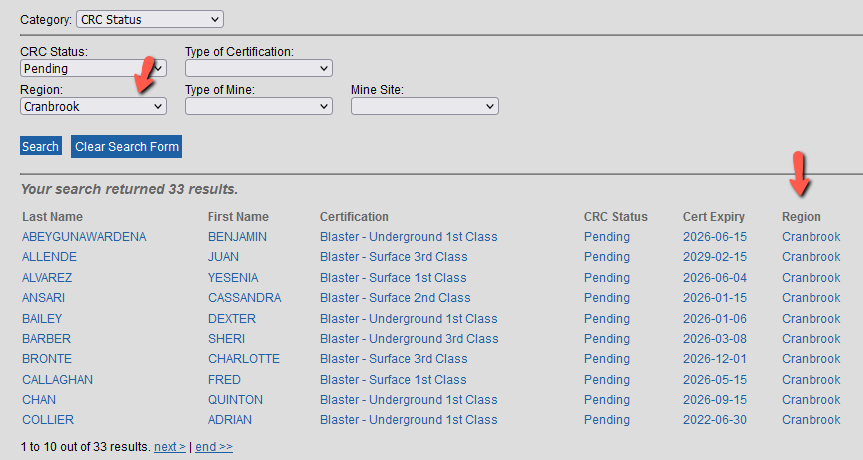
Search by Criminal Record Check Status
The Blaster certification types require a Criminal Record Check to complete the certification requirements.
To check the status of a Criminal Record Check:
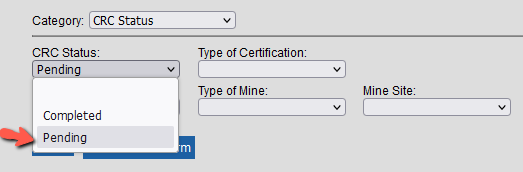
- Select the CRC Status category from the search category menu:
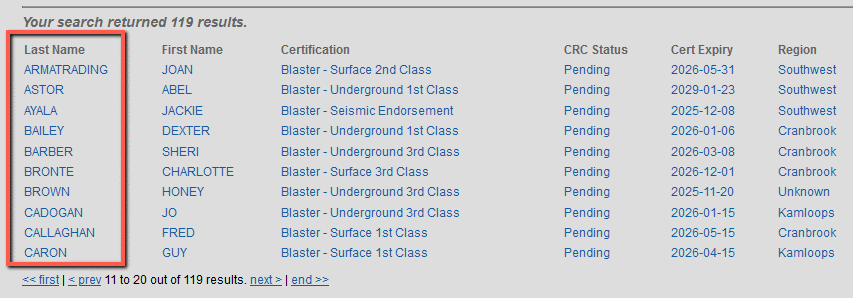
- Select the criteria you wish to search by. For example, to find any Criminal Record Checks that still need to be completed, select ‘Pending’ from the CRC Status field:
- The search results are listed alphabetically by the client’s first name:
- To refine the search, add criteria.
For example: select the ‘Region’.
The search results now include all pending criminal record checks in the region selected:
TIPS - An empty Criminal Record Check search will return all Blaster certifications that have a pending or completed criminal record check.
- The Criminal Record Check returns only new Blaster certification types, not the Legacy Blaster certification types. The Legacy Blaster records do not include a Criminal Record Check field.
|
ADD STUDENT (CLIENT)
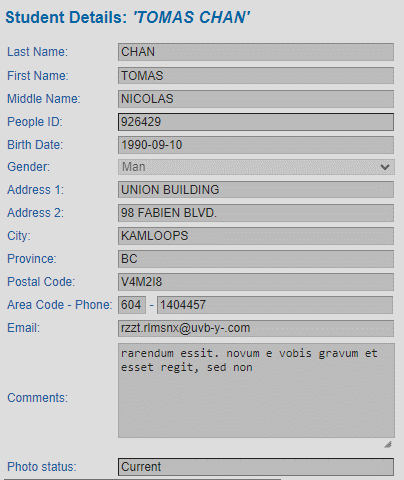
Add Student (Client)
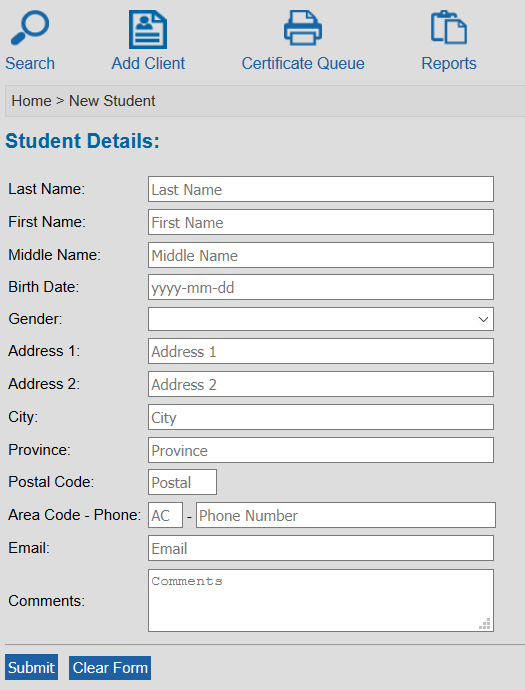
To add a new client record manually:
- Click on the Add Client icon:
- A ‘Student Details’ form opens:
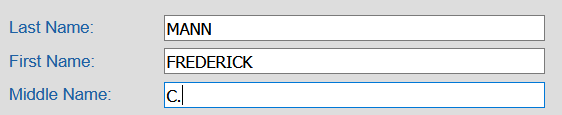
- Enter the ‘last name’, ‘first name’, and ‘middle name’ data in the appropriate fields.
Use the Tab key to move from one field to the next:
|
TIPS - The ‘Last Name’ field has a limit of 35 characters.
- The ‘First Name’ and ‘Middle Name’ fields have a limit of 15 characters each.
- Data entered as lower case or mixed case is saved as UPPER CASE.
|
- In the ‘birthdate’ field, enter the date in the following format, including hyphens: yyyy-mm-dd.
Use the Tab key to go to the next field:
- In the ‘gender’ field, select an option from the dropdown menu: ‘Man, ‘Woman, ‘Non-Binary’ or ‘Unknown/Prefer not to answer.
Alternatively, type in ‘M’, ‘W’, ‘N’ or ‘U’ and then use the Tab key to go to the next field.
|
UPDATE APRIL 2024 British Columbians who do not identify as male or female have the choice to display ‘Non-binary’ as an option in the ‘Gender’ field. To comply with new provincial guidelines on the use of gender data, the gender options in the Registry are:
Note
Existing records in the Registry use ‘Female’ instead of ‘Woman’. When OSBC submits exam results to the Registry they will submit ‘Woman’. If the client has an existing record in the Registry with the gender value ‘Female’, the value ‘Female’ will be overwritten by ‘Woman’. Manual editing of the gender value requires the consent of the client. If consent is provided, the gender field can be edited to change Female to Woman, or another option. If no gender is supplied, please enter ‘Undetermined’. |
- Enter the address according to Canada Post guidelines. The Canada Post guidelines for Canadian addresses can be found on the Canada Post website.

|
TIP: Please take care entering this address as it is used for mailing certificates and ID cards to clients. See also Section 5.1 Canada Post Guidelines |
- In the ‘province’ field, enter two characters for the province or territory, for example: BC, AB, YT.
- In the ‘postal code’ field, enter a postal code with no space, or enter a 5-digit zip code, for example: V2V3A3, 98281
- In the ‘area code’ field, enter a three-digit code, hit the Tab key, and in the ‘phone’ field, enter the seven-digit phone number with no hyphen:
- In the ‘Email’ field, enter the client’s email address including the domain.
For example, name@domain.com: jsmith@gmail.com; john.doe@email.ca; janedoe@telus.net
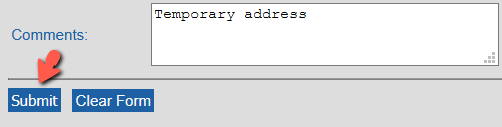
- In the ‘Comments’ field, enter any comments and save the client record using Submit:
|
TIP: The comments field is meant for factual information only. At any time, an individual can verify the accuracy of their personal information held in the BC Mine Certifications Registry by contacting the Ministry of Energy, Mines and Low Carbon Innovation. |
Add Accents in Client Names
For clients who have names containing accents, please use UTF-8 code numbers to enter the accented characters in the ‘Student Details’ form, including the first digit ‘0’.
COMMON ACCENTED CHARACTER CODES |
Character | Entry | Character Name |
À | Alt + 0192 | Latin capital letter A with grave |
 | Alt + 0194 | Latin capital letter A with circumflex |
Ç | Alt + 0199 | Latin capital letter C with cedilla |
È | Alt + 0200 | Latin capital letter E with grave |
É | Alt + 0201 | Latin capital letter E with acute |
Ê | Alt + 0202 | Latin capital letter E with circumflex |
Ë | Alt + 0203 | Latin capital letter E with umlaut |
Ñ | Alt + 0209 | Latin capital letter N with tilde |
Ô | Alt + 0212 | Latin capital letter O with circumflex |
Ö | Alt + 0214 | Latin capital letter O with umlaut |
To enter a character with an accent:
- On your keyboard Number Pad, turn the Num Lock ON.
- Hold down the Alt key.
- Position your cursor in the name field and enter the code number using the Number Pad.
Please include the ‘0’ as the first digit in the code, for example: 0201 - Release the Alt key.
- The accented character is inserted:
TIPS - In the ‘Student Details’ form you can enter the accented character codes for upper- or lower-case letters; the Registry saves both as upper case.
- Include a zero ‘0’ as the first digit in the code, for example: 0201
- The certificates, wallet cards and secure photo ID cards display names in upper case, for example: NOËL, HÉLÈNE
- A list of UTF-8 codes can be found at https://www.w3schools.com/charsets/ref_utf_latin1_supplement.asp
|
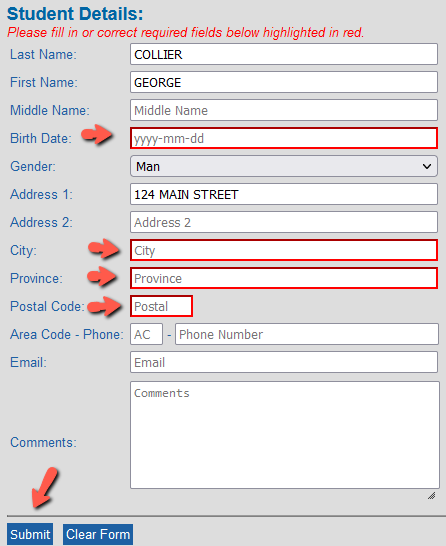
Validation Errors in the Student Details Form
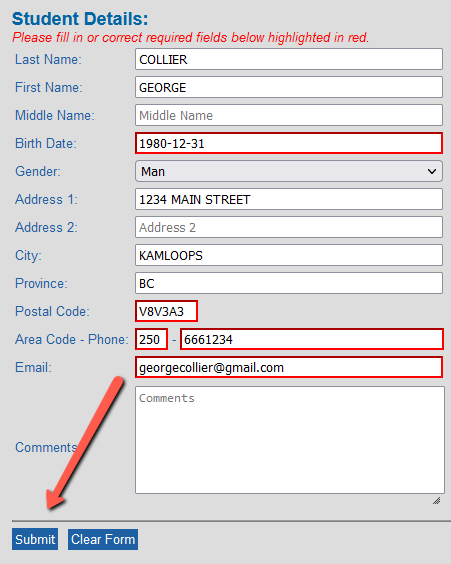
Missing data in required Student Details fields
If the Student Details form is submitted when required fields are blank, a red validation error message displays at the top of the form, and red borders display on fields which require data.
To resolve the validation error:
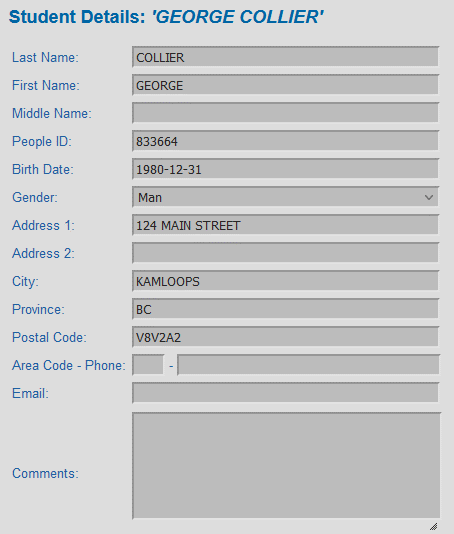
- Enter the required data and click on Submit:
- The corrected data is successfully submitted and saved:
TIP: The required ‘Student Details’ fields are indicated with a red border. The other fields are optional. 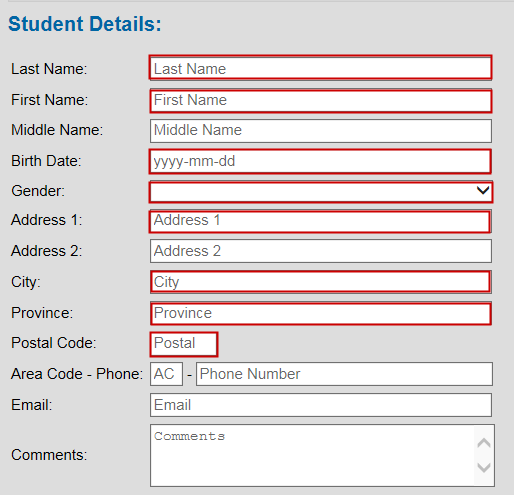
|
Incorrect data format
If the data format is incorrect, upon submit, a red validation error message displays at the top of the form, and red borders display on the fields containing data entered in an incorrect format.
To resolve a validation error:
- Hover the cursor over the field to view the tool tip message displaying details about the expected format:
- Enter the data in the required format and click on Submit:
- The corrected data is successfully submitted and saved:
TIPS - Data entered in lower case is saved as UPPER CASE.
- In fields containing drop down menus, you can use the mouse to select an option, or type in the first letter of the value, then use Tab to go to the next field.
- Student Details cannot be submitted unless data is entered in all the required fields.
- Student Details cannot be submitted unless data is entered in the correct format.
- To view a tool tip with the expected data format, hover your cursor over the field.
- To view a tool tip for correcting a validation error, hover your cursor over the field displaying the red border.
- The postal code field allows 6 characters for a postal code or 5 numbers for a zip code.
For example: V2V3A3, 98281 - The phone field allows 7 characters, no hyphen. For example: 5554321
- The email address must include the domain info.
For example, name@domain.com: jsmith@gmail.com; john.doe@email.ca; janedoe@telus.net
|
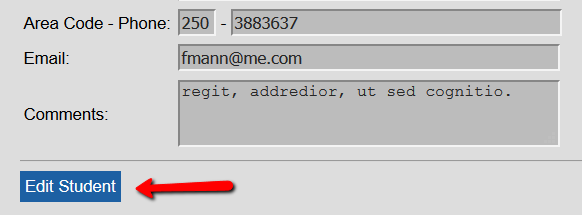
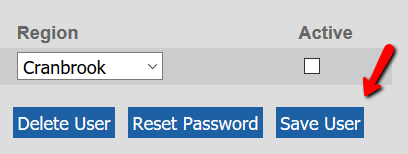
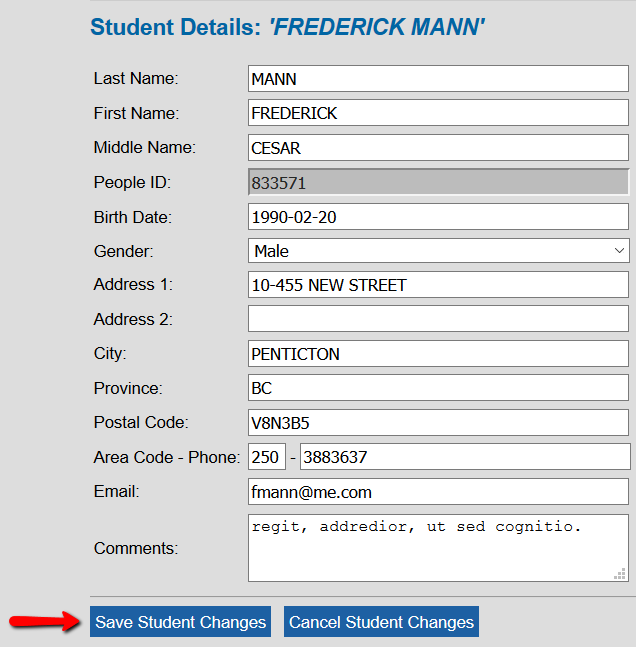
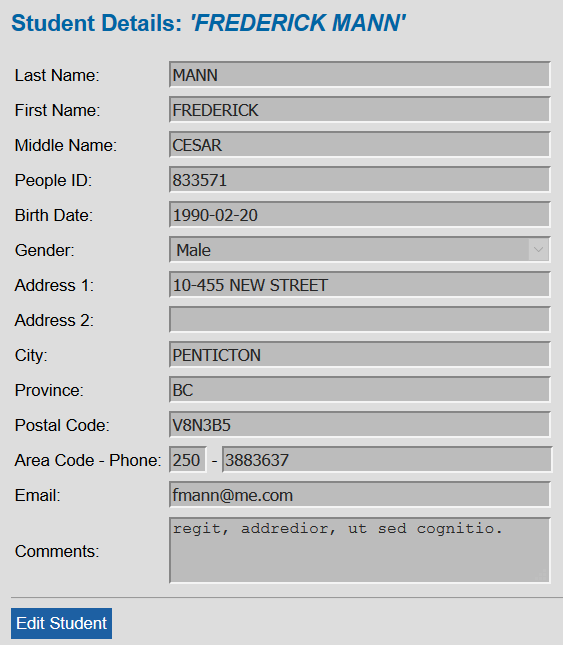
Edit Student (Client) Details
To edit Student Details such as name, address, telephone, email address, or comments:
- Click on Edit Student at the bottom of the ‘Student Details’ form:
- In the ‘Student Details’ form, all fields can be edited, except for the unique identifier number called the People ID.
Enter updated information in the fields and when all changes are entered, click on Save Student Changes:
| → | 
|
ADDRESS CHANGES
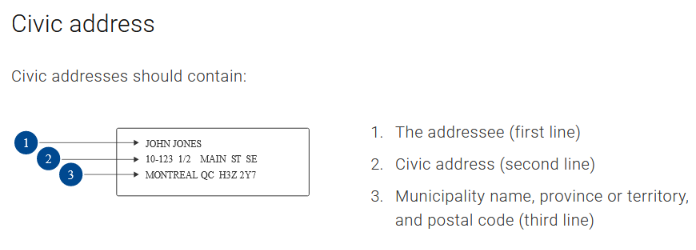
Canada Post Guidelines
When checking or updating a person’s address, please refer to the Canada Post guidelines. A correctly formatted address will ensure that the person receives their certificate and wallet card/secure photo ID card in the mail without delay. See Canada Post examples below.
1. Civic address |
|
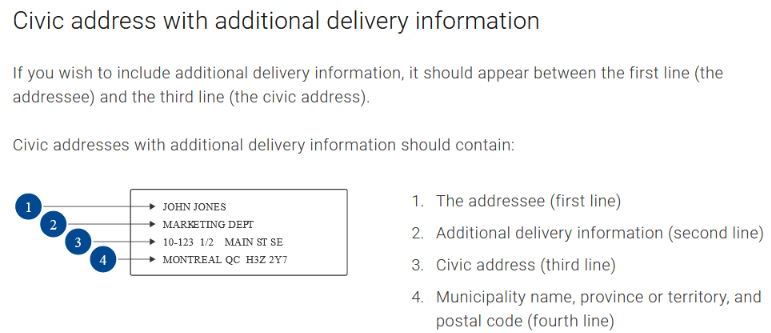
2. Civic address with additional delivery information |
|
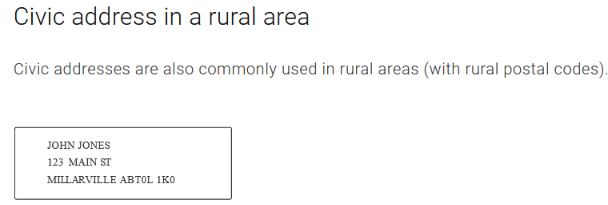
3. Civic address in a rural area |
|
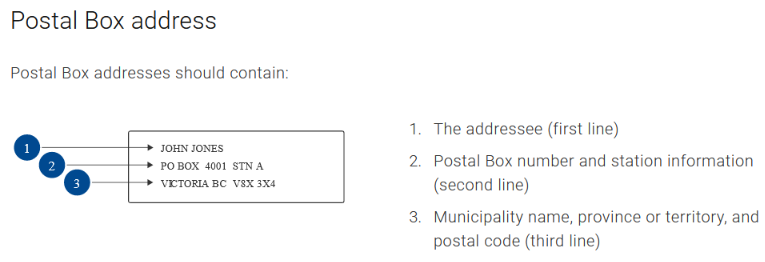
4. Postal Box address |
|
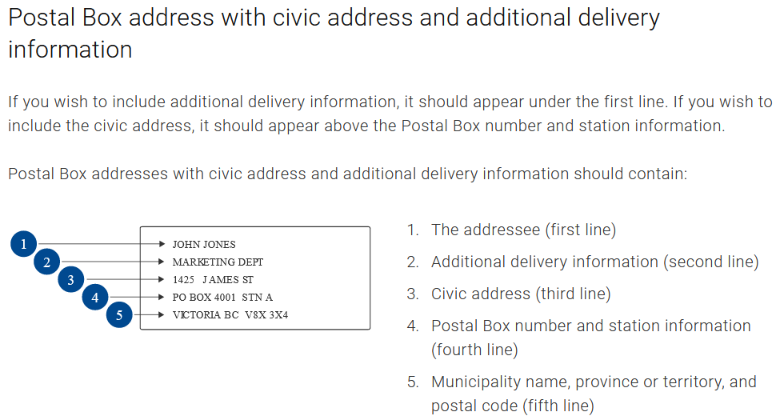
5. Postal Box address with civic address and additional delivery information |
|
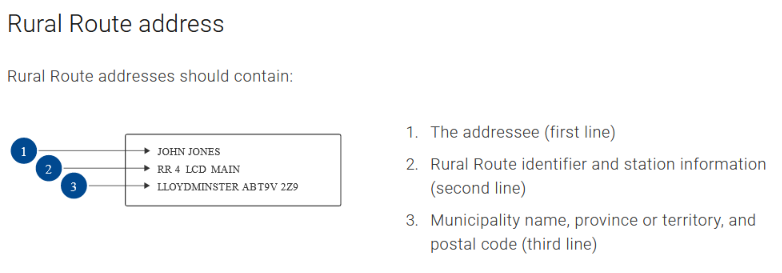
6. Rural Route address |
|
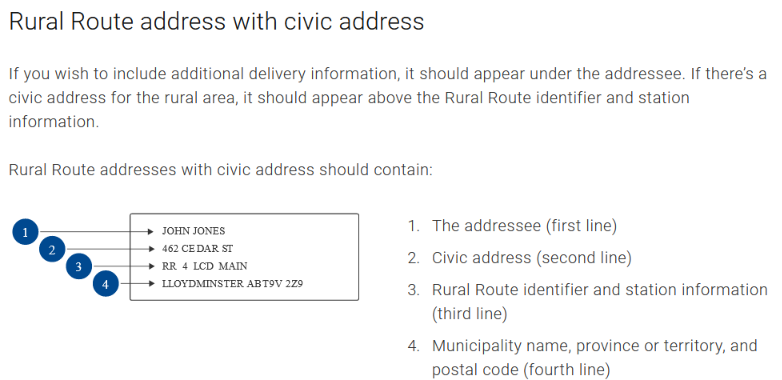
7. Rural Route address with civic address |
|
8. Rural route address with additional address information |
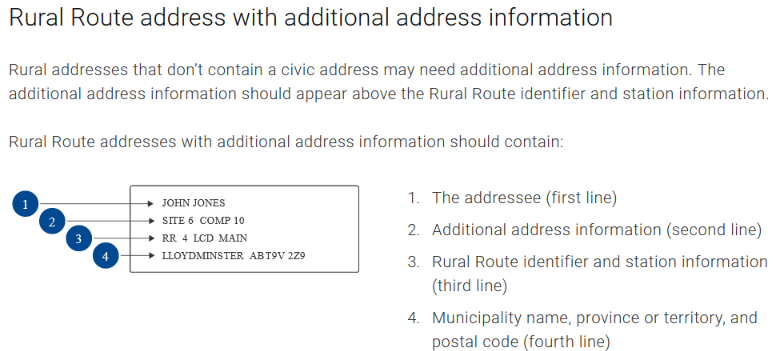
|
9. General Delivery Address |
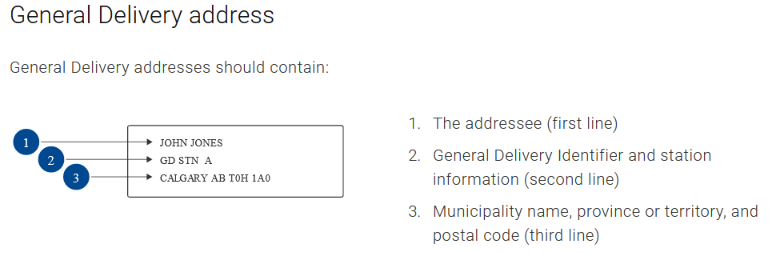
|
Address Format Safeguards
Open School System
If a client has taken a course with Open School BC, their personal details and exam data are submitted by Open School’s system to the Registry, in a system-to-system transfer of data.
Open School has implemented the following safeguards to ensure that clients are entering contact information according to Canada Post Guidelines:
- The Open School system checks for # sign and commas to prevent entry of symbols.
- A separate field is provided for unit numbers. When the address is submitted to the Registry a hyphen is added between unit number and street address in the Address 1 field.
- Instructions are included on the Open School registration form advising students of proper format.
Address Format Safeguards in the Registry
For client data that is manually entered or edited by Registry users, the following Registry safeguards are in place to minimize errors:
- The First Name field has a character limit of 15.
- The Middle Name field has a character limit of 15.
- The Last Name field has a character limit of 35.
- The Address 1 field has a character limit of 25 characters.
- The Address 2 field has a character limit of 25 characters.
- The Province field accepts two characters. Example: BC, YT.
- The Postal Code field accepts 6 characters in the following format.
Example: V8V2P9; and 5-digit zip codes. Example: 98281. - A validation error occurs when the user attempts to save incorrectly formed data.
- When the cursor hovers in a data field, tool tips instruct the user on the required format.
ADD NEW CERTIFICATION
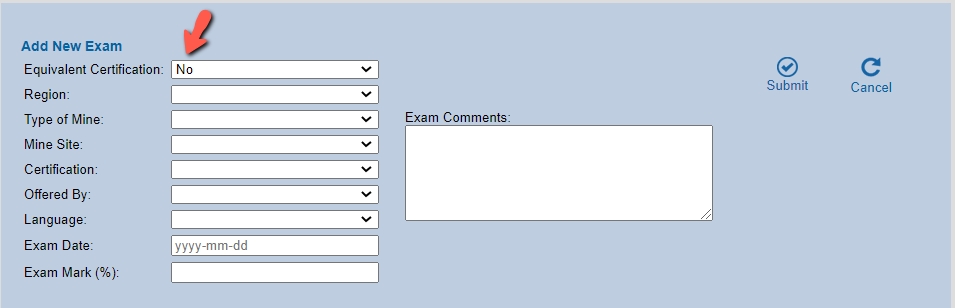
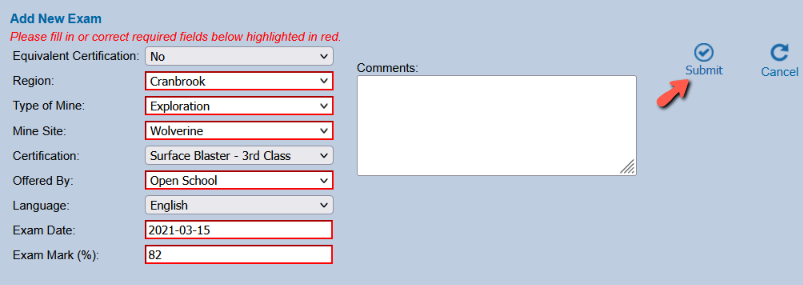
Add New Mine Supervisor Certification
TIP: The online course for the Mine Supervisor certification is available exclusively through Open School BC. When a client completes the course, the exam results are submitted by Open School to the Registry in a system-to-system transfer of data. The only time manual entry of exam results is required is if the data is not successfully transferred to the Registry. For manual entry, please follow the steps below. |
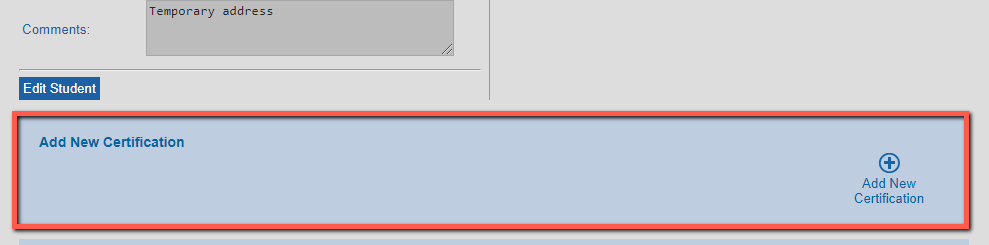
The Add New Certification panel displays below the saved ‘Student Details’ form:
To manually add a Mine Supervisor certification:
- Click on Add New Certification:
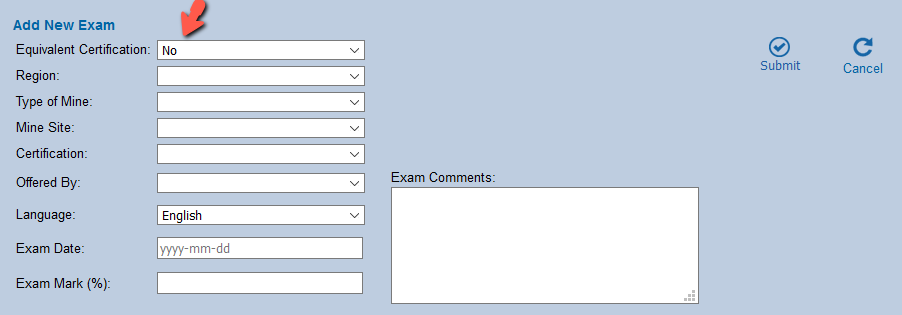
- In the exam form the ‘Equivalent Certification’ field displays the default value, ‘No’.
Skip the Equivalent Certification field and go to the ‘Region’ field.
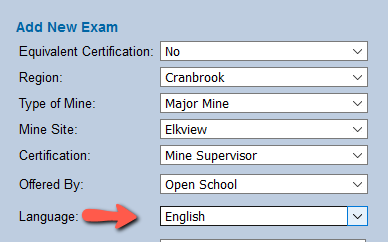
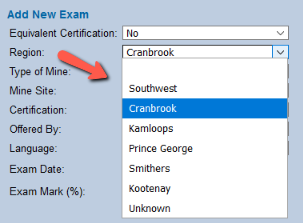
- In the ‘Region’ field, select the client’s current region from the dropdown menu.
If no region is supplied, select ‘Unknown’:
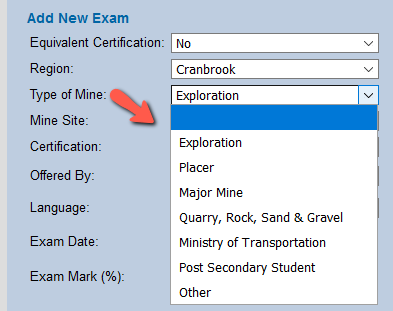
- In the ‘Type of Mine’ field, select the client’s current mine type from the dropdown menu.
If no mine type is supplied, select ‘Other’:
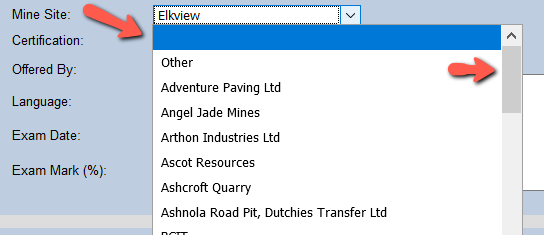
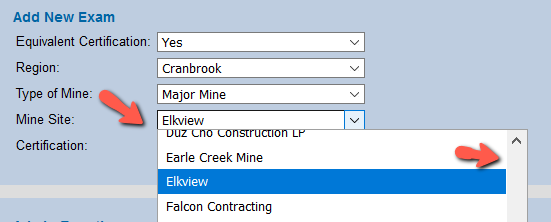
- In the ‘Mine Site’ field, select the client’s current mine site from the list of British Columbia sites in the dropdown menu. If no mine site is supplied, select ‘Other’; or, if the client is attending school, you can select ‘BCIT’ or ‘College of the Rockies’:
| TIPS - Use the scroll bar to move through the alpahabetical list, or
- Type the first letter(s) of the mine site name to advance to that name in the list.
|
- In the ‘Certification’ field, select ‘Mine Supervisor’ from the menu:
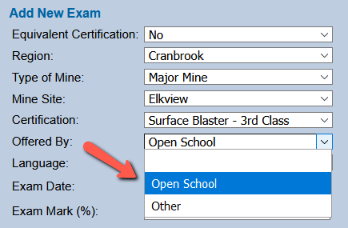
- The Mine Supervisor certification program is an online course offered exclusively by Open School BC.
In the ‘Offered By’ menu, select ‘Open School’:
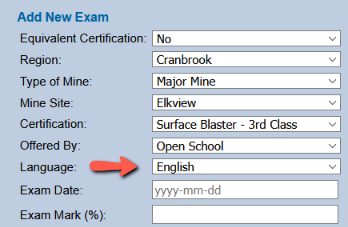
- The ‘Language’ field is pre-populated with the default value, ‘English’, the required language of the exam. Skip to the next field.
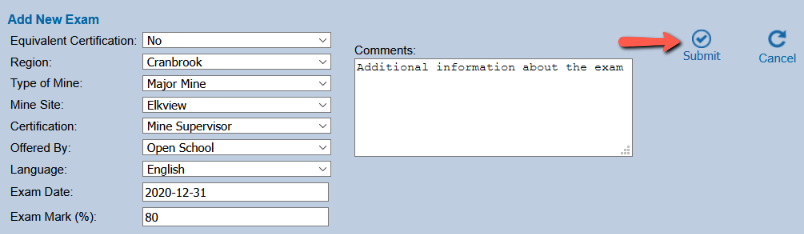
- In the ‘Exam Date’ field, enter the exam date in the following format, including hyphens: yyyy-mm-dd:
- In the ‘Exam Mark’ field, enter the exam mark as a whole number:

|
TIPS - Use numerical entries. Example: 75, 80, 100.
- Enter whole numbers. Do not enter decimals.
- Exam mark must be between 0 and 100.
- Do not enter a % sign.
- The mark required to achieve a passing grade for the Mine Supervisor exam is 80.
|
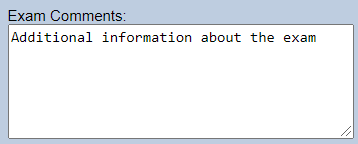
- In the ‘Exam Comments’ field, enter any additional information about the exam (up to 3,500 characters):
- When you have finished entering the exam data, click on Submit:
Add New Blaster Certification
TIPS The Blaster Certifications (OSBC) are: - Seismic Endorsement
- Surface Blaster – 3rd Class
- Surface Blaster – 2nd Class
- Surface Blaster – 1st Class
- Underground Blaster – 3rd Class
- Underground Blaster – 2nd Class
- Undergound Blaster – 1st Class
The online courses for Blaster certifications are available exlusively through Open School BC. When a client completes the course, the results of the exam and interview are submitted by Open School to the Registry in a system-to-system transfer of data. The only time manual entry is required is if the data is not successfully transferred to the Registry.
For manual entry, please follow the steps below. |
Add Technical Exam
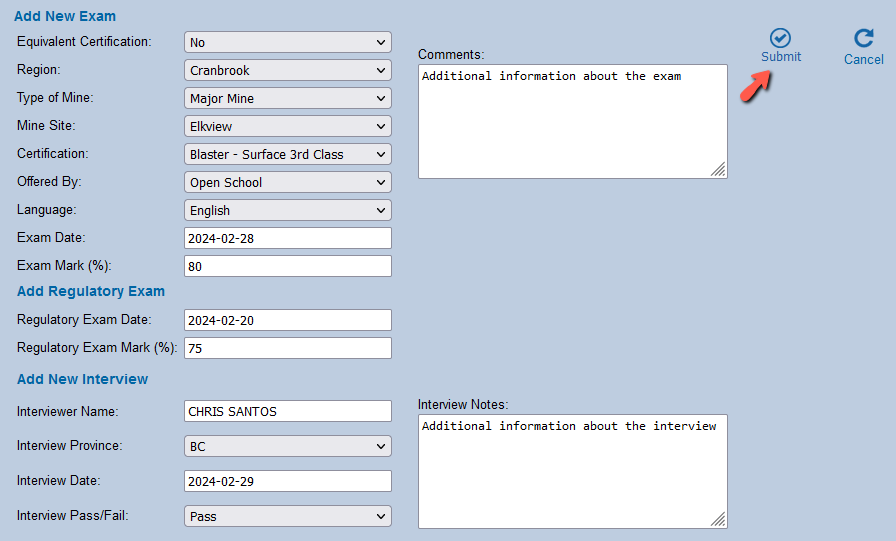
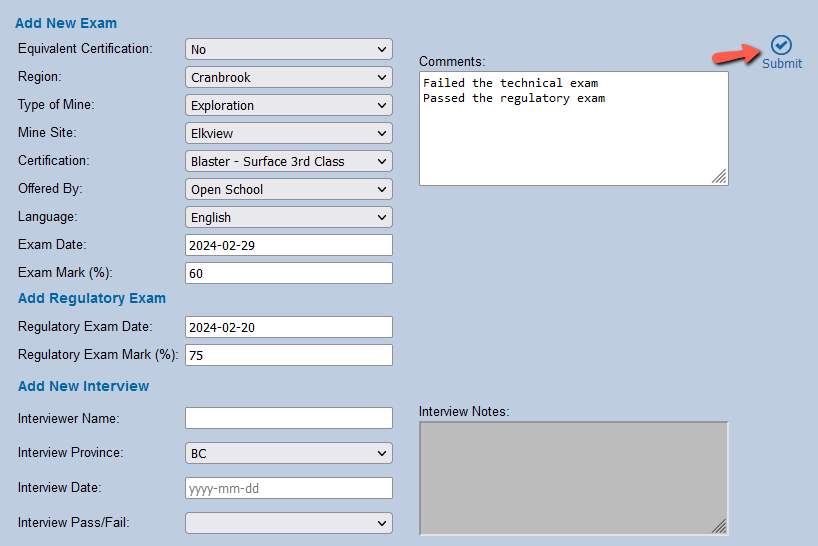
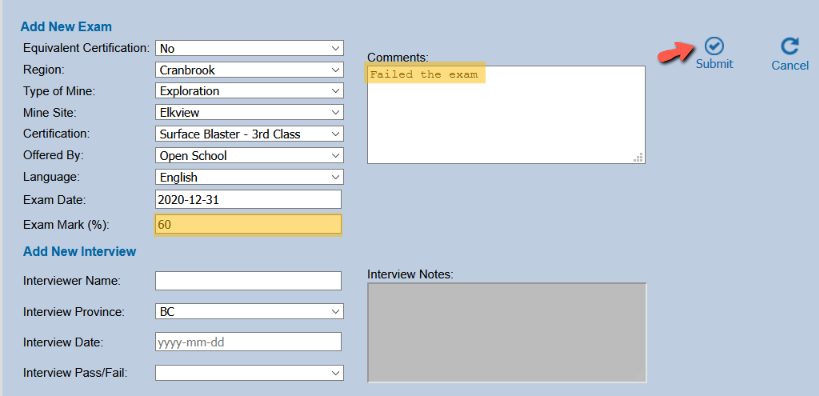
To add a Blaster certification:
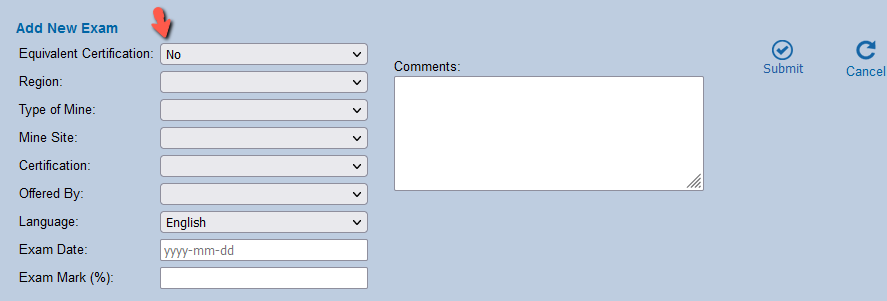
- Click on Add New Certification:
- In the technical exam form ensure that the ‘Equivalent Certification’ field displays the default value, ‘No’:
|
See Section 6.4 Add Equivalent Certification, for instructions on how to enter Equivalent certifications. |
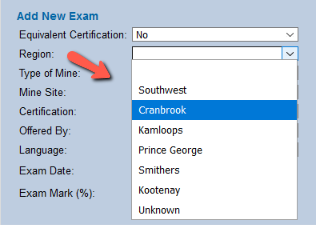
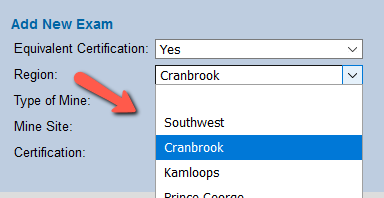
- In the ‘Region’ field, select the client’s current region from the dropdown menu.
If no region is supplied, select ‘Unknown’:
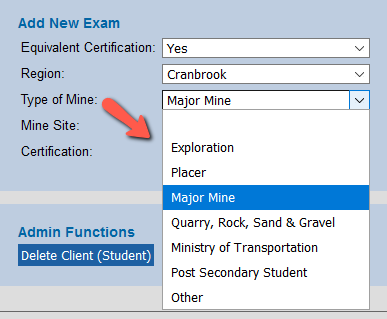
- In the ‘Type of Mine’ field, select the client’s current mine type from the dropdown menu.
If no mine type is supplied, select ‘Other’:
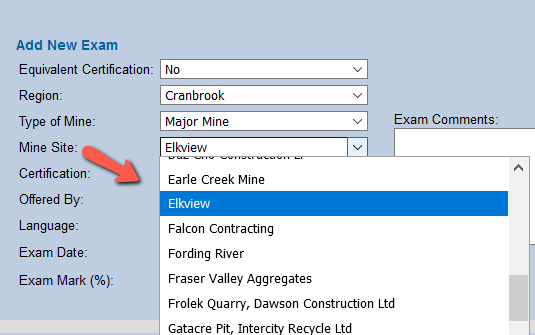
- In the ‘Mine Site’ field, select the client’s current mine site from the list of British Columbia sites in the dropdown menu. If no mine site is supplied, select ‘Other’; or, if the client is attending school, select ‘BCIT’ or ‘College of the Rockies’:
| TIPS - Use the scroll bar to move through the alpahabetical list, or
- Type the first letter(s) of the mine site name to advance to that name in the list.
|
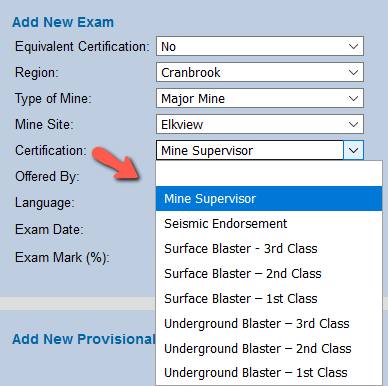
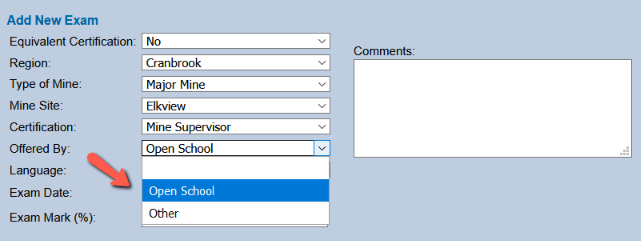
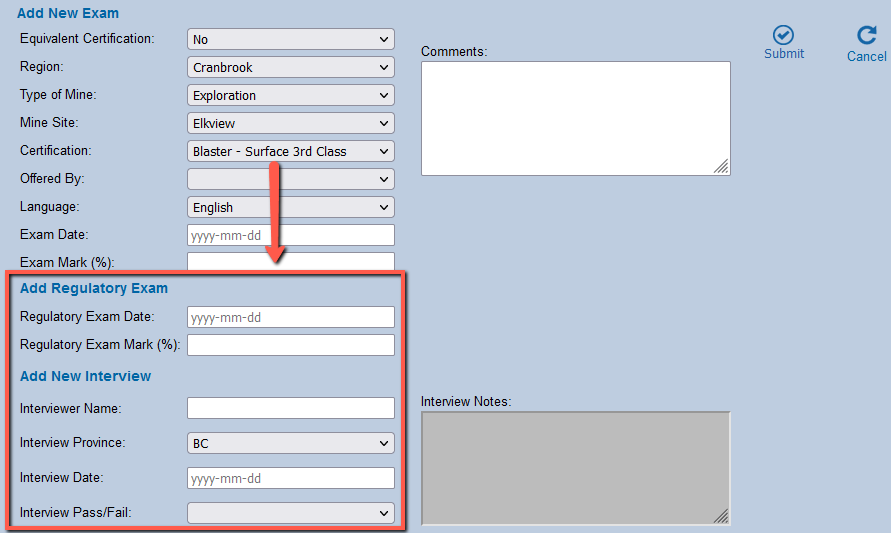
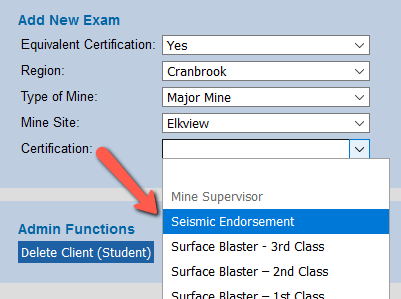
- In the ‘Certification’ field, select one of the seven types of Blaster (OSBC) certifications from the top of the menu:
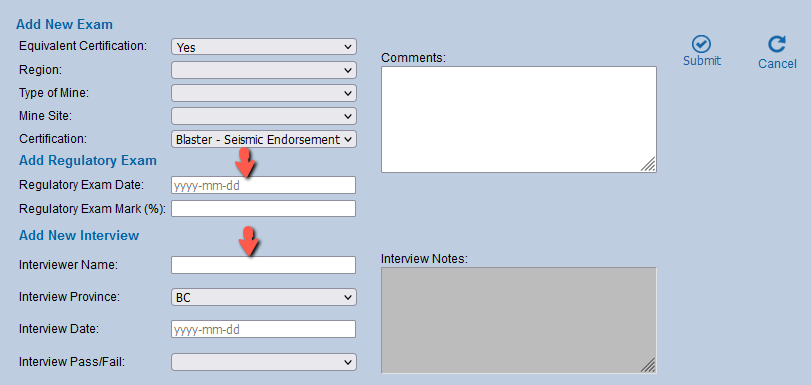
- Upon selection of a Blaster (OSBC) certification, a regulatory exam form and an interview form opens.
- Finish entering data in the technical exam fields. In the ‘Offered By’ menu, select ‘Open School’:
- The ‘Language’ field is pre-populated with the default value ‘English’, the required language of the exam. Skip to the next field.
- In the ‘Exam Date’ field, enter the exam date in the following numerical format, including hyphens: yyyy-mm-dd:
- In the ‘Exam Mark’ field enter the exam mark as a whole number:
- In the ‘Exam Comments’ field enter any additional information about the exam (up to 3,500 characters):
- When you have finished entering the technical exam data, continue to the regulatory exam form.
TIPS Technical Exam Details - Use numerical entries. Example: 75, 80, 100.
- Enter whole numbers. Do not enter decimals.
- Exam mark must be between 0 and 100.
- Do not enter a % sign.
- The marks required to achieve a passing grade on the new Blaster exams are as follows:
Blaster Certification Types | Passing Mark | Seismic Endorsement | 75 | Surface Blaster– 3rd Class | 75 | Surface Blaster – 2nd Class | 75 | Surface Blaster – 1st Class | 80 | Underground Blaster – 3rd Class | 75 | Underground Blaster – 2nd Class | 75 | Underground Blaster – 1st Class | 80 |
- To submit a Blaster exam that has a failing technical exam mark, enter the technical exam details plus the regulatory exam details, but skip the interview form, and submit.
|
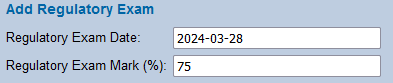
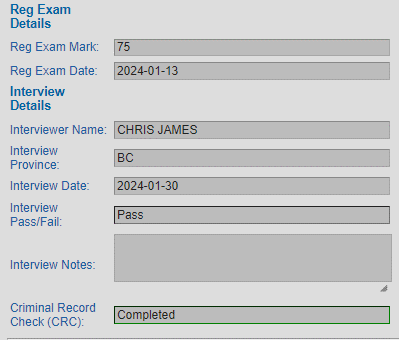
Add Regulatory Exam
In the Regulatory Exam form:
- Enter the ‘Regulatory Exam Date’ in the following format, including hyphens: yyyy-mm-dd.
- Enter the ‘Regulatory Exam Mark’ as a whole number.
TIPS - The passing mark for Blaster regulatory exams is 75.
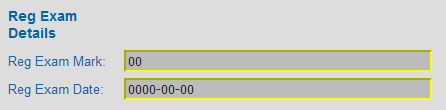
- It is expected that new Blaster exam results will be submitted to the Registry with both technical and regulatory exam data; however, if regulatory exam data is missing, it will not cause a validation error in the Registry.
- If regulatory exam data is missing in new Blaster (OSBC) exam results or in existing Blaster (OSBC) exam results, default values of ‘0’ are entered automatically in the date and mark fields and yellow highlighting displays.
- When both the regulatory exam date and mark are available for entry:
- Select Edit Certification:
- Enter the mark and date and Save Certification Changes:
- Upon Save, the regulatory exam date and mark are locked from further editing.
|
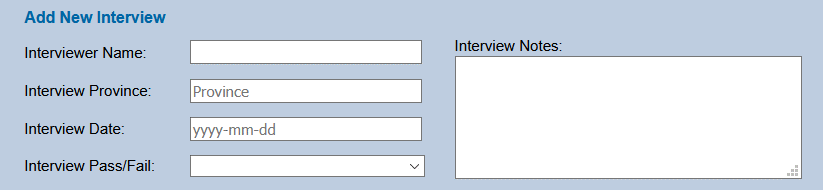
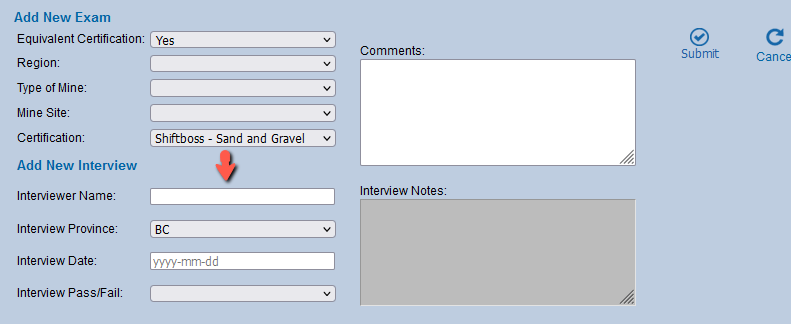
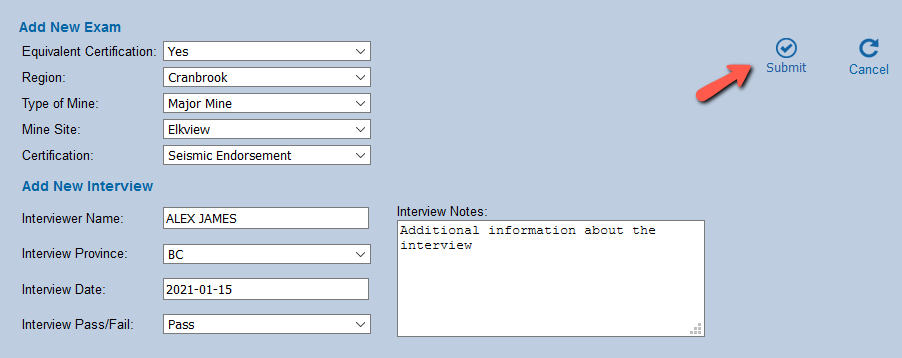
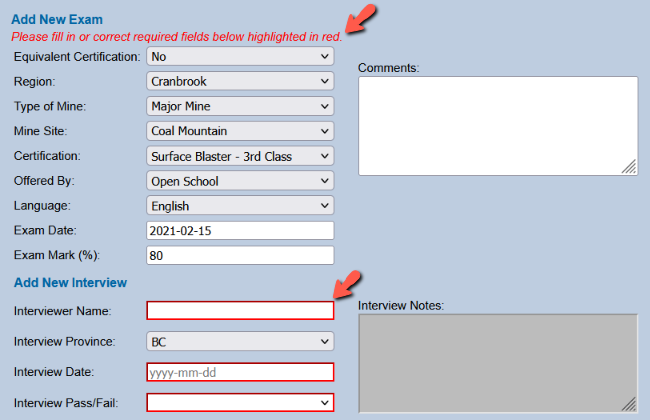
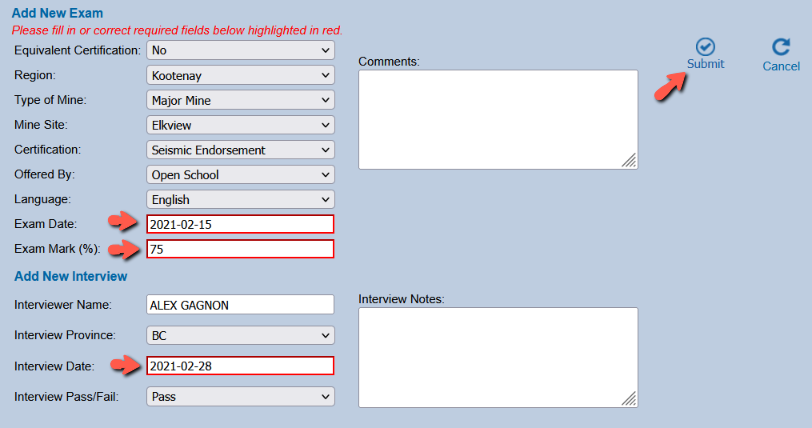
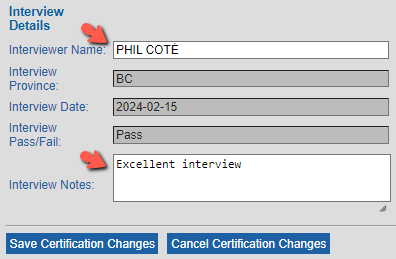
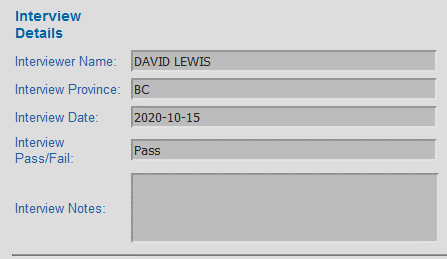
Add Interview
Clients who pass the Blaster regulatory and technical exams are required to complete an interview with an inspector who is certified as an examiner/interviewer.
To manually add the Interview data:
- In the ‘Interviewer Name’ field, type in the name of examiner/interviewer:
- The ‘Province’ field is pre-populated with the province of ‘BC’. Skip to the next field.
- In the ‘Interview Date’ field, enter the date in the following format, including hyphens: yyyy-mm-dd
- In the ‘Interview Pass/Fail’ field, select ‘Pass’ or ‘Fail’:
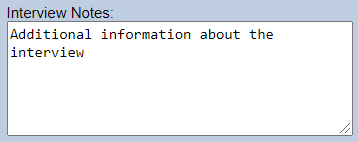
- When the first four fields are filled in, the ‘Interview Notes’ field is enabled.
Enter any additional information about the interview in the Interview Notes field (up to 1,000 characters):
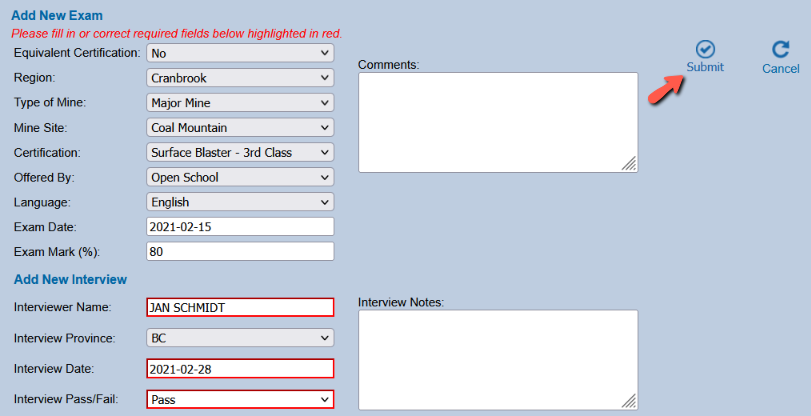
- When you have finished entering the exam and interview data, click on Submit:
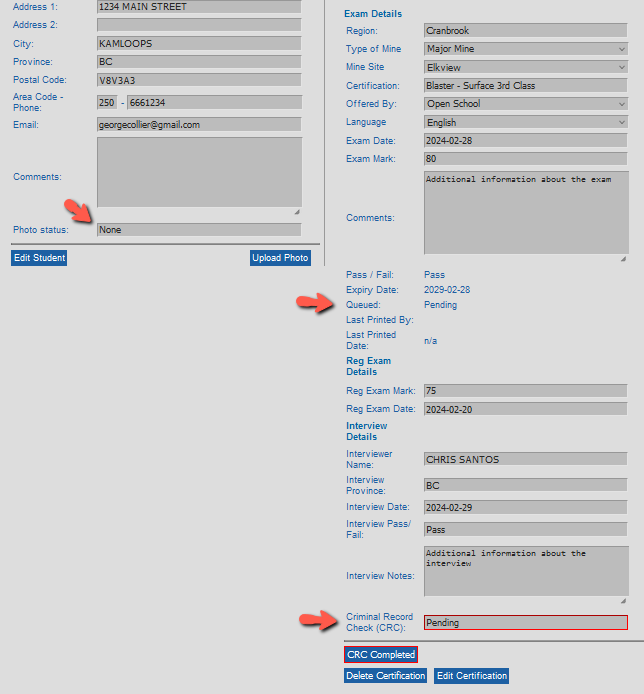
Add Criminal Record Check
Upon submission of the Blaster exam and interview results, the status of the Blaster certification is as follows:
- Photo status = None (or ‘Expired’ if a previous Blaster certificate is present and has a last printed date).
- Criminal Record Check status = Pending
- Queued status = Pending
There are two additional steps to complete before the Blaster certificate and the secure photo ID card can be issued.
- Upload a headshot photo, and
- Complete the Criminal Record Check.
If uploading the photo headshot first:
- Click on the Upload Photo button and follow the prompts in the photo application (see Part 7).
- Upon completion of Photo Upload:
- Photo status = Current
- Criminal Record Check status = Pending
- Queued status = Waiting (for CRC)
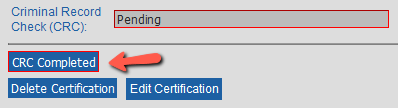
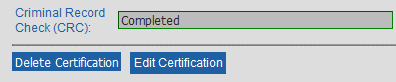
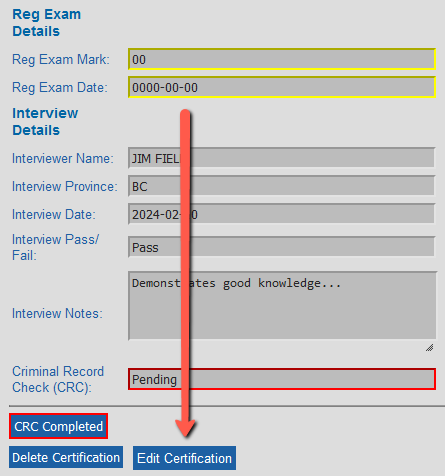
- Next, confirm that the client has completed their mandatory criminal record check, and click on the CRC Completed button.
- Upon completion of the Criminal Record Check:
- The Criminal Record Check status changes to ‘Completed’ and the field is highlighted in green:
- The queued status changes to ‘Yes’ and the certificate and photo ID card are automatically added to the print queue for printing by BC Mail Plus:
TIPS - When the Criminal Record Check is performed before the Upload Photo:
- Photo status = None (or Expired if another Blaster is present that has a last printed date)
- Criminal Record Check status = Pending
- Queued status = Pending
- Existing Blaster (OSBC) certifications, with a last printed date, can be reprinted without the Criminal Record Check. For Blaster reprints the CRC status can be ‘Pending’ or ‘Completed’.
|
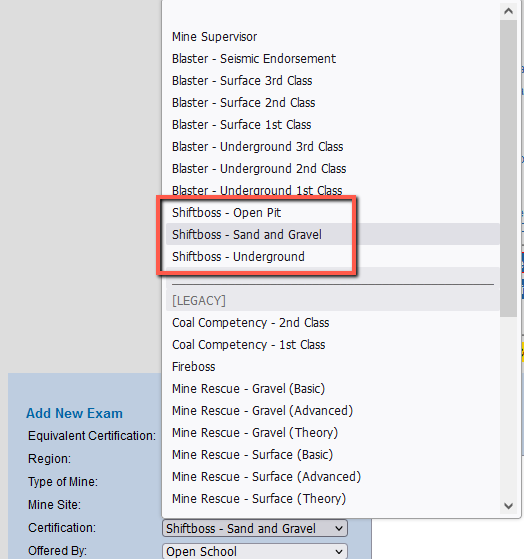
Add New Shiftboss Certification (OSBC)
To add a Shiftboss (OSBC) certification:
- In the Add New Exam form, in the Certification menu, select from the first set of Shiftboss certifications. These are the latest Shiftboss certifications, offered via Open School BC (OSBC).
- Upon submission of successful exam and interview results, the Shiftboss certificate and wallet card are automatically added to the print queue for printing by BC Mail Plus.
TIPS - The new Shiftboss certifications offered via Open School, share the same names as the legacy Shiftboss certifications.
- Shiftboss – Open Pit
- Shiftboss – Sand and Gravel
- Shiftboss – Underground
- To differentiate the Shiftboss (OSBC) and Shiftboss (Legacy) certifications in the Registry, the legacy Shiftboss are labelled with the suffix ‘(Legacy) in all menus, search results, and reports.
 - Certificates and wallet cards for Shiftboss (OSBC) and Shiftboss (Legacy) are the same and do not include the ‘(Legacy)’ suffix.
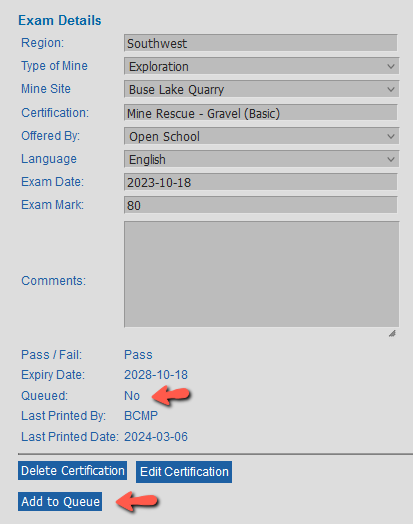
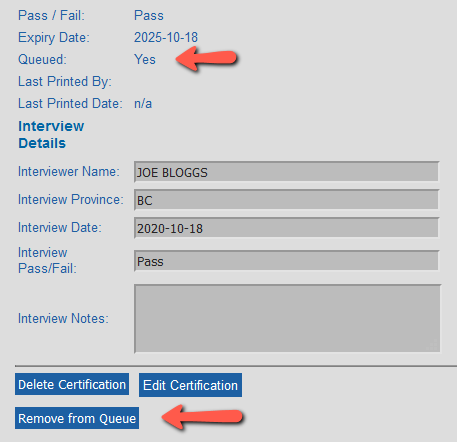
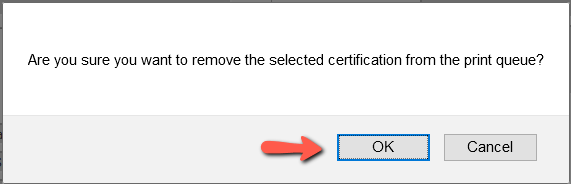
- If adding a Shiftboss (Legacy) certification to the Registry, the automatic add to queue action is disabled.
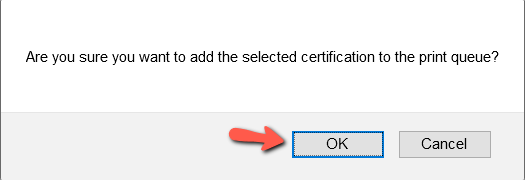
If you need to print the legacy certificate after adding it to the Registry, use the Add to Queue button.
|
Add Equivalent Certification
To manually add an Equivalent certification:
- Click on Add New Certification:
- In the exam form, in the ‘Equivalent Certification’ field, select ‘Yes’ from the menu.
Upon selection of ‘Yes’, a short exam form replaces the long exam form:
Long form 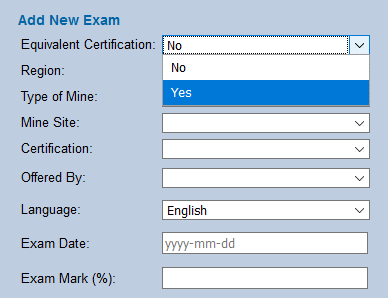
| 🡪 | Short form 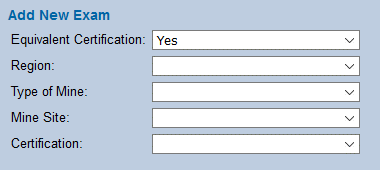
|
- In the ‘Region’ field, select the client’s current region from the dropdown menu.
If no region is supplied, select ‘Unknown’:
- In the ‘Type of Mine’ field, select the client’s current mine type from the dropdown menu.
If no mine type is supplied, select ‘Other’:
- In the ‘Mine Site’ field, select the client’s current mine site from the list of British Columbia sites in the dropdown menu. If no mine site is supplied, select ‘Other’; or, if the client is attending school, you can select ‘BCIT’ or ‘College of the Rockies’:
| TIPS - Use the scroll bar to move through the alpahabetical list, or
- Type the first letter(s) of the mine site name to advance to that name in the list.
|
- In the ‘Certification’ field, select an eligible certification from the menu:
- Upon selection of a:
- Blaster certification, the ‘Add Regulatory Exam’ form and ‘Add New Interview’ form are displayed:
- Shiftboss, Fireboss or Legacy Blaster certification, the ‘Add New Interview’ form is displayed:
- For instructions on completing the Regulatory Exam form, see Section 6.2.2 Add Regulatory Exam.
- For instructions on completing the Interview form, please see Section 6.2.3 Add Interview.
- When you have finished entering the applicable reg exam and interview data, click on Submit:
- Upon submit the Equivalent status is ‘Yes’ and the equivalent field is highlighted in green:
TIPS The following certification types are eligible for equivalent certifications: - Blaster
- Shiftboss
- Fireboss / Coal Competency
Equivalent Blaster Certifications - Blasters holding certifications from another province or territory in Canada can apply for an Equivalent Blaster certification through the BC Mine Certification Program, offered via Open School BC.
- Applicants for Equivalent Blaster certifications are required to pass a regulatory exam followed by an interview with an inspector-examiner.
- Upon completion of the interview, results are submitted by Open School to the Registry in a system-to-system transfer of data.
- Blaster certificates and secure photo ID cards are issued to successful Equivalent Blaster applicants.
- The only time manual entry of Equivalent results is required is if the data is not successfully transferred from OSBC to the Registry. For manual entry, please follow the steps below.
|
Validation Errors on the Exam and Interview Forms
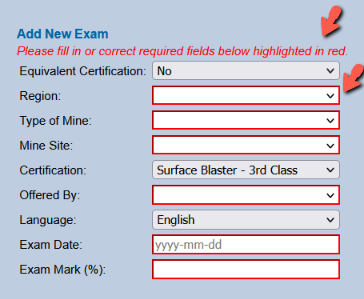
Missing data in exam fields
- When an exam form is submitted with blank fields, a red validation error message displays at the top of the form, and red borders display on exam fields which require data:
- To resolve the validation errors, enter data in the blank fields, and, if applicable, fill in the interview form.
Re-submit.
Missing data in regulatory exam fields for Blaster exams
It is expected that new Blaster (OSBC) exam results will be submitted to the Registry with both technical and regulatory exam data; however, if regulatory exam data is missing, it will not cause a validation error in the Registry.
If regulatory exam data is missing in new Blaster (OSBC) exam results or in existing Blaster (OSBC) exam results, default values of ‘0’ are entered automatically in the date and mark fields and yellow highlighting applied.
When both the regulatory exam date and mark are available,
- Select Edit Certification:
- Enter the date and mark and Save Certification Changes:
- Upon Save, the regulatory exam date and mark are locked from further editing.
Missing data in interview fields
Blaster exams with a failing mark are submitted with a blank interview form.
Blaster exams with a passing mark are submitted with a completed interview form.
- If a blank interview form is submitted for an exam with a passing mark, a red validation error message displays at the top of the exam form, and red borders display on the interview fields which require data:
- To resolve the validation errors, enter data in the blank fields and Submit:
TIPS - Interview data is not required for Blaster exam records that have a failing mark.
- Validation errors do not occur upon submission of a blank interview form when the associated exam has a failing mark.
- To manually enter a Blaster exam that has a failing mark, enter the exam details, skip the interview form, and submit the exam:
- A failed exam is saved without the interview form.
- If a completed interview form is submitted with a Blaster exam that has a failing grade, the interview form is saved. An interview grade of pass or fail does not affect the status of the failed exam in this case.
- A certificate cannot be issued on an exam that has a failing grade.
|
Incorrect data format
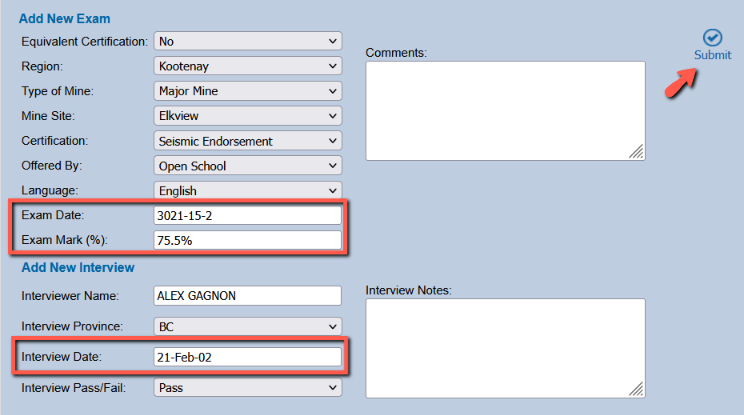
Validation errors occur on exam and interview fields when the data submitted is in an incorrect format.
To resolve a validation error:
- Hover the cursor over the field to view the tool tip message displaying details about the expected format:
- Enter the data in the expected format and click on Submit:
TIPS - Expected format for ‘Exam Date’ and ‘Interview Date’:
- Enter dates in the following numerical format, including hyphens: yyyy-mm-dd.
Example: 2021-03-15. - Do not enter future dates.
- Do not enter dates earlier than 1900-01-01.
- Expected format for ‘Exam Mark’:
- Use numerical entries. Example: 75, 80, 100.
- Enter whole numbers. Do not enter decimals.
- Exam mark must be between 0 and 100.
- Do not enter a % symbol.
|
PHOTO FOR SECURE PHOTO ID
Upload Photo
Clients who achieve a passing grade on a new Blaster certification are issued a certificate and a secure photo ID. A photograph of the certified person is required for the secure photo ID.
Designated staff are responsible for taking photographs and administering photograph files, to ensure they meet the standards and criteria required for successful printing. No selfies please.
See Section 7.2 Photographs, for information on photograph standards and file criteria.
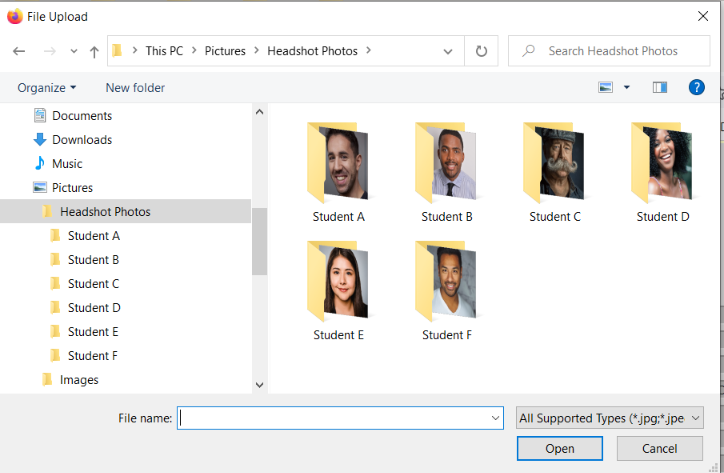
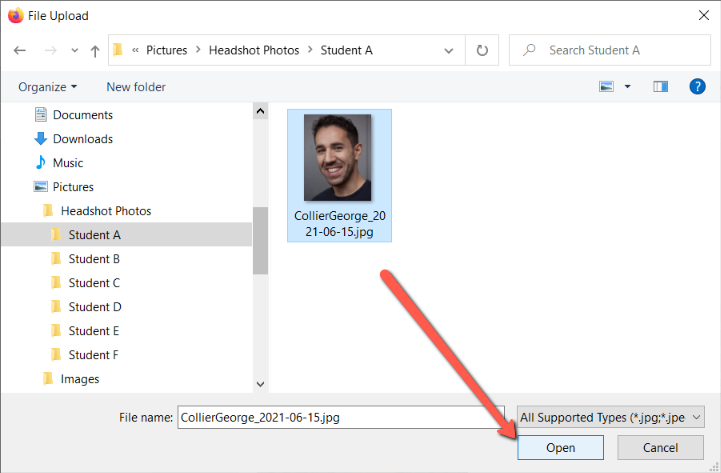
To upload a photo for the new Blaster certification:
- Click on Upload Photo below the client details:
- In the ‘Upload a Photo’ app, click on Click to select an image:
- Navigate to the folder in your directory where the photo files are stored:
- Select the photo file and click on Open:
- Ensure that the green checkmarks
 are displaying next to all the criteria and then click on Submit:
- Upon successful submission of the photo, it is saved in the Registry’s Photo App, and:
- The ‘Photo status’ changes from ‘None’ to ‘Current’ (or from ‘Expired’ to ‘Current’ if another Blaster certification is present):
Photo Status 'None' 
|
Photo Status 'Current' 
|
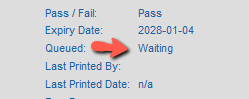
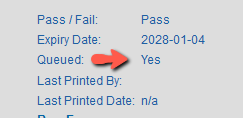
- If the status of the Criminal Record Check is:
- ‘Pending’, the queued status changes from ‘Pending’ to ‘Waiting’. The CRC must be completed before the certificate and photo ID are added to the print queue.
- ‘Completed’, the queued status changes from ‘Pending’ to ‘Yes’, and the certificate and photo ID are automatically added to the print queue.
Queued Status – Waiting for Criminal Record Check 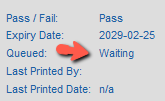
| Queued Status – Yes, added to print queue 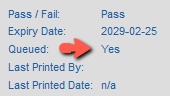
|
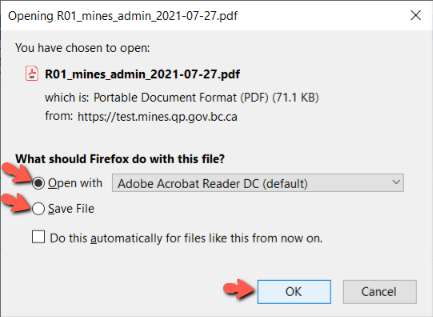
- Once the queued status is ‘Yes’ the Registry generates a Blaster certificate and secure photo ID in PDF format, and adds them to the queue for printing by BC Mail Plus. BC Mail Plus downloads the certificate files for printing and shipping and clears the queue.

|
Secure Photo ID Front 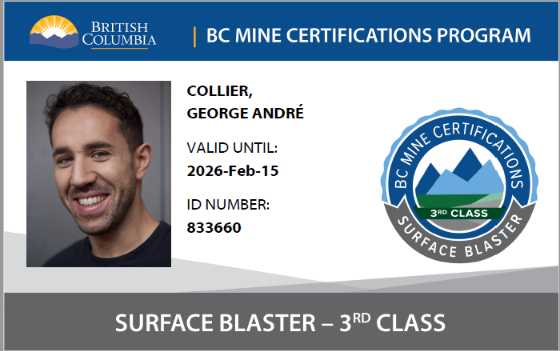
| Secure Photo ID Back 
|
Certificate 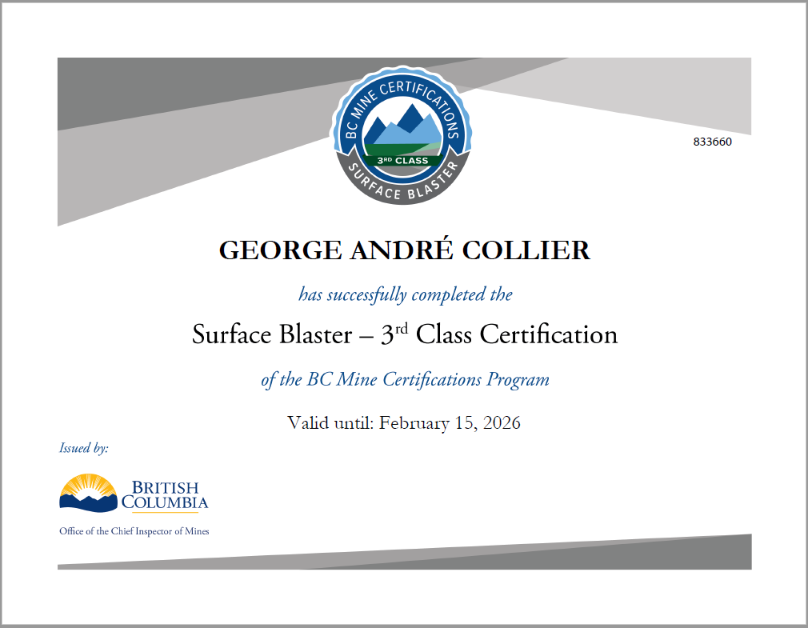
|
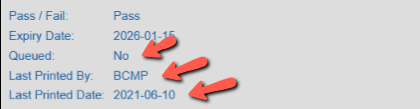
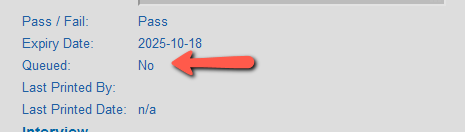
- After BC Mail downloads and clears the queue:
- The Queued status changes to ‘No’.
- The Last Printed By field displays the username of the person who downloaded the queue.
- The Last Printed Date field displays the date of the queue download:
TIPS - The Photo App only stores one photo: the newest photo.
- A new photo must be uploaded for each new Blaster certification.
- If a client requires a reprint for any active Blaster certification, the latest photo is used for the secure photo ID.
- If another active Blaster certification is present when a new Blaster certification is submitted, the photo status changes from ‘current’ to ‘expired’ until a new photo is uploaded for the new certification.
- If a reprint is needed for an existing Blaster (OSBC) certification before a new photo is uploaded for the newest certification, the last photo is used.
- Existing Blaster (OSBC) certifications, with a last printed date, can be reprinted without the Criminal Record Check.
For Blaster reprints the CRC status can be ‘Pending’ or ‘Completed’.
|
Photographs
Photographer Instructions
Photographers taking photographs of the client must ensure the photograph meets the standards.
Once you’ve taken the photo and ensured that it meets the standards, please send the photo file to the Ministry for processing and uploading to the Registry. Email: mine.certifications@gov.bc.ca
PHOTOGRAPH STANDARDS |
No selfies. Digital cameras or cell phone cameras are acceptable. |
Camera Settings |
- Flash: off
- Format: JPG, JPEG
- File Size: maximum 1,800 KB / 1.8 MB
- Picture Size / Shape: rectangular portrait, not square
|
Photo Composition |
- Take the photo against a neutral background such as a blank wall, or a solid door.
- Hold the camera in a portrait orientation (not landscape).
- Include head and shoulders within the frame, with some extra room at the top and sides.
|
Photo Quality |
- Ensure that the photo is not blurry.
- Ensure that the photo is neither too dark nor too bright.
- Ensure that the lighting does not cause reflections in eyeglasses.
- Do not crop.
- Do not use photo filters or effects.
|
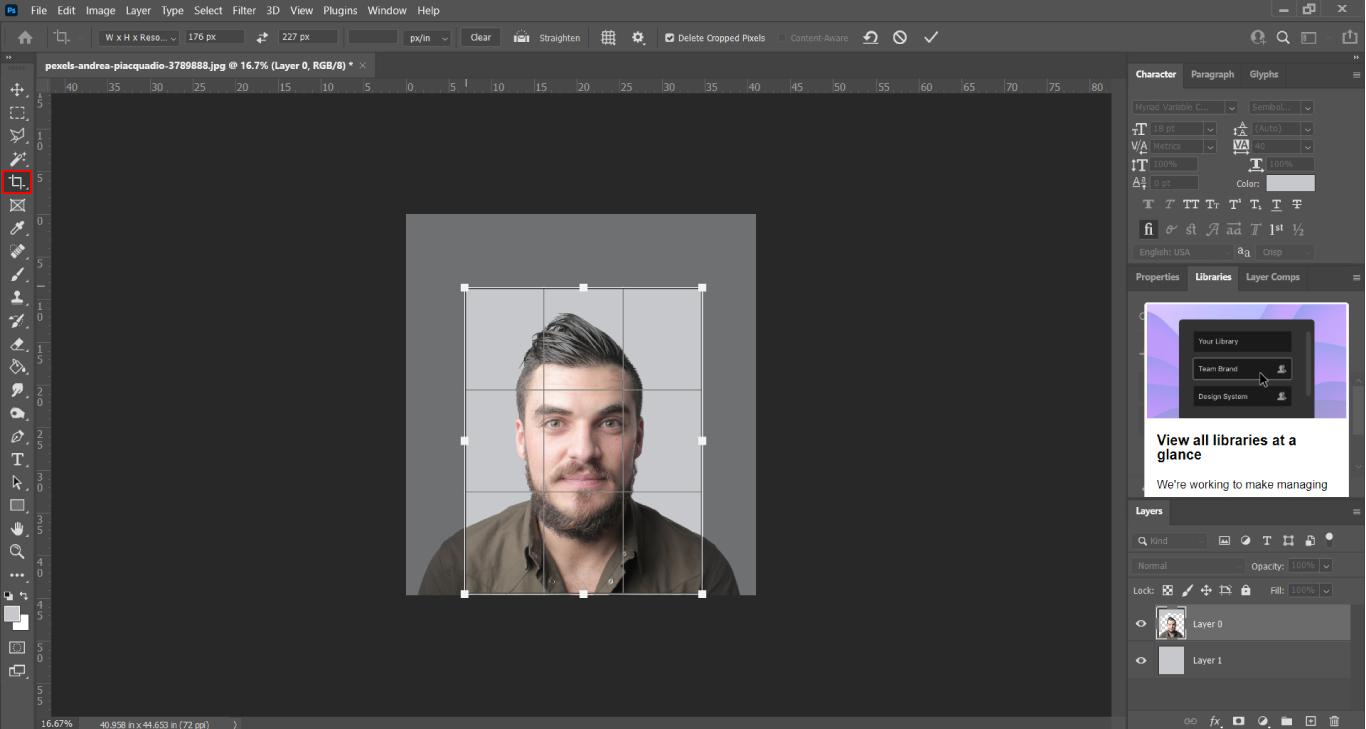
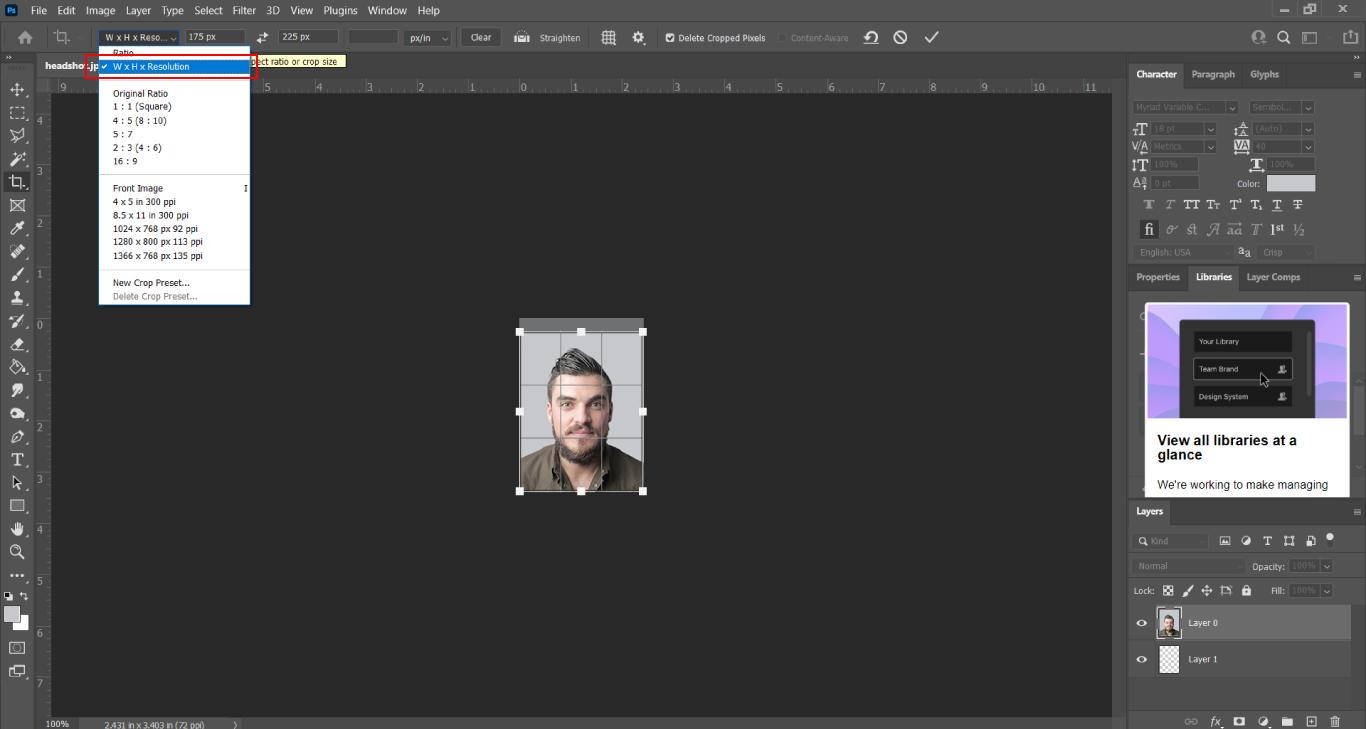
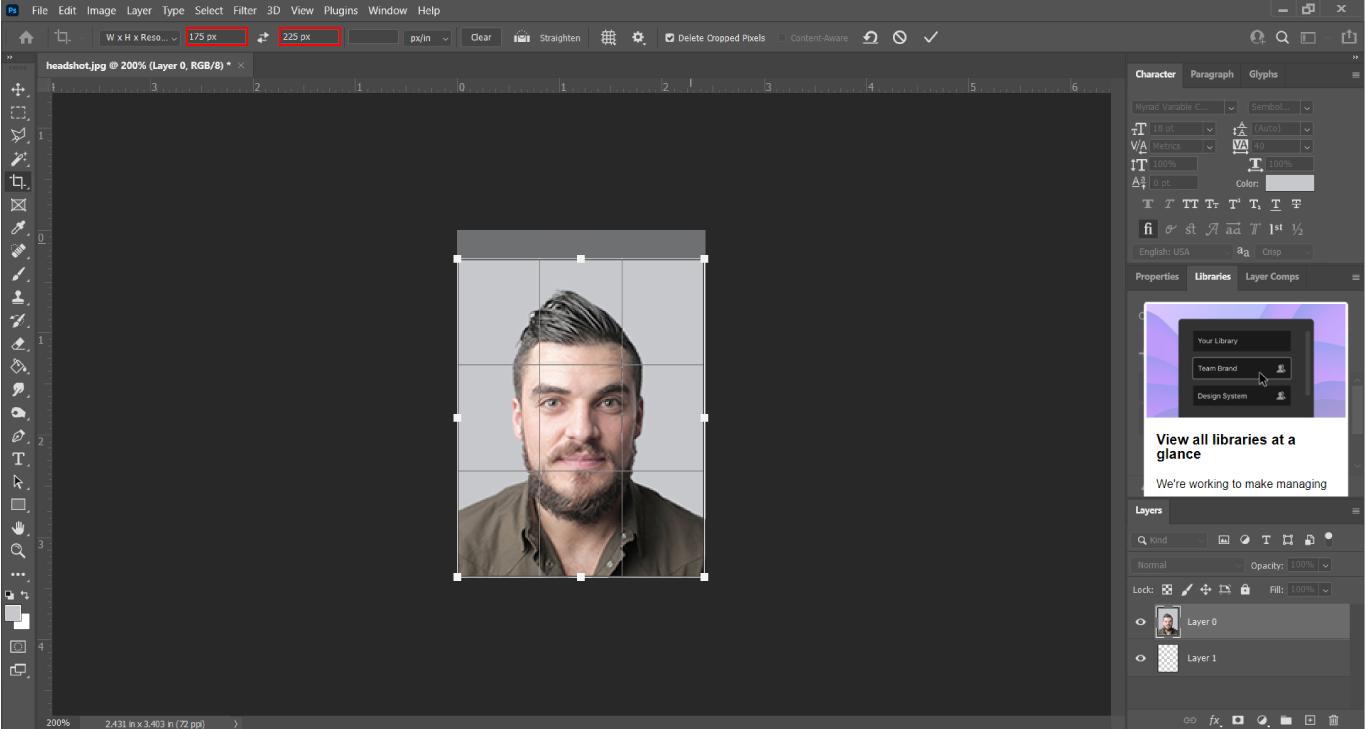
Photo Administrator Instructions, Adobe Photoshop (Online Version)
Upon receipt of the photo file from the photographer, check that the photograph standards have been met.
See Section 7.2.1 Photographer Instructions.
In preparation for upload to the Registry:
- Open the photo file in Photoshop:
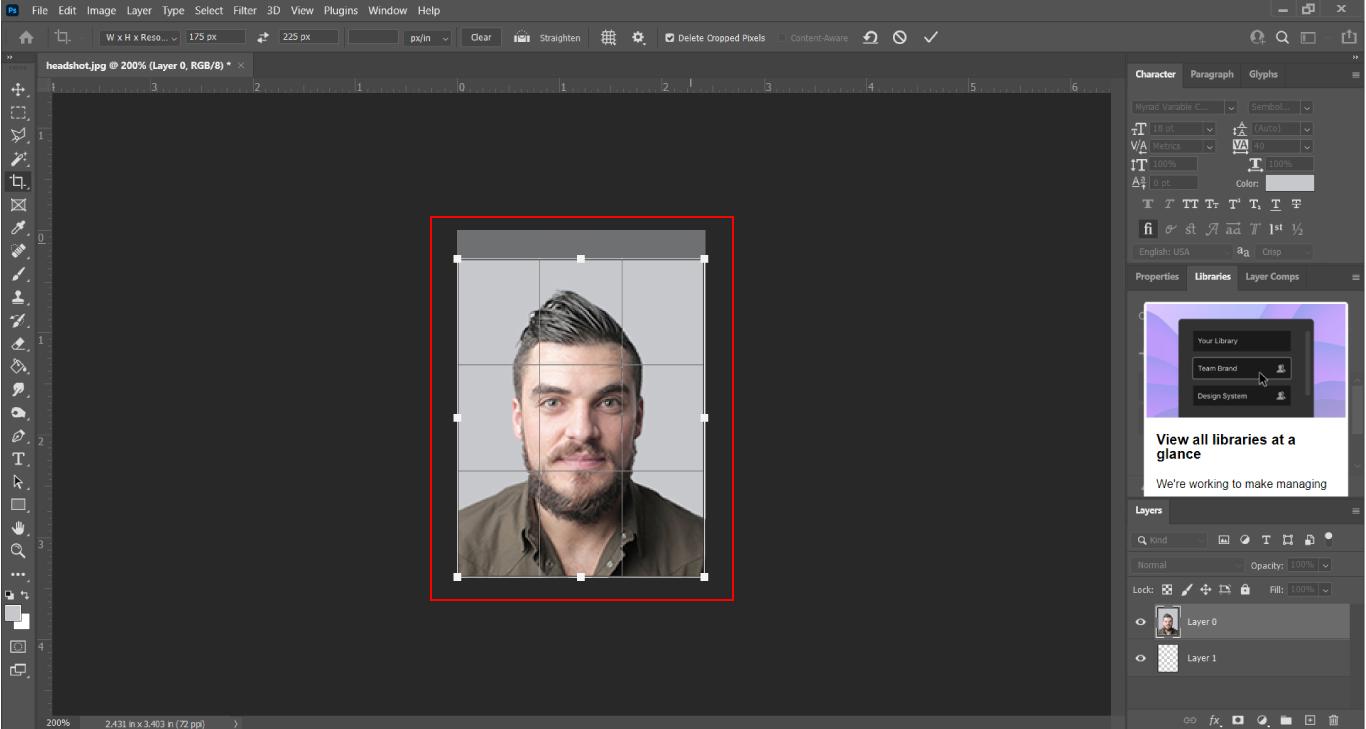
- Select the crop tool from the tool bar on the left-hand side:
- In the top bar you will see a dropdown menu. Select W x H x Resolution:
- Next to the dropdown menu, in the ‘width’ field enter ‘175’ px. In the ‘height’ field, enter ‘225’ px:
- Drag the crop tool over the image to select the area you want to capture:
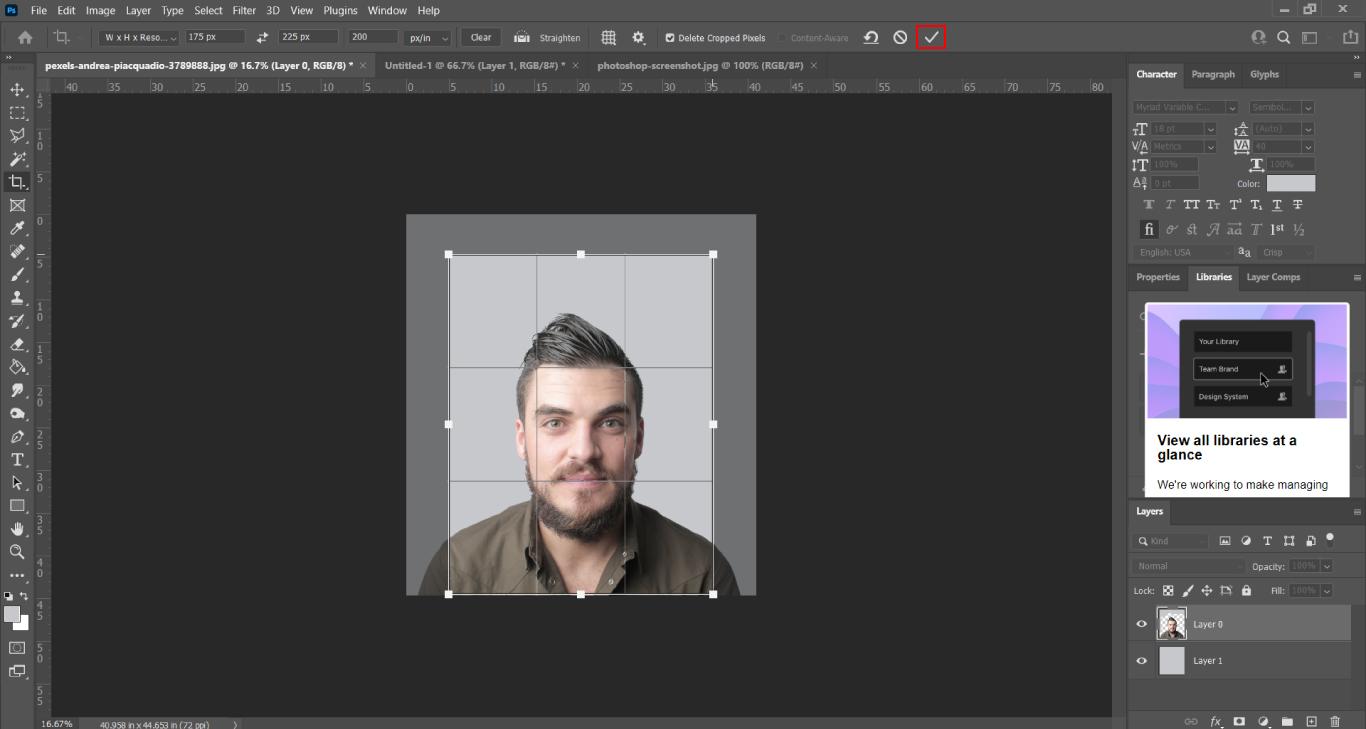
- In the top bar, click the checkmark to confirm:
- In the Menu bar, select File > Save As to create a new copy.
- Name the file according to Ministry file name conventions. Example: ‘LastnameFirstname_YYYYMMDD.jpg’
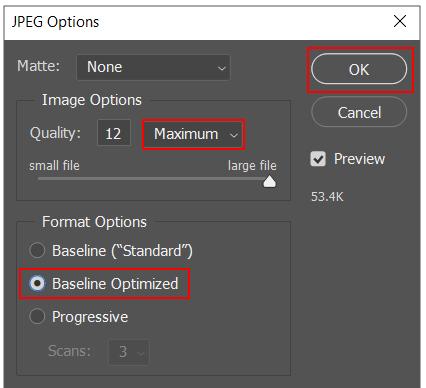
- When prompted by the JPEG options dialogue:
- Ensure ‘Quality’ is set to Maximum.
- Under ‘Format Options’ select Baseline Optimized.
- Click OK
- Close the file.
- Open the Registry, open the client’s record and upload the photo.
See Section 7.1 Upload Photo
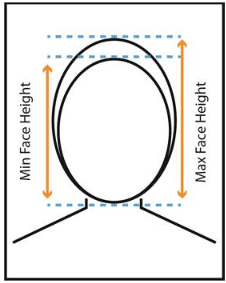
Photo Validation Criteria
The Registry’s Photo App validates the photo file to ensure that the properties of the file meet the criteria needed to print the photo clearly for the Secure Photo ID.
Photo File Criteria |
File type: | jpg/jpeg |
Orientation: | portrait |
File size: | less than 1,800 kb (1.8 mb) |
Dimensions: | 175 x 225 pixels |
Height width ratio: | 1: 1.286 |
Resolution: | minimum 72 pixels per inch |
Upon upload of the photo, if any of the file properties are marked with an X, the photo does not meet the criteria and is considered invalid. The photo cannot be submitted until the file properties are modified to meet the criteria.
When the photo file properties meet the criteria and are all marked with a  , the photo can be submitted.
Figure 1 Photo does not meet criteria 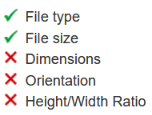
| Figure 2 Photo meets criteria 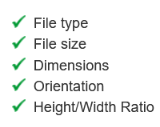
|
To adjust the photo file properties:
- Use Photoshop, or similar software, to modify the file properties.
- When the file properties of the photo meet the criteria, try the ‘Upload Photo’ action again.
- When all criteria are met, the photo can be submitted.
TIP Please contact the Ministry of Energy, Mines and Low Carbon Innovation for information about the equipment and procedures required for meeting the photo standards and criteria. mine.certifications@gov.bc.ca |
Photo Status
There are three possible values for ‘Photo Status’:
| Photo Status Values |
1. | None | 
|
2. | Current | 
|
3. | Expired | 
|
The following table describes possible photo status cases when one or more blaster certificate is present in a client record.
Num | Case Description | Initial photo status upon submission of new Blaster certification | Photo status after photo upload | Criminal Record Check status | Queued
Status after photo upload |
1. | The first new Blaster certification is added to a client record. | None | Current | Completed | Yes Automatically adds new certificates to print queue |
2. | The first new Blaster certification is added to a client record and before a photo is uploaded, additional Blaster certifications are added to the record. | None | Current In this case 1 photo will suffice for all new certificates | Completed | Yes Automatically adds all the new certificates to the print queue and uses the same photo for all |
3. | A new Blaster certification is added to a client record that has an active Blaster certification with a last printed date. | Expired | Current | Completed | Yes Automatically adds new certificate to print queue |
4. | A new Blaster certification is added to a client record that has an expired Blaster certification with a last printed date. | Expired | Current | Completed | Yes Automatically adds new certificate to print queue |
5 | A new Blaster certification is added to the client record and a new photo is uploaded. | None / Expired | Current | Pending | Waiting |
6 | A new Blaster certification is added to the client record and a new photo is uploaded | None / Expired | Current | Completed | Yes |
Update Photo
Client photos can be updated at any time.
To update a photo in the client record:
- Click on Update Photo:
- Follow the steps under Section 7.1 Upload Photo.
LEGACY CERTIFICATIONS
Add Legacy Certification
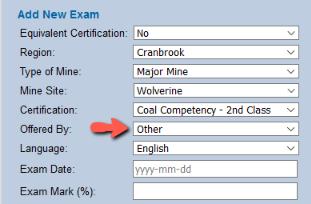
To manually add a Legacy certification for the Shiftboss, Fireboss/Coal Competency, Mine Rescue and Blaster categories:
- Click on Add New Certification:
- In the exam form, select ‘Yes’ or ‘No’ from the ‘Equivalent Certification’ field, as applicable.
- In the ‘Region’ field, select the client’s region from the dropdown menu.
If no region is supplied, select ‘Unknown’:
- In the ‘Type of Mine’ field, select the client’s mine type from the dropdown menu.
If no mine type is supplied, select ‘Other’:
- In the ‘Mine Site’ field, select the client’s mine site from the list of British Columbia sites in the dropdown menu.
If no mine site is supplied, select ‘Other’:
| TIPS - Use the scroll bar to move through the alpahabetical list, or
- Type the first letter(s) of the mine site name to advance to that name in the list.
|
- In the Certification field, scroll down to the ‘Legacy’ list and select a Legacy certification from the Coal Competency, Fireboss, Mine Rescue, Shiftboss or Blaster categories:
- In the ‘Offered By’ field, select ‘Other’:
- The ‘Language’ field is pre-populated with the default value ‘English’. Skip to the next field.
- In the ‘Exam Date’ field enter the date in the following format, including hyphens: yyyy-mm-dd:
- In the ‘Exam Mark’ field, enter the mark:
TIPS - Expected format for ‘Exam Date’ and ‘Interview Date’:
- Enter dates in the following numerical format, including hyphens: yyyy-mm-dd
Example: 2021-03-15. - Do not enter future dates.
- Do not enter dates earlier than 1900-01-01.
- Expected format for ‘Exam Mark’:
- Use numerical entries. Example: 75, 80, 100.
- Enter whole numbers. Do not enter decimals.
- Exam mark must be between 0 and 100.
- Do not enter a % symbol.
- If only a grade of ‘Pass’ is supplied, enter the default minimum mark required to achieve a passing grade on the Legacy certifications:
Legacy Certification Categories | Default Mark for a Pass | Fireboss / Coal Competency | 70 | Mine Rescue | 70 | Shiftboss | 70 | Blaster | 70 |
|
- Enter any additional information about the exam in the ‘Exam Comments’ field (up to 3,500 characters):
- To add the interview details for Legacy Fireboss/Coal Competency, Shiftboss and Blaster certifications,
See Section 6.2.4 Add Interview.
TIPS - Interview data is expected for the following Legacy Certifications:
- Shiftboss
- Fireboss / Coal Competency
- Blaster
- Expiry dates for Legacy Certifications
- Shiftboss – N/A
- Fireboss – N/A
- Mine Rescue – exam date + 5 years
- Blaster – interview date + 5 years
- To add an Equivalent certification for eligible Legacy certifications, follow the steps in Section 6.4 Add Equivalent Blaster Certification.
|
EDIT / DELETE CERTIFICATION
Edit Certification
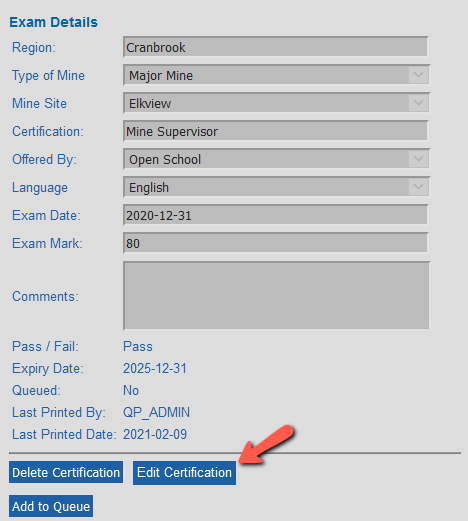
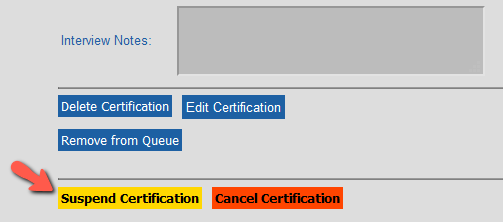
To edit a certification:
- Under ‘Certification History’, select the certification:
- At the bottom of the ‘Exam Details’ form, click on Edit Certification:
- Enter the changes in the editable fields (fields that display with a white background):
Mine Supervisor and Mine Rescue Editable Fields 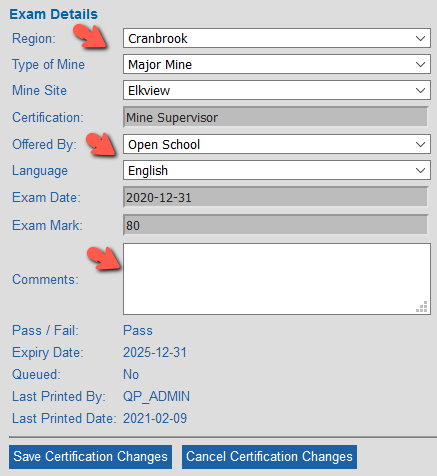
| Shiftboss and Fireboss Editable Fields 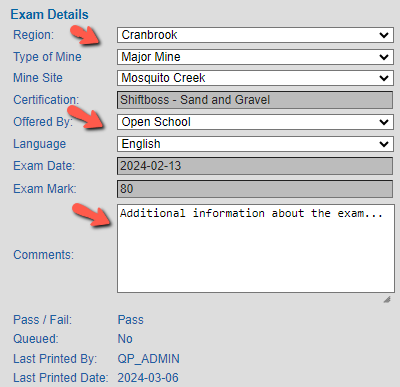
|
- When you have finished making the changes, click on Save Certification Changes at the bottom of the certification.
TIP Editable fields for an Equivalent certification are as follows (fields with white background): 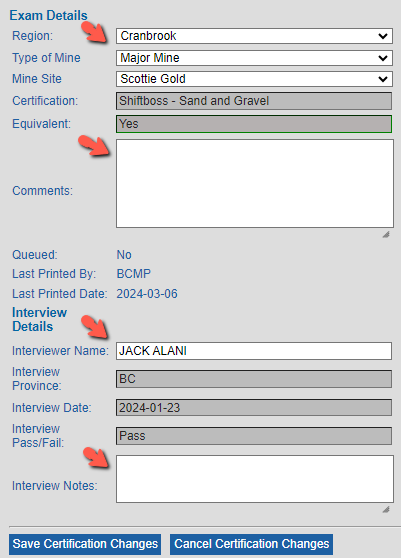
|
Edit Blaster Reg Exam
If regulatory exam data is missing in Blaster (OSBC) exam results, default values of ‘0’ are entered automatically in the date and mark fields, and yellow highlighting applied.
To add the actual regulatory exam date and mark in the Registry:
- Select Edit Certification:
- Enter the mark AND date and Save Certification Changes:
- Upon Save, the regulatory exam date and mark are locked from further editing.
TIPS When entering regulatory exam data please enter both the exam mark and the exam date. If entering an exam mark only, upon submit you will receive a validation error requiring entry of the exam date. 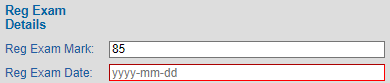
If entering an exam date only, upon submit you will receive a validation error requiring entry of the exam mark. 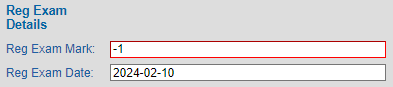
|
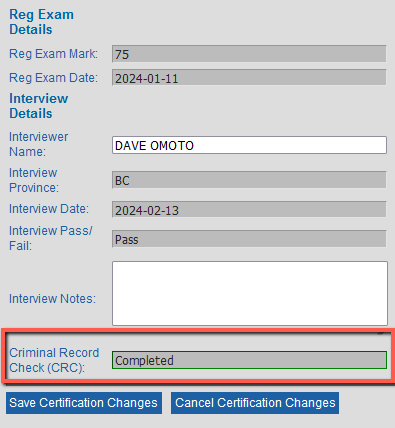
Edit Blaster Criminal Record Check
For Blaster certifications (OSBC), the Criminal Record Check ‘Pending’ status can be updated to ‘Completed’, using the CRC Completed button:
When the CRC status is ‘Completed’, the CRC field is locked from further editing.
|
TIP For existing Blaster certifications (OSBC) that were issued prior to implementation of the ‘CRC Completed’ feature in the Registry in April 2024, the CRC status cannot be updated from ‘Pending’ to ‘Completed. To record any details about Criminal Record Check for existing Blaster certifications, the interview notes field can be used. |
Delete Certification
To delete a certification:
- In the client record, under ‘Certification History’, click on the certification you want to delete:
- At the bottom of the certification details, click on Delete Certification:
- At the prompt, click OK:
- The exam is deleted, and the certification removed from the ‘Certification History’:
TIPS For certifications that include an interview, the delete certification action deletes the exam + interview. For certifications that include a technical exam, reg exam and interview, the delete certification action deletes the technical exam, regulatory exam and interview. For information about data deletion policy please contact the Ministry of Energy, Mines and Low Carbon Innovation
at mine.certifications@gov.bc.ca |
VIEW CERTIFICATIONS
View Student (Client) Record
A client record includes some or all of the following elements:
- Student Details
- Photo Status
- Certification History
- Certification Details (exam details + regulatory exam, interview details)
- Suspension and Cancellation History
- Provisional Certification Details
View Certification History
The ‘Certification History’ displays a list of all the client’s BC Mine Certifications saved in the Registry, which could include Mine Supervisor (2018), Blaster (2022), Shiftboss (2024) and any Legacy Certifications (Shiftboss, Fireboss, Mine Rescue, Blaster).
Certifications are listed in date order, with the newest certification at the top of the list.
Certification History data includes:
- The ‘Status’ of each certification:
- Active (pass + un-expired)
- Expired
- Failed
- Suspended
- Cancelled
- In the ‘Susp’ column, the number of suspensions issued on a certification, including current and expired suspensions:
- In the ‘Mine Site’ column, the mine site associated with each certification:
TIP
A scroll bar is enabled when the list of certifications becomes lengthy. Scroll down the list to see older certifications. 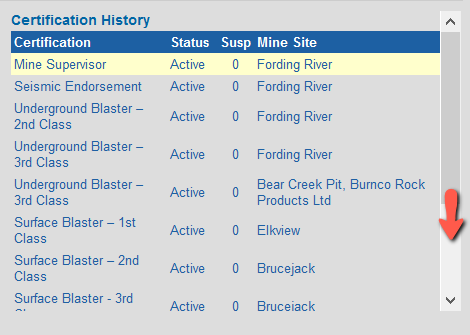
|
View Certification Status
The Certification Status values are defined as follows:
- Active – means that the certification has a passing grade and is unexpired.
- Expired – means that the certification had a passing grade but has reached its expiry date and is no longer valid.
- Failed – means that client did not pass the exam, or passed the exam but failed the interview.
- Suspended – means that the certification has been suspended for a period of time set by the issuer.
- A certification can have one or more suspensions.
- A suspension can be active or expired.
- An active suspension is displayed in the ‘Status’ column as ‘Suspended’ and is also counted in the ‘Suspension’ column.
- An expired suspension is counted in the ‘Suspension’ column.
- A suspension can have a start date and end date or can be open ended and have no end date assigned.
- Cancelled – means that the certification has been cancelled by the issuer.

|
TIPS Under ‘Certification History’: - The Status column displays current suspensions and cancellations, on non-expired certifications.
- The ‘Susp’ (Suspension) column displays the number of suspensions issued on the certification, including current and expired suspensions.
- When a suspension period expires on a non-expired certification, the certification status changes from ‘Suspended’ to ‘Active’.
- A certification’s ‘Expired’ status takes precedence over a ‘Suspended’ or ‘Cancelled’ status. Once a suspended or cancelled certification reaches the certification expiry date, the certification status changes from ‘Suspended’ or ‘Cancelled’ to ‘Expired’.
Certification History Status 'Expired' 
| Suspension and Cancellation History 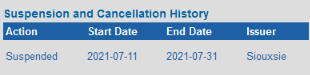
|
- To view suspension and cancellation details for expired and non-expired certifications, check the ‘Suspension and Cancellation History’.
- If a current suspension is not displaying as ‘Suspended’ in the ‘Status’ column as expected, check the dates in the ‘Suspension and Cancellation History’. If the end date entered occurs before the start date, the suspension won’t be recognized as current. Correct the error.
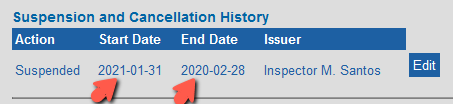
For information about suspension and cancellation policies and procedures, including lifetime limits on the number of suspensions which can be issued, please contact the Ministry of Energy, Mines and Low Carbon Innovation at mine.certifications@gov.bc.ca |
View Mine Supervisor Certification Details
To view the details for a Mine Supervisor certification:
Select Certification under ‘Certification History’ 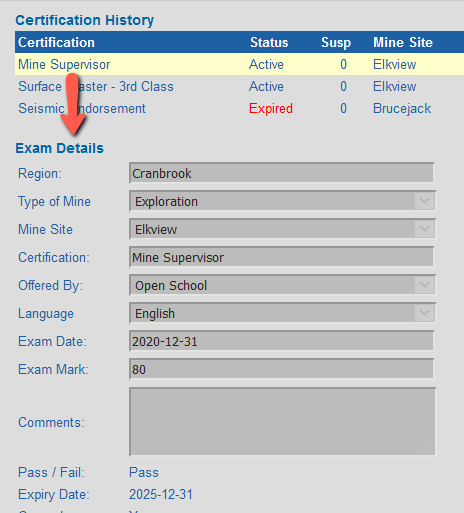
|
| Exam Details 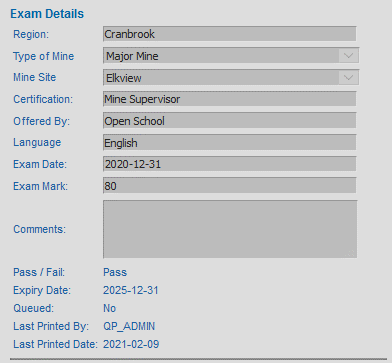
|
- The Certification Details for a Mine Supervisor certification include ‘Exam Details’:
- The client’s region.
- The type of mine in which the client is employed.
- The mine site at which the client is employed.
- The certification type.
- The organization that offered the training (Open School).
- The language of the exam (always ‘English’).
- The exam mark (a whole number between 0 and 100).
- Any comments about the exam (up to 3,500 characters).
- A pass/fail grade based on a mark of 80 or higher to pass the Mine Supervisor exam.
- An expiry date (exam date + five years) for exams with a passing grade.
- A queued status of ‘Yes’ or ‘No’:
- ‘Yes’ means that the certificate and ID card are in the certificate print queue awaiting printing.
- ‘No’ means that the certificate and ID card are not in the certificate print queue.
Queued Status 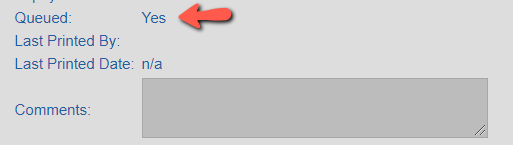
|
- A last printed by field indicating the BC Mail user who last printed the certificate and card. If the certificate and card have never been printed the field is blank.
- A last printed date for the certificate and wallet card. If the certificate and card have never been printed the field displays ‘n/a’ (not applicable).
Blaster Certifications, 2022
There are seven types of Blaster certification issued by the BC Mine Certifications Program.
TIP: Listed below are the official names of the Blaster certifications as they occur on the certificates and cards. In the Registry, Blaster certifications are displayed with a Blaster prefix, e.g. Blaster – Surface 3rd Class. |
1 | Seismic Endorsement | This BC Mines certification authorizes the bearer to handle explosives and assist with blast preparation. The bearer may perform single-series electric blasting and seismic blasts. |
2 | Surface Blaster – 3rd Class | This BC Mines certification authorizes the bearer to handle explosives, assist with blast preparation, act as a trainee to a Certified Blaster, and perform single-shot blasts on the surface of a mine. |
3 | Surface Blaster – 2nd Class | This BC Mines certification authorizes the bearer to perform general surface blasting operations outside of defined urban zones. |
4 | Surface Blaster – 1st Class | This BC Mines certification authorizes the bearer to perform all general surface blasting operations in all zones. |
5 | Underground Blaster – 3rd Class | This BC Mines certification authorizes the bearer to handle explosives, assist with blast preparation, and act as a trainee to a Certified Blaster. The Bearer may perform single-shots in a non-coal underground mine. |
6 | Underground Blaster – 2nd Class | This BC Mines certification authorizes the bearer to perform all general underground blasting operations with the exception of underground coal. |
7 | Underground Blaster – 1st Class | This BC Mines certification authorizes the bearer to perform underground blasting operations in underground coal mines only. |
View Blaster Certification Details
The Certification Details for a Blaster (OSBC) certification include Exam Details for the Technical Exam, Regulatory Exam Details’, ‘Interview Details’ and the Criminal Record Check field.
The Exam Results submitted to the Registry include:
- Technical exam data:
- The client’s region.
- The type of mine in which the person is employed.
- The mine site at which the person is employed.
- The certification type.
- The organization that offered the Blaster training (Open School).
- The language of the exam (always ‘English’).
- The technical exam date (YYYY-MM-DD)
- The technical exam mark (a whole number between 0 and 100).
- Any comments about the exam (up to 3,500 characters).
- A pass/fail grade based on the combined result of the Blaster exams + interview:
- Pass = exam pass + interview pass
- Fail = exam pass + interview fail
- Fail = technical exam fail (regulatory exam results must be a pass to be submitted to the Registry).
- An expiry date for certifications which have a passing grade on both the exam and the interview. The expiry date is based on interview date + five years.
For example, if the interview date is November 15, 2020, the certification expiry date is November 15, 2025:
- A queued status of ‘Yes’, ‘No’, ‘Pending’ or ‘Waiting’ which depends on the status of the photo and criminal record check:
- ‘Yes’ means that the certificate & secure photo ID are currently in the queue.
- ‘No’ means that the certificate & secure photo ID are not in the queue.
- ‘Pending’ means that a photo of the client needs to be uploaded before the certificate & secure photo ID can be added to the queue.
- ‘Waiting’ means that the Criminal Record Check needs to be completed before the certificate & secure photo ID can be added to the queue.
- A last printed by field indicating the BC Mail user who last printed the certificate. If the certificate has never been printed the field is blank.
- The last printed date for the certificate and secure photo ID card. If the certificate and card have never been printed the field displays ‘n/a’ (not applicable).
- The Regulatory Exam Details include:
- Regulatory exam mark (a whole number between 0 and 100).
- Regulatory exam date (YYYY-MM-DD).
- The Interview Details include:
- The name of the interviewer.
- The province where the interview took place (always ‘BC’).
- The date of the interview.
- The interview grade of pass or fail.
- Any notes about the interview (up to 1,000 characters).
- The status of the mandatory Criminal Record Check (pending or completed).
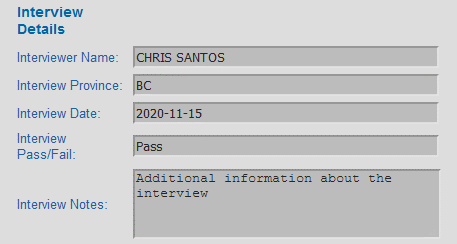
|
TIPS - Exam Pass / Interview Pass: If the client passes the regulatory exam, technical exam and the interview, the results are submitted to the Registry together in one submission.
- Exam Fail: If the client passes the regulatory exam but fails the Blaster technical exam, the exam results are submitted to the Registry without an interview.
- Exam Pass / Interview Fail: If the client passes both exams but fails the interview, the exam and interview results are submitted to the Registry together in one submission.
- Regulatory Exam Fail: If the client fails the regulatory exam and does not advance to the technical exam, the results are stored in Open School’s system and are not submitted to the Registry.
- Mine Type/Mine Site: If the client is not currently employed, the value ‘Other’ is used.
- Offered By: For the Mine Supervisor and Blaster certifications offered by Open School BC, enter ‘Open School’. For Legacy certifications enter ‘Other.
- Pass / Fail: The minimum marks required to pass the new Blaster exams are:
Blaster Certification Types | Passing Mark | Seismic Endorsement | 75 or higher | Surface Blaster– 3rd Class | 75 or higher | Surface Blaster – 2nd Class | 75 or higher | Surface Blaster – 1st Class | 80 or higher | Underground Blaster – 3rd Class | 75 or higher | Underground Blaster – 2nd Class | 75 or higher | Underground Blaster – 1st Class | 80 or higher |
- Expiry Date: The certification expiry date is based on the interview date.
For example, if the exam date is November 30, 2020 and the interview date is December 31, 2020, the certification expiry date is December 31, 2025. - Queued status: Upon submission of a successful Blaster certification, the certificate queue status is ‘pending’. When the required client photo is uploaded, and Criminal Record Check completed, the certificate is automatically added to the print queue and the queued status changes to ‘Yes’.
- Printed By: BC Mail Plus[1] prints the certificate queue (containing files of certificates, wallet cards, secure photo ID cards, and mailing addresses) on a weekly basis. To confirm that the client certificate is in the print queue, check that the queued status is ‘Yes’, or open the Certificate Queue to locate the record:
Queued Status
Certificate Queue 
|
Check Certification for Equivalent Status
The Certification History displays a list of all the client’s BC Mine Certifications, including Equivalent Blaster, Fireboss, and Shiftboss certifications. To check the equivalency status for an eligible certification:
- Under ‘Certification History’, select the certification:
- Under ‘Exam Details’, if the certification is an Equivalent, the ‘Equivalent’ field is present and marked ‘Yes’. The ‘Equivalent’ field is highlighted with a green border:
TIPS - The ‘Equivalent’ field is present in the saved exam details only when Equivalent = Yes.
- Certifications eligible for equivalency are:
- Blaster
- Fireboss
- Shiftboss
|
View Equivalent Blaster Certification Details
The Certification Details for an Equivalent certification include a short form of Exam Details and the same Regulatory Exam Details, and Interview Details, and Criminal Record Check information as the B.C. Blaster certification.
SUSPENSIONS AND CANCELLATIONS
Add Suspension
To add a suspension:
- Open the client record.
- Under ‘Certification History’, select the certification being suspended:
- Below the ‘Certification Details’, click on Suspend Certification:
- The ‘Issue a Suspension’ dialogue opens:
- In the ‘Issued By’ field, enter the name of the person issuing the suspension (not the person entering the data):
- Click in the ‘Start Date’ field and enter the starting date of the suspension.
Use the calendar to select a date or enter the date manually in the following format, including hyphens: yyyy-mm-dd
For example: 2021-10-13.
- If you know the end date of the suspension, enter it in the ‘End Date’ field, otherwise leave the field blank.
- To advance the calendar to a future month, click on the ‘next’ icon at the top right corner of the calendar:
- Add any notes about the Suspension, and Submit:
- The Suspension and Cancellation History is updated:
- Hover over the notes box to view notes in a hover box.
- If the notes field is empty, the notes field displays empty:
Edit a Suspension
To edit a suspension, for example to add an end date or add notes:
- Under the ‘Suspension and Cancellation History’ for the selected certification, click on Edit:
- In the ‘Edit a Suspension record’ dialogue, enter the date in the ‘End Date’ field, add any notes, and Save Changes:
- The suspension history is updated:
TIP: To advance the calendar to a future month, click on the ‘next’ icon at the top right corner of the calendar: 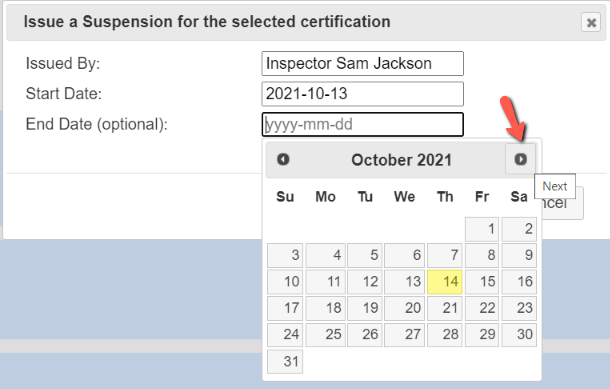
|
View Suspensions
To check for suspensions on a certification:
- Open the client record.
- Under ‘Certification History’ check the ‘Suspension’ column to see the number of suspensions recorded for all the client’s certifications, including active and expired suspensions:
- Check the ‘Status’ column to see if any of the suspensions are current. Current suspensions are indicated by the word ‘Suspended’ in orange:
- To view the suspension details, select the certification:
- The suspension details are displayed under ‘Suspension and Cancellation History’, below the certification details:
- The suspension details include the ‘Start Date’, ‘End Date’ (if known) and the ‘Issuer’.
The issuer is the person who issued the suspension, not the person who entered the data.
Suspensions are listed in date order, with the newest suspensions at the top of the list.
TIPS - Suspensions are listed in date order, with the newest suspensions at the top of the list.
- When a suspension period expires on a non-expired certification, the certification status changes from ‘Suspended’ to ‘Active’.
- To view suspension and cancellation details for expired and non-expired certifications, check the Suspension and Cancellation History.
For information about suspension and cancellation policies and procedures, including limits on the number of suspensions that can be issued, please contact the Ministry of Energy, Mines and Low Carbon Innovation at mine.certifications@gov.bc.ca |
Add Cancellation
To cancel a certification:
- Open the client record.
- Under ‘Certification History’, select the certification being cancelled:
- Below the certification details, click on Cancel Certification:
- The ‘Issue a Cancellation' dialogue opens:
- In the ‘Issued By’ field, enter the name of the person issuing the cancellation (not the person entering the data):
- Click in the ‘Start Date’ field and enter the starting date of the cancellation.
Use the calendar to select a date or enter the date manually in the following format, including hyphens: yyyy-mm-dd
For example: 2024-02-25.
- Enter any notes about the cancellation and click on Submit:
- The cancellation details are displayed under ‘Suspension and Cancellation History’:
- The cancellation is also displayed under ‘Certification History’ at the top of the record.
Cancellations display as ‘Cancelled’ in the ‘Status’ column:
View Cancellations
To check for a cancelled certification:
- Open the client record.
- Under ‘Certification History’ check the ‘Status’ column for Cancelled certifications:
- To view the cancellation details, select the certification:
- The cancellation details are displayed under ‘Suspension and Cancellation History’, below the certification details.
The issuer is the person who issued the cancellation, not the person who enters the data.
TIPS - A five-year certification can have a maximum of one cancellation.
- A cancellation supersedes a suspension.
- Cancellations are final.
For information about suspension and cancellation policies and procedures, including limits on the number of suspensions that can be issued, please contact the Ministry of Energy, Mines and Low Carbon Innovation at mine.certifications@gov.bc.ca |
Edit Cancellations
TIP: For information about suspension and cancellation policies and procedures, including editing or deleting a suspension or cancellation, please contact the Ministry of Energy, Mines and Low Carbon Innovation at mine.certifications@gov.bc.ca |
To edit a cancellation:
- Open the client’s record.
- Under ‘Certification History’, select the certification:
- In the ‘Suspension and Cancellation’ history, click on Edit:
- In the ‘Edit a Cancellation Record’ dialogue, enter the changes as required and Save Changes:
- The Suspension and Cancellation History is updated to reflect the changes:
TIPS When a certification is cancelled, the Suspend Certification and Cancel Certification buttons are disabled when
the effected certification is selected: |
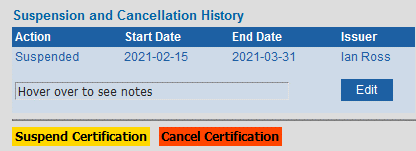
| 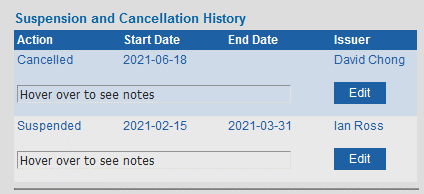
|
Delete Suspension and Cancellation
TIP: For information about suspension and cancellation policies and procedures, including editing or deleting a suspension or cancellation, please contact the Ministry of Energy, Mines and Low Carbon Innovation at mine.certifications@gov.bc.ca |
To delete a suspension or cancellation submitted in error:
- Under ‘Suspension and Cancellation History’, click on Edit next to the suspension or cancellation:
- In the Edit dialogue, click on Delete:
- At the prompt, select OK:
- The record of suspension or cancellation is deleted from the client record.
Tips on Certification History, Suspension and Cancellation History
TIPS – CERTIFICATION HISTORY - The ‘Status’ column displays current suspensions and cancellations on non-expired certifications.
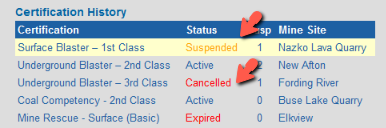
- When a suspension period expires on a non-expired certification, the status of the certification reverts to ‘Active’.
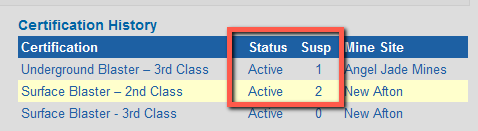
- The ‘Expired’ status takes precedence over a suspended or cancelled status. When a suspended or cancelled certification reaches the certification expiry date, the status changes from ‘Suspended’ or ‘Cancelled’ to ‘Expired’.
Certification History Status 'Expired'
| Suspension and Cancellation History 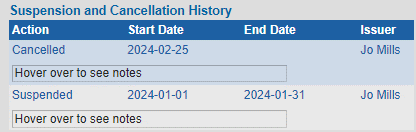
|
- When a suspension period is edited so that an expired suspension is extended to a future date, the status of the certification changes from ‘Active’ to ‘Suspended’.
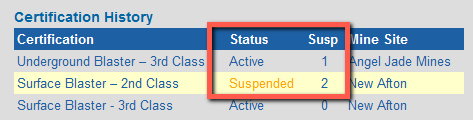
- The ‘Susp’ (Suspensions) column displays the number of active and expired suspensions on the certification.
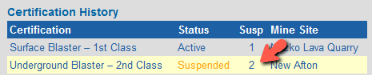
For information about suspension and cancellation policies and procedures, including editing or deleting a suspension or cancellation, please contact the Ministry of Energy, Mines and Low Carbon Innovation at mine.certifications@gov.bc.ca |
TIPS – SUSPENSION AND CANCELLATION HISTORY - Suspensions are listed in date order, with the newest suspensions at the top of the list.
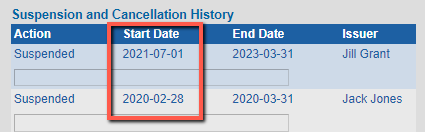
- Suspension and Cancellation History displays all suspensions issued on the certification, whether the certification is expired or non-expired.
- If a current suspension is not displaying as ‘Suspended’ in the ‘Status’ column as expected, check the dates in the ‘Suspension and Cancellation History’. If the end date entered occurs before the start date, the suspension won’t be recognized as active. Correct the error.
For information about suspension and cancellation policies and procedures, including limits on the number of suspensions that can be issued, please contact the Ministry of Energy, Mines and Low Carbon Innovation at mine.certifications@gov.bc.ca |
PROVISIONAL CERTIFICATIONS
Add New Provisional Certification
To add a provisional certification to a record:
- Open the client record.
- Scroll down to the ‘Add New Provisional’ panel and click on Add Provisional:
- The ‘Add New Provisional’ form opens:
- In the ‘Certification’ menu, select one of the eligible certification types:
- Select the client’s current mine site from the list of British Columbia sites in the ‘Mine Site’ menu:
- In the ‘Effective Date’ field, use the calendar to select a starting date or enter the date manually in the following format, including hyphens: yyyy-mm-dd, for example: 2021-01-15.
- In the ‘Issued By’ field, enter the name of the person who is issuing the provisional certification (not the person entering the data):
- In the Notes field, enter any notes about the provisional certification, and Submit:
TIPS - Eligible categories for provisional certification are Blaster, Fireboss, and Shiftboss.
- The expiry date for a provisional certification is calculated automatically by the Registry upon submission of the provisional certification:
- The expiry date for a provisional Blaster certification is the effective date plus 90 days.
- The expiry date for a provisional Fireboss certification is the effective date plus 6 months.
- The expiry date for a provisional Shiftboss certification is the effective date plus 6 months.
- The issuing of provisional certifications is limited to one provisional certification per eligible category, per client lifetime.
For information about provisional certification policies and procedures, please contact the Ministry of Energy, Mines and Low Carbon Innovation at mine.certifications@gov.bc.ca |
View Provisional Certification Details
To check a client record for a Provisional Certification:
- Open the client record.
- Any provisional certifications issued for a Blaster, Fireboss, or Shiftboss certification, are displayed below the ‘Student Details’:
- The Provisional Certification details include:
- The type of provisional certification.
- The Mine Site at which the provisional certification is issued.
- The Effective Date (start date) of the provisional certification.
- The Expiry Date of the provisional certification.
- The name of the person who issued the provisional certification.
- Notes about the provisional certification.
Edit Provisional Certification
To edit a Provisional Certification:
- Click on Edit Provisional:
- Enter the changes in the editable fields:
- When you have finished making the changes, click on Save:
TIPS If the effective date is changed, the Registry automatically updates the expiry date upon ‘Save’. 
For information about provisional certification policies and procedures, please contact the Ministry of Energy, Mines and Low Carbon Innovation at mine.certifications@gov.bc |
CERTIFICATE PRINTING
View Certificate Queue
The Certificate Queue contains any certificates recently queued for printing, including the following certificate types:
- Blaster (OSBC) - certificate and secure photo ID card
- Mine Supervisor (OSBC) - certificate and wallet card
- Shiftboss (OSBC) - certificate and wallet card
- Fireboss, Mine Rescue and Shiftboss (Legacy) - certificate and wallet card
To view the certificates in the Certificate Queue:
- Click on the Certificate Queue icon:
- The certificate queue displays certificates in groups of 10.
The certificates are grouped by certification category, in the following order:
- Coal Competency/Fireboss
- Mine Rescue
- Shiftboss (Legacy)
- Mine Supervisor
- Shiftboss (OSBC)
- Blaster (OSBC)
- The queue order matches the order in the certificate print files (PDF) and address file (Excel).
- The Blasters occur at the end to facilitate a different printing / assembly process for the Blaster photo ID cards.
- To navigate through the queue, use the next, previous, first, and end actions at the bottom of the queue:
- To open the client record from the certificate queue, click in the row:
- The client record opens:
- To return to the certificate queue, click on the Certificate Queue breadcrumb:
Certificate Printing by BC Mail Plus
BC Mail Plus handles the printing and mailing of the certificates, wallet cards and secure photo ID cards on a weekly basis. After the certificates in the queue have been downloaded and saved, the queue is cleared by BC Mail.
Certification Type | Certificate (8-1/2” x 11”) | Card |
Blaster (OSBC) | Paper Certificate | Secure Photo ID Card (laminated, hologram) |
Mine Supervisor (OSBC) Shiftboss (OSBC) | Paper Certificate | Paper Wallet Card |
Fireboss (Legacy) Mine Rescue (Legacy) Shiftboss (Legacy) | Paper Certificate | Paper Wallet Card |
Certificates, wallet cards and secure photo ID cards are mailed to the address stored in the client’s record under ‘Student Details’.
If you are manually updating an address, please follow the Canada Post guidelines.
See Section 5.1 Canada Post Guidelines
See also Section 2.9 Official Certificate Reprints, and Section 2.10 Official Certificate Reprint Fees
TIPS - The Customer Support role at Crown Pubs, King’s Printer does not have the ability to update data in the Registry.
If the address or any other contact information requires updating Crown staff will contact an Admin role person at the Ministry of EMLI and request an update to the client’s contact information. - The client’s mailing address must be updated before the certificate is added to the queue, so that BC Mail Plus receives the latest mailing address when they download the certificate and address files for processing.
Note: If a certificate is already in the queue when an address is updated, the address is updated for the certificate in the queue. When BC Mail Plus downloads the queue, they will get the new address. See Section 2.5 Registry Partners, for Crown Publishing, customer support contact Information |
Add Legacy Certificate to Print Queue
To add a Legacy certificate to the certificate print queue:
- Open the client record.
- Select the certification.
- Check the ‘Queued’ status.
- If the Queued status is ‘No’ and you want to add the certificate to the queue, click on Add to Queue at the bottom of the certification details:
- At the prompt, select OK:
- Check the Queued status to ensure it is ‘Yes’:
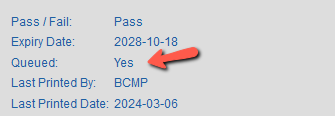
|
IMPORTANT - The Admin role is able to use the Add to Queue and Remove from Queue actions for the following
Legacy Certifications:
- Fireboss / Coal Competency (Legacy),
- Mine Rescue (Legacy),
- Shiftboss (Legacy).
- Legacy Blaster certifications cannot be printed via the Registry. Please contact the Ministry of EMLI if you need a reprint of a Blaster (Legacy) certificate.
Email: mine-certifications@gov.bc.ca
Toll free in North Am: 1 (800) 978-9798 - Since the introduction of the new Shiftboss (OSBC) certification, when you add a Legacy Shiftboss certification to the Registry, the automatic add to print queue action is disabled. If you (Admin role) need to print a legacy Shiftboss certificate, use the Add to Queue button.
- When Legacy Mine Rescue, Fireboss or Coal Comptency certifications are submitted to the Registry, the certificate and wallet card are automatically added to the print queue upon submission.
- Printing fees for any Legacy certificates added manually to the print queue by the Admin role are charged to the Ministry of Energy Mines and Low Carbon Innovation.
- If a client requests a reprint/replacement certificate, please follow the instructions under Section 2.9 Official Certificate Reprints, and direct the request to Customer Support, Crown Publications at mines.certificate.reprint@gov.bc.ca. Crown staff will accept payment from the client and add the certificate and card to the print queue.
- If you don’t see the ‘Add to Queue’ or ‘Remove from Queue’ buttons for the certification selected, it could be because:
- Your Registry role does not have permission to add / remove the selected certificate type to / from the queue.
- The certification is expired.
- The certification is suspended.
- The certification is cancelled.
- The Blaster certificate is missing a photo.
- The Blaster certificate is missing a criminal record check.
- The certification is a Legacy Blaster and cannot be printed via the Registry.
- To request removal of a Blaster, Shiftboss or Mine Supervisor certificate from the queue, please contact:
Crown Publications, King’s Printer
Hours of operation: Monday to Friday 7:30 to 4:30 PST
Email: mines.techsupport@gov.bc.ca
Toll-Free: 1-800-663-6105
Victoria: 250 387-6409 |
Remove Legacy Certificate from Queue
To remove a Legacy certificate from the certificate print queue
- Open the client’s record.
- Select the certification.
- Check the Queued status.
- If the Queued status is ‘Yes’ and you want to remove the certificate from the queue, click on
Remove from Queue at the bottom of the certification details:
- At the prompt, select OK:
- Check the Queued status to ensure it is ‘No’:
CERTIFICATE, WALLET CARD & SECURE PHOTO ID CARD SPECIFICATIONS
Mine Supervisor Certificate and Wallet Card
Clients who achieve a Mine Supervisor Certification receive an 8-1/2” x 11” paper certificate and a paper wallet card.
Mine Supervisor Certificate 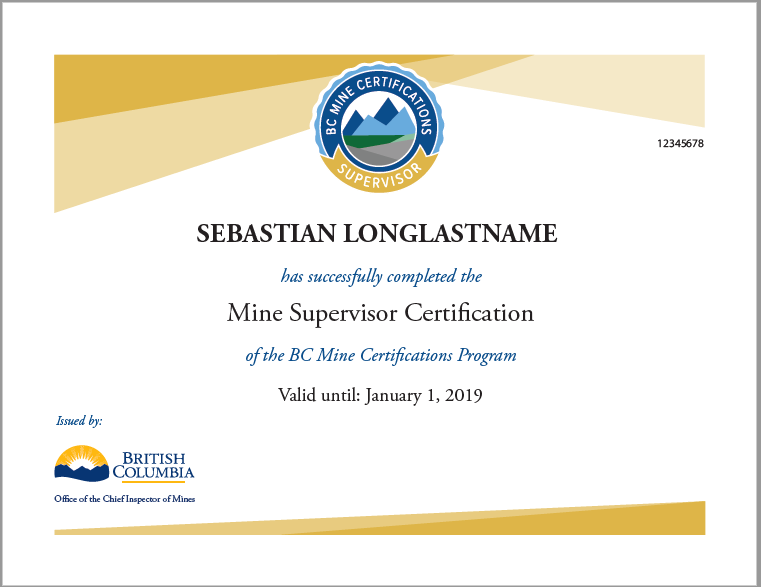
|
Mine Supervisor Wallet Card 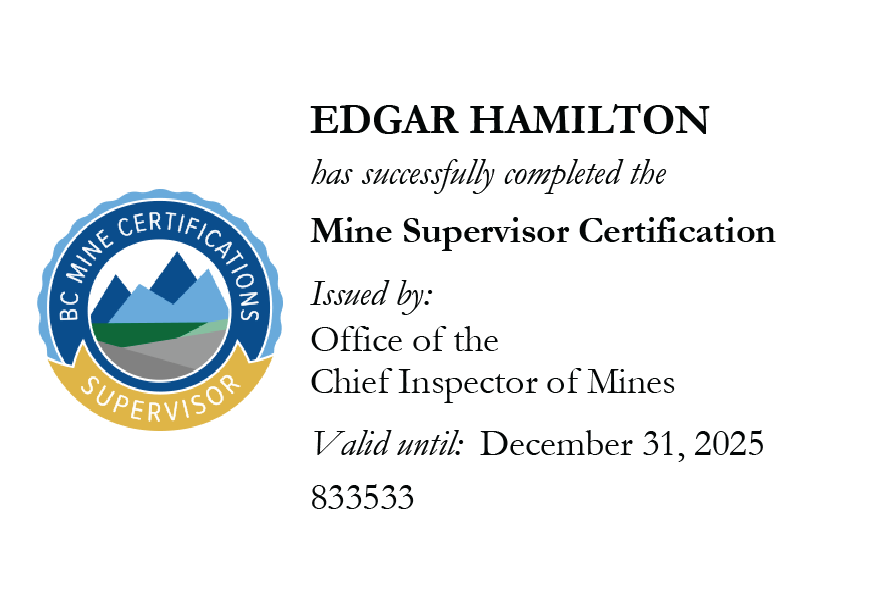
|
Blaster Certificate and Secure Photo ID Card
Clients who achieve a Blaster Certification receive an 8-1/2” x 11” paper certificate and a secure photo ID card:
Blaster Certificate 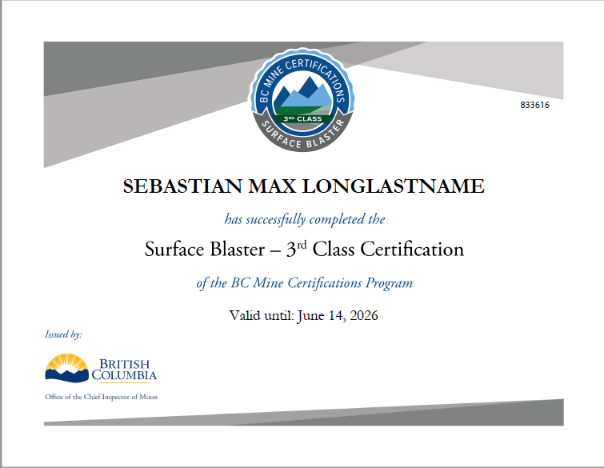
|
FRONT: Blaster Secure Photo ID 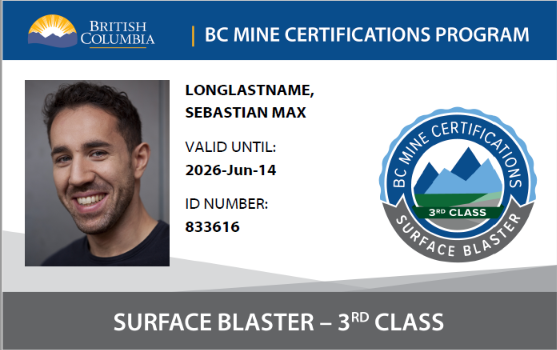
| BACK: Blaster Secure Photo ID 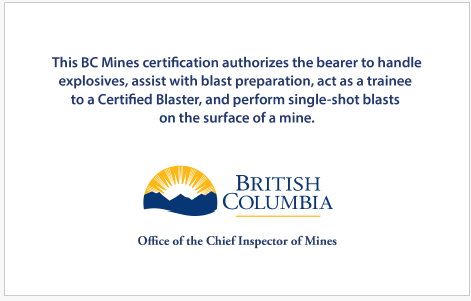
|
Shiftboss Certificates and Wallet Card
Clients who achieve a Shiftboss Certification receive an 8-1/2” x 11” paper certificate and a paper wallet card.
Shiftboss Certificate 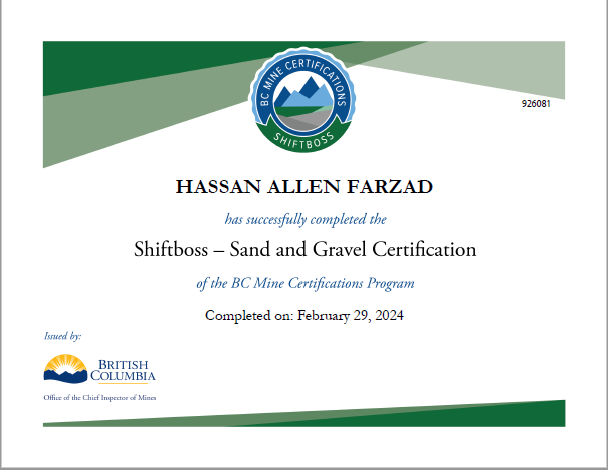
|
Shiftboss Wallet Card 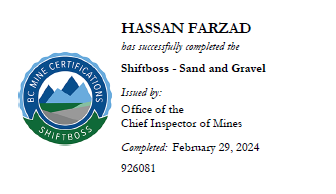
|
Legacy Certificates and Wallet Cards
Clients who have a legacy certification are eligible to receive an 8-1/2” x 11” paper certificate and a paper wallet card.
Legacy Fireboss Certificate 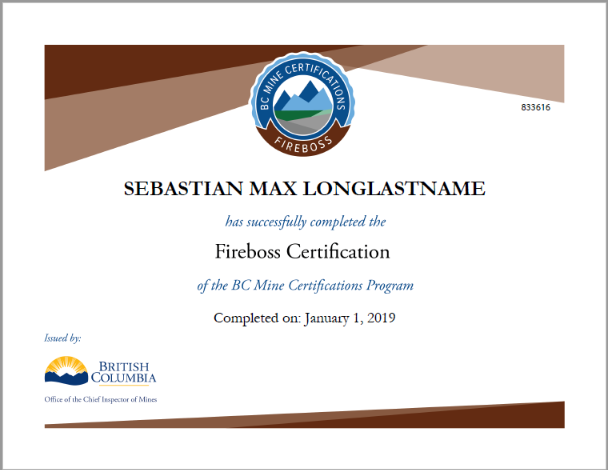
| Legacy Fireboss Wallet Card 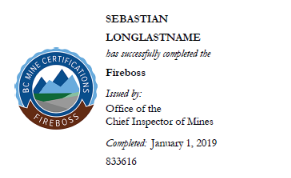
|
Legacy Mine Rescue Certificate 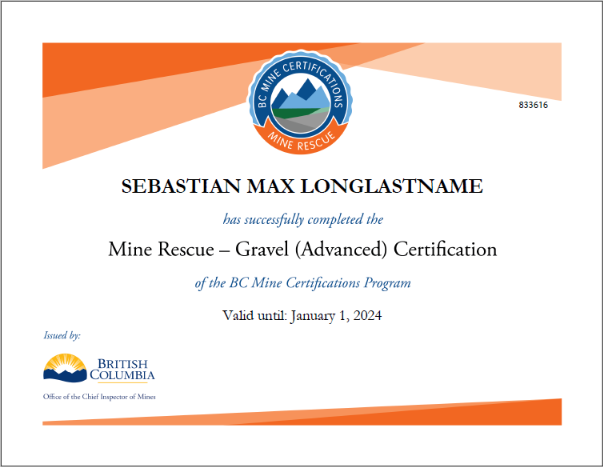
| Legacy Mine Rescue Wallet Card 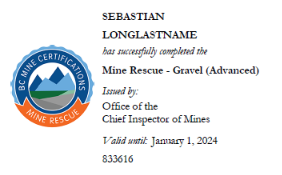
|
Legacy Shiftboss Certificate 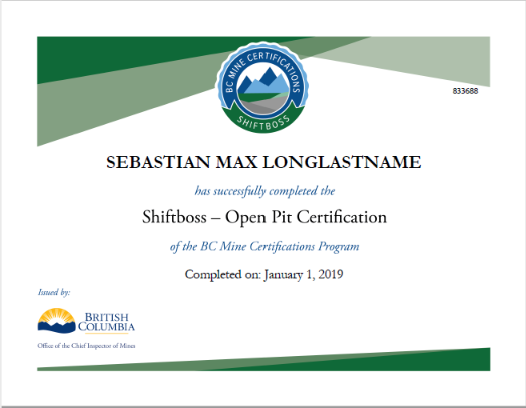
| Legacy Shiftboss Wallet Card 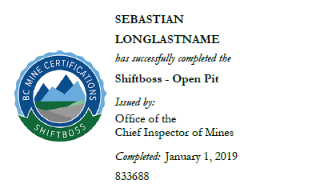
|
DELETE A STUDENT (CLIENT) RECORD (Duplicates)
The Admin role has the unique ability to delete a client record. The only reason to delete a client record is when a duplicate record is found.
If you have identified a duplicate client record:
- Confirm that the person in one record is the same as the person in a suspected duplicate record, by comparing (and matching) personal identifiers such as middle name, birth date, address, etc.
- Copy over any missing exam data to the record that will be retained. If an exam is missing in the record to be retained, manually add an exam and manually enter the data from the duplicate record. Any questionable records should not be altered or deleted.
- Once information has been transferred over, delete any exam records attached to the duplicate record, by clicking on Delete Exam.
- Finally, please contact the Regulatory Management and Enforcement Branch at The Ministry of Energy, Mines and Low Carbon Innovation at mine.certifications@gov.bc.ca to advise them of the record to be deleted. In your email, include the client name and people ID number for the record to be deleted.
TIP The Regulatory Management and Enforcement Branch of the Ministry of Energy, Mines and Low Carbon Innovation will only delete client records that have no exam results attached to the record. Contact: mine.certifications@gov.bc.ca |
MANAGE USERS IN THE REGISTRY
The Manage Users functions include the ability to add a new user account, delete a user account, assign roles and regions to a user account, activate or de-activate a user account, and re-set passwords.
Add new user account
To add a new user account:
- Click on the Manage Users icon:
- In the ‘Manage Users’ page, click on Add New User:
- In the data entry fields, enter the username, email address, role and region (if applicable).
- Role options are as follows:
- The Clerical role for Mine Inspectors who are not examiners.
- Admin role for the
- Designated administrative users, and
- Mine Inspectors who are examiners.
- For Clerical role users, in the ‘Region’ menu, select a region:
TIP: For the Admin role, a region is not required: 
|
- When you finish entering the user account data, select Active:
- Click on Save User:
- At the prompt, click on OK:
- A message will confirm the addition of the new user:
- An automated email is sent to the user with a temporary password generated by the Registry:
- To log in to the Registry for the first time, the user will use the temporary password, and the username supplied by the Admin role user:
- After the user logs in to the registry for the first time, they can change their password using the ‘Change Your Password’ function. To access the Change My Password function, go to the User Profile page by clicking on the username in the top right corner.
See Section 2.4 Change Your Password.
TIPS For security reasons, the username must be supplied separately from the temporary password. - The Admin role person creates the user account and supplies the ‘username’ to the user via email or telephone.
Username example: ASMITH - Upon activation of the account, the Registry emails a temporary password to the user.
|
Delete User
To delete a user:
- Click on the Manage Users icon:
- In the ‘Manage Users’ page, click on the user to open their record:
- Click on Delete User:
- At the prompt, click OK:
- A message will confirm deletion of the user:
Deactivate a User
To deactivate a user:
- Click on the Manage Users icon:
- In the ‘Manage Users’ page, click on the user to open their record:
- To deactivate the user, click in the Active checkbox to remove the checkmark:
- Click on Save User:
- At the prompt, click on OK:
- A message will confirm that the information has been updated:
- In the ‘Manage Users’ page, under the ‘Active’ column, the status changes from ‘True’ to ‘False’, which indicates that the user is deactivated:
Edit User
To edit a user:
- Click on the Manage Users icon:
- To locate the user in the ‘Manage Users’ page, click on any of the column headers to sort alphabetically by that column (A-Z). Click a second time on the column header to reverse the order (Z-A).
- When you have located the user, click in the row to open their record:
- Make any corrections to the username or email, or change the role or region as required, and click on Save User:
- At the prompt click on OK:
- A message will confirm that the information has been updated:
Reset Password
To reset a user’s password:
- Click on the Manage Users icon:
- In the ‘Manage Users’ page, click on the user to open their record:
- Click on Reset Password:
- A message will confirm that the password has been reset:
- An email notification is sent to the user with a temporary password. Once the user has logged in to the system using the temporary password, they can use the Change Your Password function to change their password.
REPORTS
UPATE APRIL 2024 Report 01, Report 10, Report 20, and Report 30 have been updated to include the new Shiftboss (OSBC) certifications. Legacy Shiftboss are counted separately and display with the legacy suffix, Example: Shiftboss – Open Pit (Legacy) |
Access Reports
To access the Reports:
- Click on the Reports icon:
- In the ‘Reports’ page, select the report type:
- Use the calendar to select a start date and end date for the report, or enter the dates manually in the following format, including hyphens: yyyy-mm-dd
- Click on Submit:
- In the dialogue, select Open or Save as desired and click on OK. A report in PDF format is created:
R01 Student Certifications Report by Type of Certification
The R01 report lists all certifications recorded during the date range entered, based on the certification date (exam date or interview date, depending on certification type).
The report includes region, mine site, type of mine, client name, exam date, exam mark, exam grade and people ID.
The report has one table for each type of certification. In each table the clients are grouped by region and mine site.
Certification types included in the report are in alphabetical order, as follows:
- Blaster (Legacy & OSBC)
- Blaster – Electric (Legacy)
- Blaster – Exploration (Legacy)
- Blaster – General (Legacy)
- Blaster – Seismic Endorsement
- Blaster – Surface (Legacy)
- Blaster – Surface 1st Class
- Blaster – Surface 2nd Class
- Blaster – Surface 3rd Class
- Blaster – Underground (Legacy)
- Blaster – Underground 1st Class
- Blaster – Underground 2nd Class
- Blaster – Underground 3rd Class
- Blaster – Underground Coal
- Blaster – Urban (Legacy)
- Legacy Fireboss
- Coal Competency – 1st Class
- Coal Competency – 2nd Class
- Fireboss
- Legacy Mine Rescue
- Mine Rescue – Gravel (Advanced)
- Mine Rescue – Gravel (Basic)
- Mine Rescue – Gravel (Theory)
- Mine Rescue – Surface (Advanced)
- Mine Rescue – Surface (Basic)
- Mine Rescue – Surface (Theory)
- Mine Rescue – Underground (Advanced)
- Mine Rescue – Underground (Basic)
- Mine Rescue – Underground (Theory)
- Mine Supervisor, 2018
- Shiftboss (Legacy / OSBC)
- Shiftboss – Open Pit
- Shiftboss – Open Pit (Legacy)
- Shiftboss – Sand and Gravel
- Shiftboss – Sand and Gravel (Legacy)
- Shiftboss – Underground
- Shiftboss – Underground (Legacy)
TIP: To generate a report of manageable size, generate reports by calendar year or fiscal year. |
R10 Mine Certifications Report by Region
The R10 report lists the number and percentage of mine certifications for each region that have a passing grade and were recorded during the date range entered.
Certification types included in the report are listed in alphabetical order, as follows.
(For a complete listing of subcategories see Section 17.2 R01 Mine Certifications Report by Type of Certification.)
- Blaster (Legacy and OSBC)
- Fireboss
- Mine Rescue
- Mine Supervisor
- Shiftboss (Legacy and OSBC)
Report 10 Example 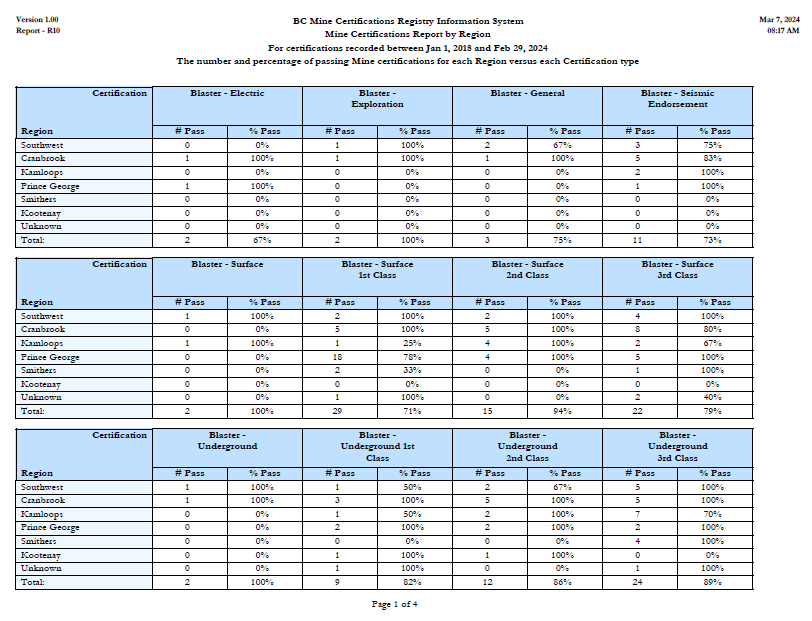
|
R20 Regional Certification Status Report
The R20 Regional Certification Status Report lists the number of certifications for each region that:
- Were issued during the date range entered (based on certification date).
- Are expiring during the date range entered (based on certification expiry date).
- Were suspended during the date range entered (based on suspension start date).
- Were cancelled during the date range entered (based on cancellation start date).
Certification types included in the report are listed in alphabetical order, as follows.
(For a complete listing of subcategories see Section 17.2 R01 Mine Certifications Report by Type of Certification.)
- Blaster (Legacy and OSBC)
- Fireboss
- Mine Rescue
- Mine Supervisor
- Shiftboss (Legacy and OSBC)
Report 20 Example Blaster (Legacy) 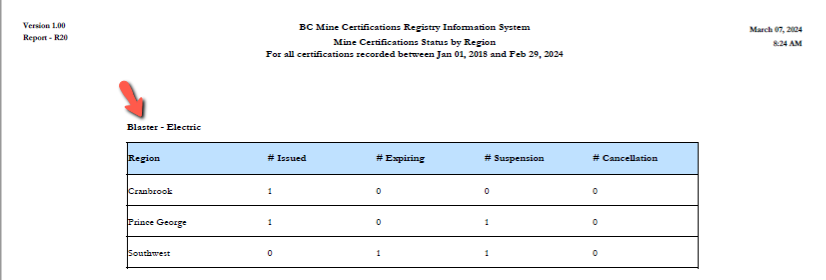
|
Blaster (OSBC) 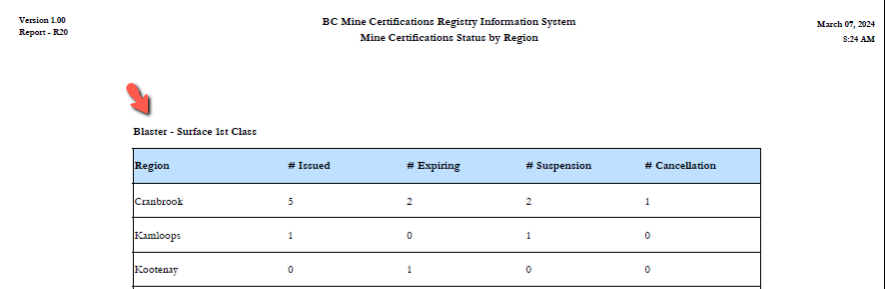
|
Fireboss 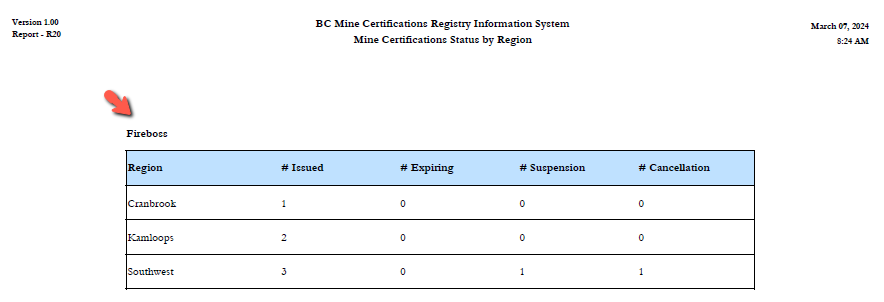
|
Mine Rescue 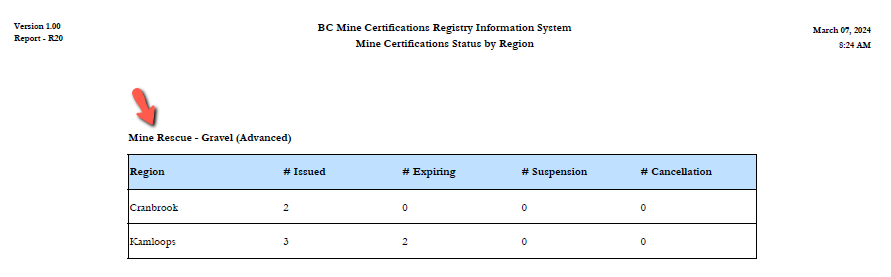
|
Mine Supervisor 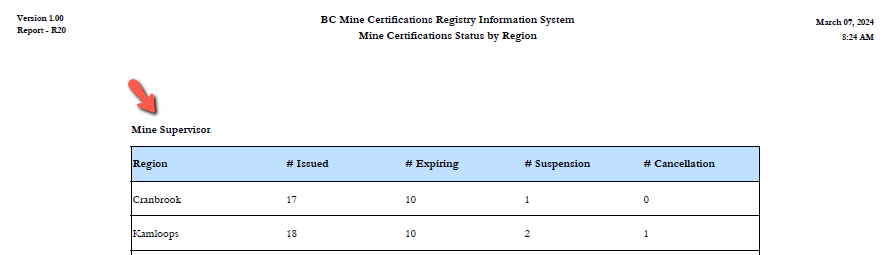
|
Shiftboss (OSBC) 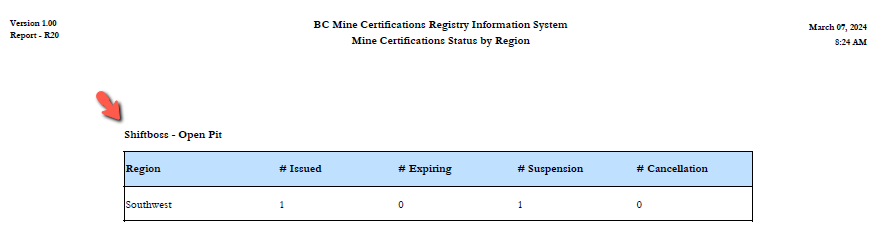
|
Shiftboss (Legacy) 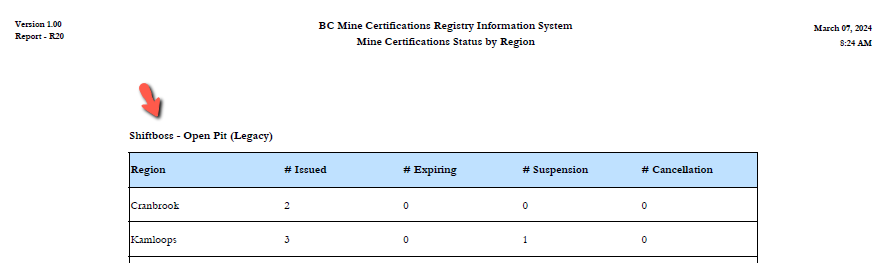
|
R30 Certification Status by Mine Site Report
To run the R30 Report:
- Open the ‘Report Type’ menu and select ‘R30 – Certification Status by Mine Site’:
- Open the ‘Mine Site’ menu and select a mine site. Selecting a mine site is mandatory:
- Open the ‘Type of Certification’ menu:
- Select a certification type, or
- Do not select a certification type, if you want the report to include all certification types:
- Click on Submit:
- The R30 Report is generated in PDF format. Open the PDF.
- The name of the mine site is displayed above the table, on each page of the report.
- If a certification type is selected, for example, ‘Surface Blaster – 3rd Class’, then all Surface Blaster – 3rd Class certifications at the mine site are included in the report:
- If a certification type is not selected, then all certification types at the mine site are included in the report:
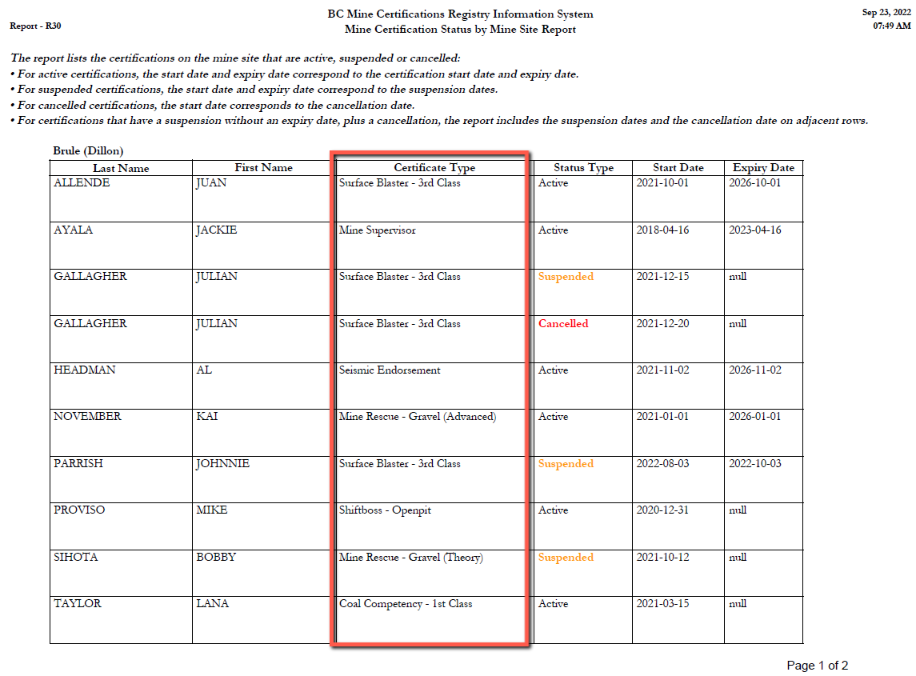
|
TIPS - To run a report showing all certification types at the mine site that are active, suspended or expired, do not select a certification type from the menu:
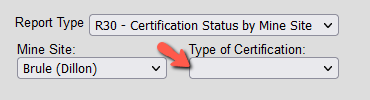
- The report is ordered by last name in alphabetical order.
- The report includes the certifications on the mine site that are active, suspended or cancelled.
- The report excludes certifications that have expired.
- In the Start Date and Expiry Date columns:
- For active certifications, the start date and expiry date correspond to the certification start date and expiry date.
- For suspended certifications, the start date and expiry date correspond to the suspension dates.
- For cancelled certifications, the start date corresponds to the cancellation date.
- For certifications that have a suspension without an end date and a cancellation, the report includes the suspension dates and the cancellation date on adjacent rows.
- The null value in the expiry date column means that no expiry date exists.
- A certification expiry date supersedes suspensions and cancellations. Once a certification expires, the certification, and any suspensions and cancellations on that certification are excluded from the report.
|
Certificate Printing Report
For certificate billing purposes, the Registry generates a monthly report for Kings Printer Publishing Services indicating the number of certificates and secure photo IDs which were printed, and the role that queued the certificates.
The report is generated automatically by the Registry at month-end and emailed to kppublishingservices@gov.bc.ca.
Certificate reprints queued by Customer Support may include Blaster, Mine Supervisor, Shiftboss and Legacy certificates (except for legacy Blaster).
Certificates queued by Open School (OSBC) may include Blaster, Mine Supervisor, and Shiftboss.
Certificates queued by the Ministry may include the Shiftboss (Legacy), Fireboss (Legacy), or Mine Rescue (Legacy).
BC Mine Certifications Printing Report, 2024 
|
[1] BC Mail Plus is a branch of Supply Services, Ministry of Citizens’ Services.